Guides
Writing blocking activities
In this guide, we will learn how to create blocking activities by implementing a sample activity that acts as a workflow trigger.
Source Code
The completed solution for this guide can be found here.
Blocking Activities
Examples of blocking activities are the Timer, Cron, HTTP Endpoint, Signal Received and User Task activities.
Blocking activities can be used to trigger the start of a workflow or resume suspended ones. To implement a blocking activity, we need to follow these three steps:
- Create the activity and implement its
OnExecuteAsyncandOnResumeAsyncmethod. - Create a bookmark provider.
- Create a service that triggers workflows that start with or or blocked on our custom activity.
We will go through each step in detail by implementing a demo activity called File Received.
About the File Received Activity
The File Received activity will wait for a file to be received. This could be coming from an API endpoint that receives files, or perhaps some background job that monitors a file system directory for new files. Whatever the case may be, our activity library will provide a convenient service that can be used to trigger workflows with the File Received activity.
We will also allow the user to optionally specify a list of file extensions that the received file must have in order for the activity to trigger.
When the activity executes, it will put the received file in its Output property. Other activities can then access this file and e.g. send it as an email attachment or write it to blob storage.
Scaffolding the Solution
When developing custom activities, it is often convenient to create them within the context of an actual Elsa Server project so you can try out your work while developing. When writing activity libraries, a convenient setup is to have a directory structure that holds the Elsa Server and the activity library in separate folders, like this:
/ElsaGuides.BlockingActivities
   /src
      /activities
         /MyActivityLibrary
      /web
         /Elsa.Server.Web
   ElsaGuides.BlockingActivities.sln
The following commands will generate the above structure, solution and projects:
dotnet new web -n Elsa.Server.Web -o ElsaGuides.BlockingActivities\src\web
dotnet new classlib -n MyActivityLibrary -f netstandard2.1 --langVersion latest -o ElsaGuides.BlockingActivities\src\activities
dotnet new sln -n ElsaGuides.BlockingActivities -o ElsaGuides.BlockingActivities
dotnet sln ElsaGuides.BlockingActivities/ElsaGuides.BlockingActivities.sln add ElsaGuides.BlockingActivities/src/activities/MyActivityLibrary.csproj ElsaGuides.BlockingActivities/src/web/Elsa.Server.Web.csproj
Let's add the activity library project as a project reference to the web project:
dotnet add ElsaGuides.BlockingActivities/src/web/Elsa.Server.Web.csproj reference ElsaGuides.BlockingActivities/src/activities/MyActivityLibrary.csproj
Next, let's add the necessary Elsa packages to each respective project we just created.
Add the following packages to MyActivityLibrary and ElsaGuides.BlockingActivities:
dotnet add ElsaGuides.BlockingActivities/src/activities/MyActivityLibrary.csproj package Elsa.Core
dotnet add ElsaGuides.BlockingActivities/src/web/Elsa.Server.Web.csproj package Elsa
dotnet add ElsaGuides.BlockingActivities/src/web/Elsa.Server.Web.csproj package Elsa.Server.Api
dotnet add ElsaGuides.BlockingActivities/src/web/Elsa.Server.Web.csproj package Elsa.Persistence.EntityFramework.Sqlite
Web Project Startup
Now that we have a solution structure in place, it's time to configure the Elsa Server project's Startup class. Open Startup.cs and replace its contents with the following code:
using Elsa.Persistence.EntityFramework.Core.Extensions;
using Elsa.Persistence.EntityFramework.Sqlite;
using Microsoft.AspNetCore.Builder;
using Microsoft.AspNetCore.Hosting;
using Microsoft.Extensions.Configuration;
using Microsoft.Extensions.DependencyInjection;
using Microsoft.Extensions.Hosting;

namespace Elsa.Server.Web
{
    public class Startup
    {
        public Startup(IWebHostEnvironment environment, IConfiguration configuration)
        {
            Environment = environment;
            Configuration = configuration;
        }

        private IWebHostEnvironment Environment { get; }
        private IConfiguration Configuration { get; }

        public void ConfigureServices(IServiceCollection services)
        {
            // Elsa services.
            services
                .AddElsa(elsa => elsa
                    .UseEntityFrameworkPersistence(ef => ef.UseSqlite())
                    .AddConsoleActivities()
                );

            // Elsa API endpoints.
            services.AddElsaApiEndpoints();

            // Allow arbitrary client browser apps to access the API.
            // In a production environment, make sure to allow only origins you trust.
            services.AddCors(cors => cors.AddDefaultPolicy(policy => policy
                .AllowAnyHeader()
                .AllowAnyMethod()
                .AllowAnyOrigin()
                .WithExposedHeaders("Content-Disposition"))
            );
        }

        public void Configure(IApplicationBuilder app)
        {
            if (Environment.IsDevelopment())
                app.UseDeveloperExceptionPage();

            app
                .UseCors()
                .UseRouting()
                .UseEndpoints(endpoints =>
                {
                    // Elsa API Endpoints are implemented as regular ASP.NET Core API controllers.
                    endpoints.MapControllers();
                })
                .UseWelcomePage();
        }
    }
}
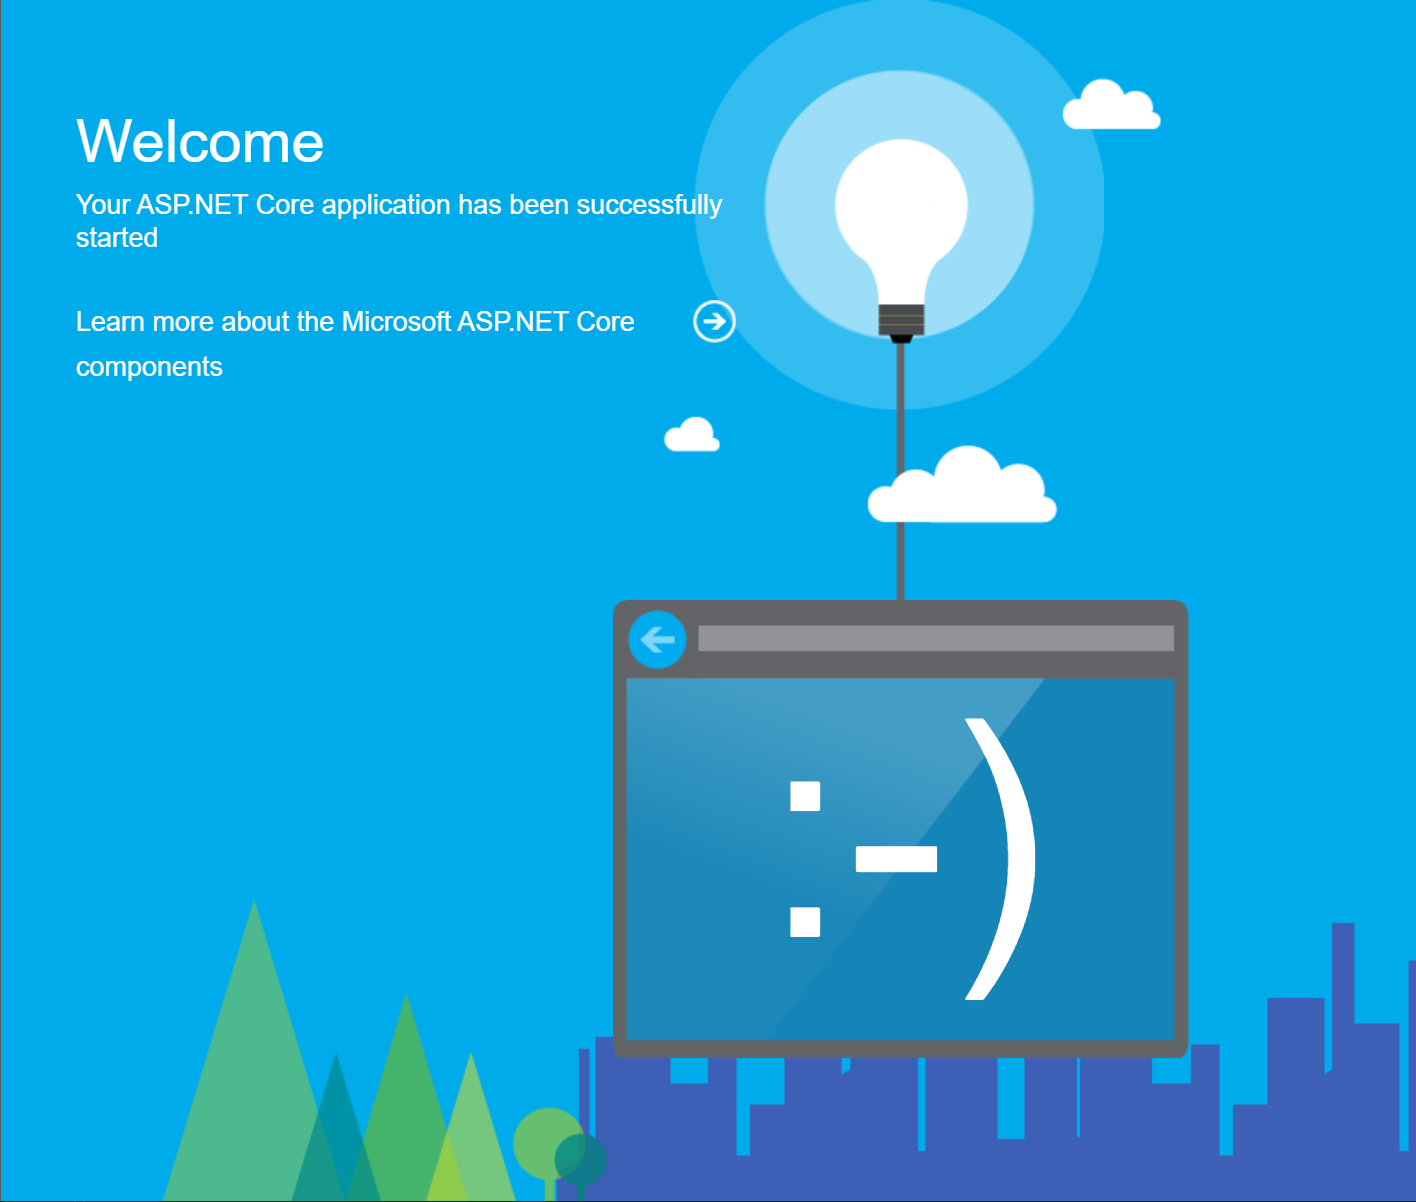
When you try to run the application now, you should see the standard ASP.NET Core welcome page:
dotnet run -p ElsaGuides.BlockingActivities/src/web
File Received Activity
Let's now turn our focus to the MyActivityLibrary project. Remove the Class1.cs file that was generated automatically and instead create a new folder called Activities and create a new class called FileReceived:
using Elsa.Attributes;
using Elsa.Services;

namespace MyActivityLibrary.Activities
{
    [Trigger(
        Category = "Elsa Guides",
        Description = "Triggers when a file is received"
    )]
    public class FileReceived : Activity
    {
    }
}
Although this activity doesn't do anything at the moment, let's see if it is available from the activity picker. A quick and easy way to interact with the Elsa Server is through its REST API using a tool like Postman.
For example, to list all available activities, invoke the following HTTP request:
curl --location --request GET 'https://localhost:5001/v1/activities'
Another way is to launch the Elsa Dashboard docker image if you have Docker installed with the following command:
docker run -t -i -e ELSA__SERVER__BASEADDRESS=http://localhost:5000 -p 16000:80 elsaworkflows/elsa-dashboard:latest
With that, Elsa Dashboard will be available via http://localhost:12000:
Try and create a new workflow definition, add an activity, and try and locate the File Received activity:
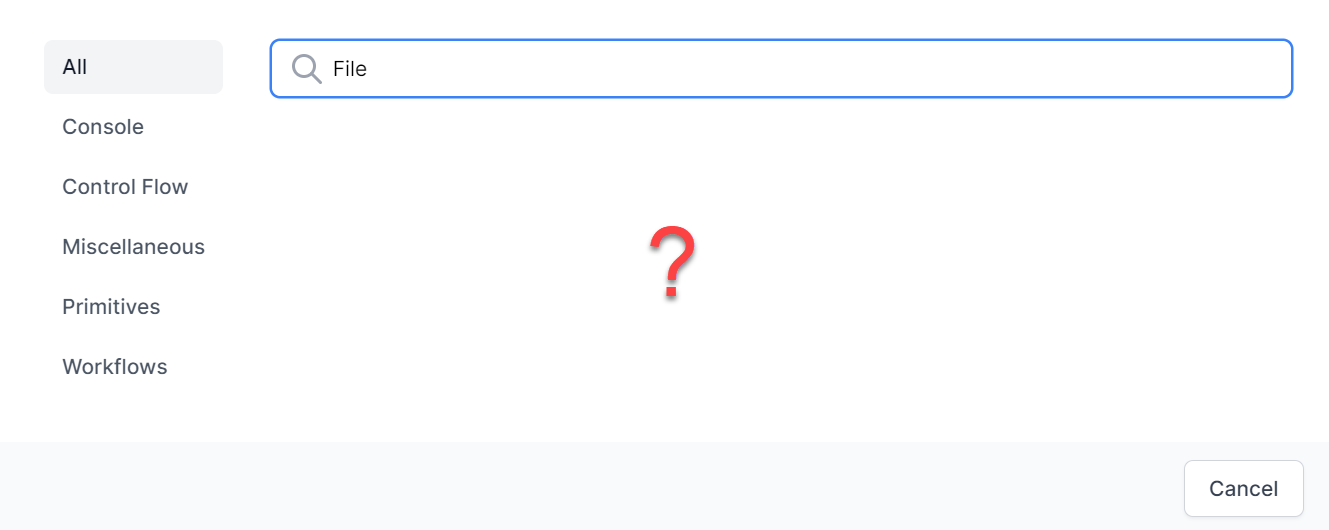
No activity by the name File Received.
This makes sense, because we haven't registered the activity with Elsa Server. To do so, go back to the Startup class and register the activity as follows:
services
    .AddElsa(elsa => elsa
        .UseEntityFrameworkPersistence(ef => ef.UseSqlite())
        .AddConsoleActivities()
        .AddActivity<FileReceived>() // <-- Add this line.
    );
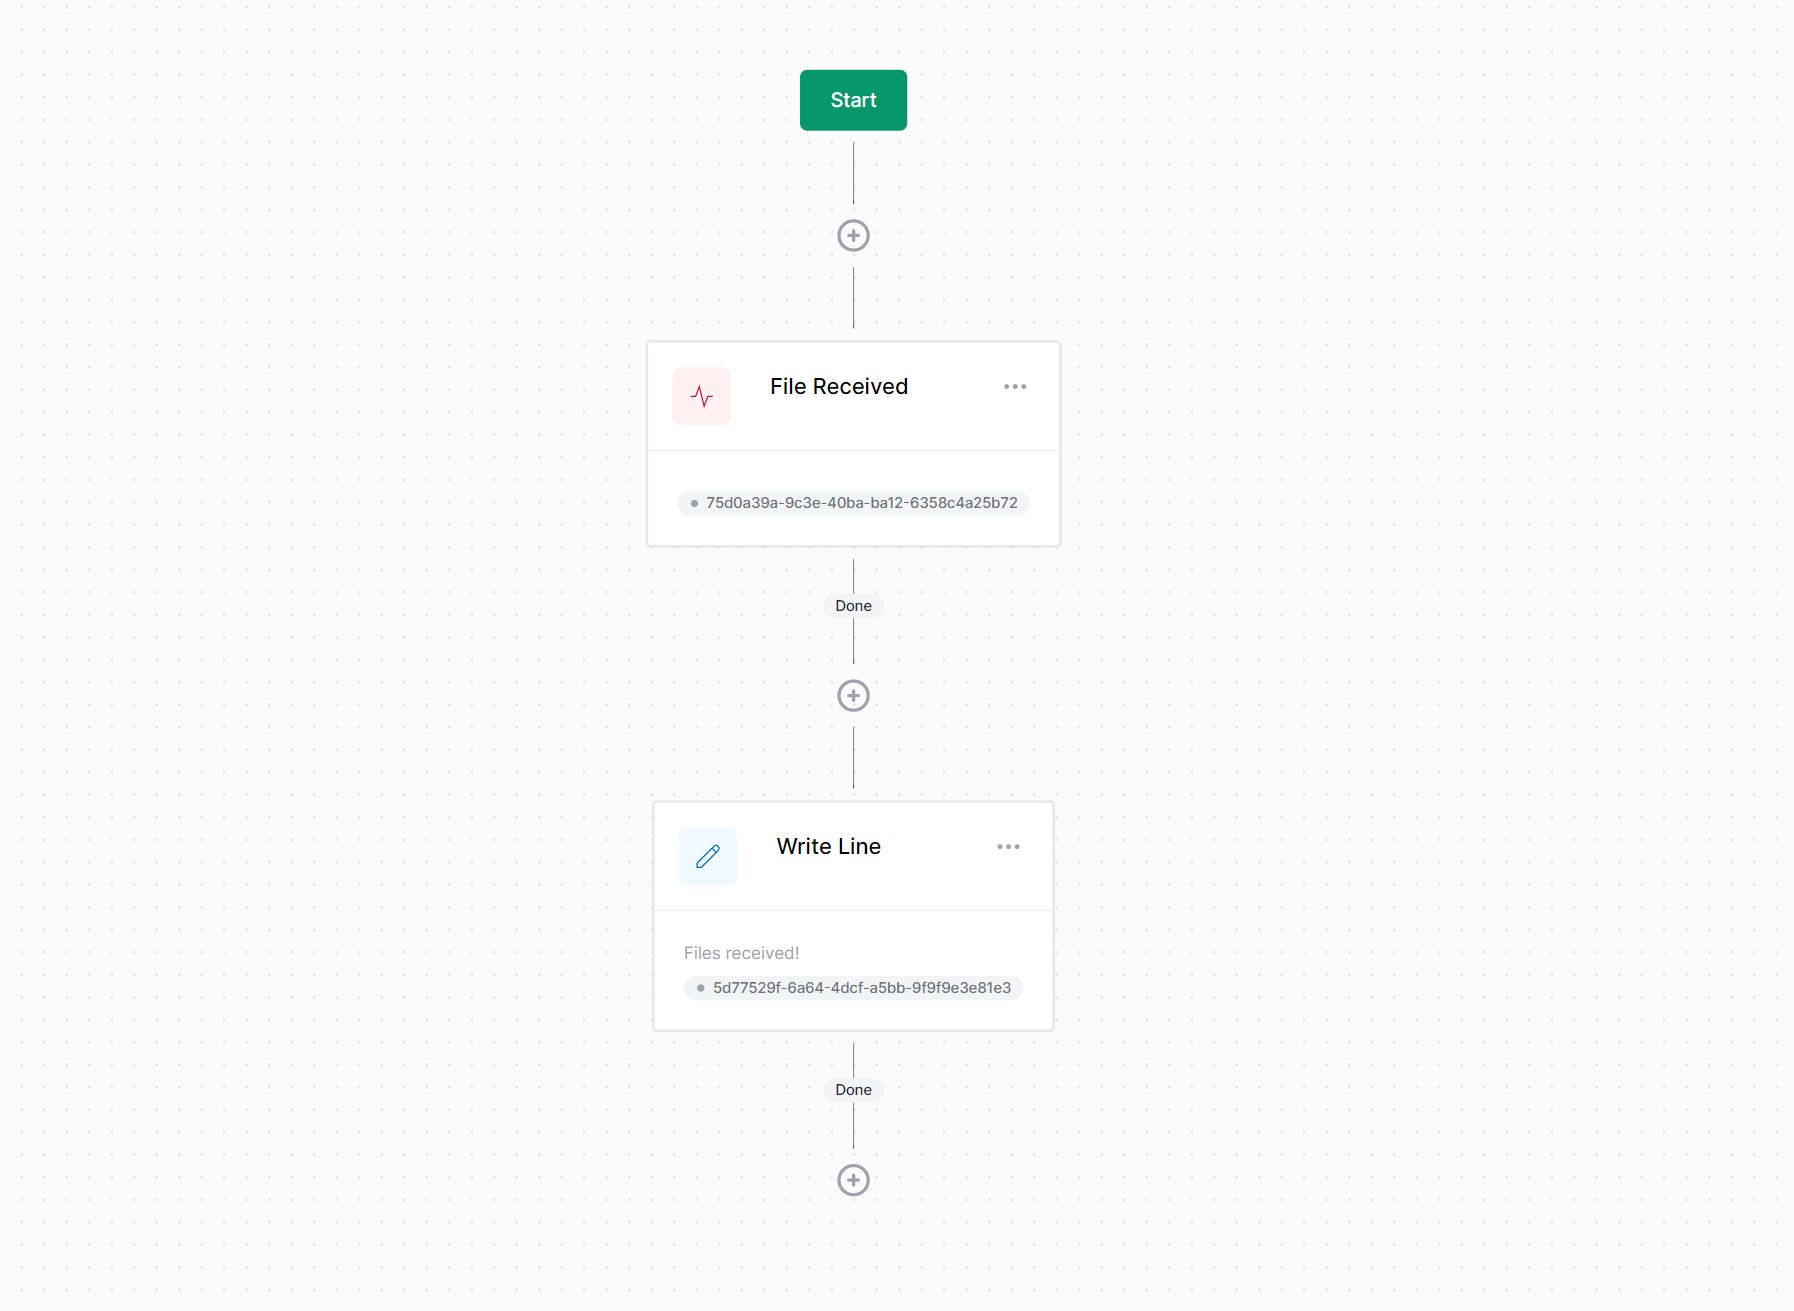
When you now restart the server and try to add the activity, you should see this:

Perfect.
Now let's get it to do something.
Suspend & Resume
Since we are writing a blocking activity, the activity needs to tell the workflow engine that execution should pause until a file is received. To do so, we might implement the OnExecute method of the activity like this:
protected override IActivityExecutionResult OnExecute()
{
    return Suspend();
}
That will work, but only when the activity is used a blocking activity and not as a starting activity. If we used this as a starting activity, what will happen is that when a file is received, the workflow will begin, but gets suspended immediately after. That's no good. Instead, what we want is for the workflow to continue to the next activity when a file is received.
To make that work, we need to return a SuspendResult only if this is not the first pass. If it IS the first pass, we will simply return an OutcomeResult with the "Done" outcome. Like this:
protected override IActivityExecutionResult OnExecute(ActivityExecutionContext context)
{
    return context.WorkflowExecutionContext.IsFirstPass ? Done() : Suspend();
}
That will achieve exactly what we need: when the activity is used as a starting activity, it will return "Done" and execution of the workflow will continue. But when the activity is used as a blocking activity (i.e. not as the first activity of the workflow), the activity will suspend the workflow.
The big idea is that we should be able to trigger workflows when a file is received, regardless of whether we have workflows that use this as a starting trigger or as a trigger to resume existing workflow instances.
Speaking of resumption, let's implement OnResume next:
protected override IActivityExecutionResult OnResume()
{
    return Done();
}
That's it. When the activity resumes, we tell the workflow to continue.
Bookmarks
Before we get into triggering workflows when a file is received, we first need to know about bookmarks.
A bookmark is a small piece of information that tells Elsa a number of things:
- What workflow instance is the bookmark referring to.
- What activity ID is the bookmark referring to.
- What correlation ID is associated with the bookmark.
A bookmark can also optionally carry a payload that can be used to further identify the appropriate workflow to resume.
For example, we want to respond only to files having a particular file extension or multiple allowed file extensions. We will create a bookmark for each of these file extensions so that when we want to trigger workflows starting with or are blocked on our activity, we can match the incoming file extension against any of the recorded bookmarks.
For now, we will start simple without file extension matching.
Create a new directory called Bookmarks and create a new class called FileReceivedBookmark that implements IBookmark:
using Elsa.Bookmarks;

namespace MyActivityLibrary.Bookmarks
{
    public class FileReceivedBookmark : IBookmark
    {
    }
}
To create actual bookmarks, Elsa relies on bookmark providers. Bookmark providers are invoked when Elsa indexes workflows when they get suspended.
Let's create another class called FileReceivedBookmarkProvider in the same directory:
using System.Collections.Generic;
using Elsa.Services.Bookmarks;
using MyActivityLibrary.Activities;

namespace MyActivityLibrary.Bookmarks
{
    public class FileReceivedBookmarkProvider : BookmarkProvider<FileReceivedBookmark, FileReceived>
    {
        public override IEnumerable<BookmarkResult> GetBookmarks(BookmarkProviderContext<FileReceived> context)
        {
            return new[] {Result(new FileReceivedBookmark())};
        }
    }
}
All this bookmark provider does is return a new instance of FileReceivedBookmark.
Next, we need to tell Elsa about this bookmark provider. To do so, go back to the Startup class and add the following line to the ConfigureServices method:
services.AddBookmarkProvider<FileReceivedBookmarkProvider>();
Trigger File Received Workflows
Now that we have the basics in place, we should be able to add the activity to a workflow, and trigger it using the IWorkflowLaunchpad service like this:
var bookmark = new FileReceivedBookmark();
var context = new WorkflowsQuery(nameof(FileReceived), bookmark);
await _workflowLaunchpad.CollectAndDispatchWorkflowsAsync(context);
To make this a bit easier for consumer code, let's create a new service called IFileReceivedInvoker (create it inside a new folder called Services):
using System.Collections.Generic;
using System.Threading;
using System.Threading.Tasks;
using Elsa.Services.Models;

namespace MyActivityLibrary.Services
{
    public interface IFileReceivedInvoker
    {
        Task<IEnumerable<CollectedWorkflow>> DispatchWorkflowsAsync(CancellationToken cancellationToken = default);
        Task<IEnumerable<CollectedWorkflow>> ExecuteWorkflowsAsync(CancellationToken cancellationToken = default);
    }
}
Create a class that implements this interface as follows:
using System.Collections.Generic;
using System.Threading;
using System.Threading.Tasks;
using Elsa.Services;
using Elsa.Services.Models;
using MyActivityLibrary.Activities;
using MyActivityLibrary.Bookmarks;

namespace MyActivityLibrary.Services
{
    public class FileReceivedInvoker : IFileReceivedInvoker
    {
        private readonly IWorkflowLaunchpad _workflowLaunchpad;

        public FileReceivedInvoker(IWorkflowLaunchpad workflowLaunchpad)
        {
            _workflowLaunchpad = workflowLaunchpad;
        }

        public async Task<IEnumerable<CollectedWorkflow>> DispatchWorkflowsAsync(CancellationToken cancellationToken = default)
        {
            var context = new WorkflowsQuery(nameof(FileReceived), new FileReceivedBookmark());
            return await _workflowLaunchpad.CollectAndDispatchWorkflowsAsync(context, null, cancellationToken);
        }

        public async Task<IEnumerable<CollectedWorkflow>> ExecuteWorkflowsAsync(CancellationToken cancellationToken = default)
        {
            var context = new WorkflowsQuery(nameof(FileReceived), new FileReceivedBookmark());
            return await _workflowLaunchpad.CollectAndExecuteWorkflowsAsync(context, null, cancellationToken);
        }
    }
}
Notice that this allows callers to either dispatch or execute workflows.
The difference between dispatching and executing workflows has to do with when the workflow executes. Dispatching a workflow will not execute the workflow directly, but instead send an instruction to a message queue. A background worker will process this queue, and therefore, execute the workflow in the background. Executing a workflow will execute the workflow directly before returning.
Make sure to register this new service with DI in Startup:
services.AddScoped<IFileReceivedInvoker, FileReceivedInvoker>();
And that's all that we need for now to try and see if we can trigger a workflow using our custom activity. To try it, let's create an API endpoint in the Elsa Server project that leverages our IFileReceivedInvoker service and see if we can get a workflow to respond to it.
Create a new folder called Endpoints, a subfolder called Files and a new controller class called Post:
Notice that I'm using the API Endpoint pattern to structure the controllers, rather than using the traditional controller pattern. To learn more about this pattern, check out Steve Smith's motivation on API Endpoints.
using System.Linq;
using System.Threading.Tasks;
using Microsoft.AspNetCore.Mvc;
using MyActivityLibrary.Services;

namespace Elsa.Server.Web.Endpoints.Files
{
    [ApiController]
    [Route("files")]
    public class Post : Controller
    {
        private readonly IFileReceivedInvoker _invoker;

        public Post(IFileReceivedInvoker invoker)
        {
            _invoker = invoker;
        }

        [HttpPost]
        public async Task<IActionResult> Handle()
        {
            var collectedWorkflows = await _invoker.DispatchWorkflowsAsync();
            return Ok(collectedWorkflows.ToList());
        }
    }
}
The above is a very simple API controller that will dispatch any and all workflows that:
- Either start with the File Received activity,
- Or are blocked on the File Received activity.
To try this out, start the workflow server and use the dashboard to create and publish a new workflow, something like this:
Then invoke a POST request on the /files endpoint:
curl --location --request POST 'https://localhost:5001/files'
The response should look something like this:
[
    {
        "workflowInstanceId": "dd3b13dabe8a44efbfb8d122c9197207",
        "activityId": "75d0a39a-9c3e-40ba-ba12-6358c4a25b72"
    }
]
And when we look at the console output of the server, we should see the following line:
Files received!
Nice!
We are now able to create custom activities that act as workflow triggers.
Real Files
Let's take it a step further and add support for actually sending a file to the workflow which we then send as an attachment via email for example.
As it turns out, all we need to do to achieve this is a couple of small things:
- Update the API endpoint to read the posted file.
- Update the
IFileReceivedInvokerto accept an incoming file to send as input when triggering workflows.
Since ASP.NET Core uses the IFormFile abstraction to handle uploaded files, we shouldn't use it "as-is" when sending to workflows, since we might also want our activity to support workflows that operate outside the context of ASP.NET Core. To that end, let's also create a small class that represents a file, called FileModel:
namespace MyActivityLibrary.Models
{
    public class FileModel
    {
        public string FileName { get; set; }
        public string MimeType { get; set; }
        public byte[] Content { get; set; }
    }
}
This should be enough information for most use cases, and we can always add to it later when we need to.
With that model in place, let's now update the IFileReceivedInvoker service:
Task<IEnumerable<CollectedWorkflow>> DispatchWorkflowsAsync(FileModel file, CancellationToken cancellationToken = default);
Task<IEnumerable<CollectedWorkflow>> ExecuteWorkflowsAsync(FileModel file, CancellationToken cancellationToken = default);
The FileReceivedInvoker concrete implementation should be updated as well:
public async Task<IEnumerable<CollectedWorkflow>> DispatchWorkflowsAsync(FileModel file, CancellationToken cancellationToken = default)
{
    var context = new WorkflowsQuery(nameof(FileReceived), new FileReceivedBookmark());
    return await _workflowLaunchpad.CollectAndDispatchWorkflowsAsync(context, file, cancellationToken);
}

public async Task<IEnumerable<CollectedWorkflow>> ExecuteWorkflowsAsync(FileModel file, CancellationToken cancellationToken = default)
{
    var context = new WorkflowsQuery(nameof(FileReceived), new FileReceivedBookmark());
    return await _workflowLaunchpad.CollectAndExecuteWorkflowsAsync(context, file, cancellationToken);
}
Notice that we are passing in the file parameter into the calls to CollectAndDispatchWorkflowsAsync and CollectAndExecuteWorkflowsAsync - this will make this object available as input to any and all workflows that are triggered.
We can now update the Post controller as follows:
[HttpPost]
public async Task<IActionResult> Handle(IFormFile file)
{
    var fileModel = new FileModel
    {
        FileName = Path.GetFileName(file.FileName),
        Content = await file.OpenReadStream().ReadBytesToEndAsync(),
        MimeType = file.ContentType
    };

    var collectedWorkflows = await _invoker.DispatchWorkflowsAsync(fileModel);
    return Ok(collectedWorkflows.ToList());
}
A sample cURL request generated from Postman looks like this:
curl --location --request POST 'https://localhost:5001/files' --form 'file=@"/C:/Users/sipke/OneDrive/Documents/document1.docx"'
Good! But how do we use it from within the workflow?
As it turns out, that's easy too - we just update our activity to read its input and store it in an output property. Something like this:
using Elsa.ActivityResults;
using Elsa.Attributes;
using Elsa.Services;
using Elsa.Services.Models;
using MyActivityLibrary.Models;

namespace MyActivityLibrary.Activities
{
    [Trigger(
        Category = "Elsa Guides",
        Description = "Triggers when a file is received"
    )]
    public class FileReceived : Activity
    {
        [ActivityOutput] public FileModel Output { get; set; }

        protected override IActivityExecutionResult OnExecute(ActivityExecutionContext context)
        {
            return context.WorkflowExecutionContext.IsFirstPass ? OnExecuteInternal(context) : Suspend();
        }

        protected override IActivityExecutionResult OnResume(ActivityExecutionContext context)
        {
            return OnExecuteInternal(context);
        }

        private IActivityExecutionResult OnExecuteInternal(ActivityExecutionContext context)
        {
            var file = context.GetInput<FileModel>();
            Output = file;
            return Done();
        }
    }
}
Notice the following:
- We refactored the activity class a bit to prevent code duplication: we introduced a private method called
OnExecuteInternalthat is invoked from bothOnExecute(if first pass is true) as well as fromOnResume. - The
OnExecuteInternalreads input from the received context. - The input is simply stored as an output property.
Because we store the file as an activity output value, it is now accessible to any subsequent activities in the workflow.
Let's take this to our advantage and send the posted file as an email attachment.
Before we can send emails, we should install another package that provides the SendEmail activity:
dotnet add ElsaGuides.BlockingActivities/src/web/Elsa.Server.Web.csproj package Elsa.Activities.Email
Make sure to install it into DI from Startup:
.AddConsoleActivities()
.AddEmailActivities(options => Configuration.GetSection("Elsa:Smtp").Bind(options)) <-- Add this line.
Since we will be dealing with emails, we need to setup an SMTP server. This is easy to: simply run the following docker command:
docker run -t -i -p 3000:80 -p 2525:25 rnwood/smtp4dev:linux-amd64-3.1.0-ci0856
That will launch an SMTP server accessible on port 2525. Let's configure appsettings.json with these values too:
{
  "Elsa": {
    "Smtp": {
      "Host": "localhost",
      "Port": "2525",
      "DefaultSender": "workflows@acme.com"
    }
  }
}
Restart the server with the applied changes and open the workflow we created earlier. Add a new Send Email activity after the Write Line activity:
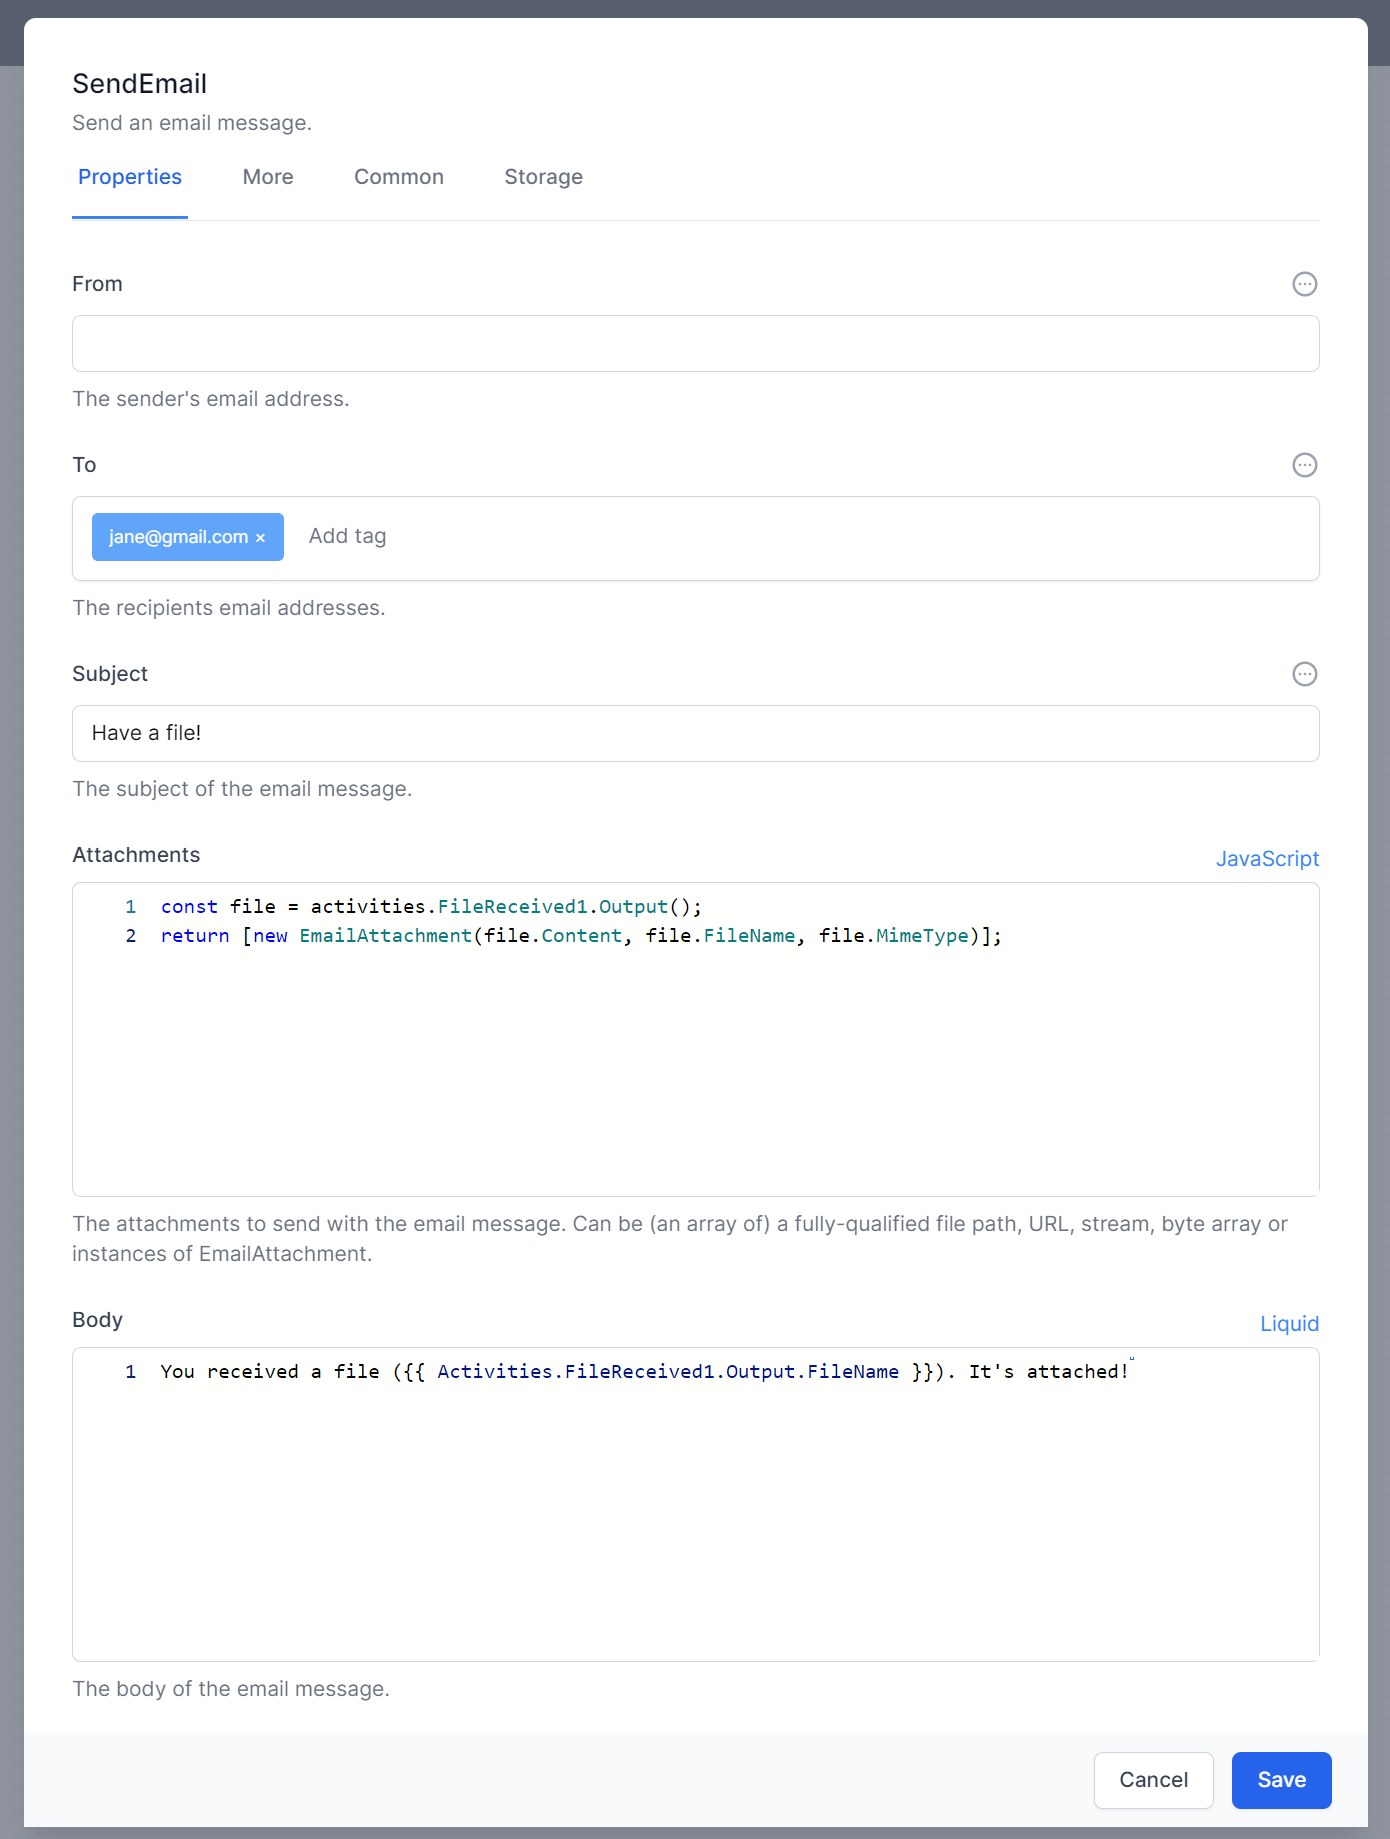
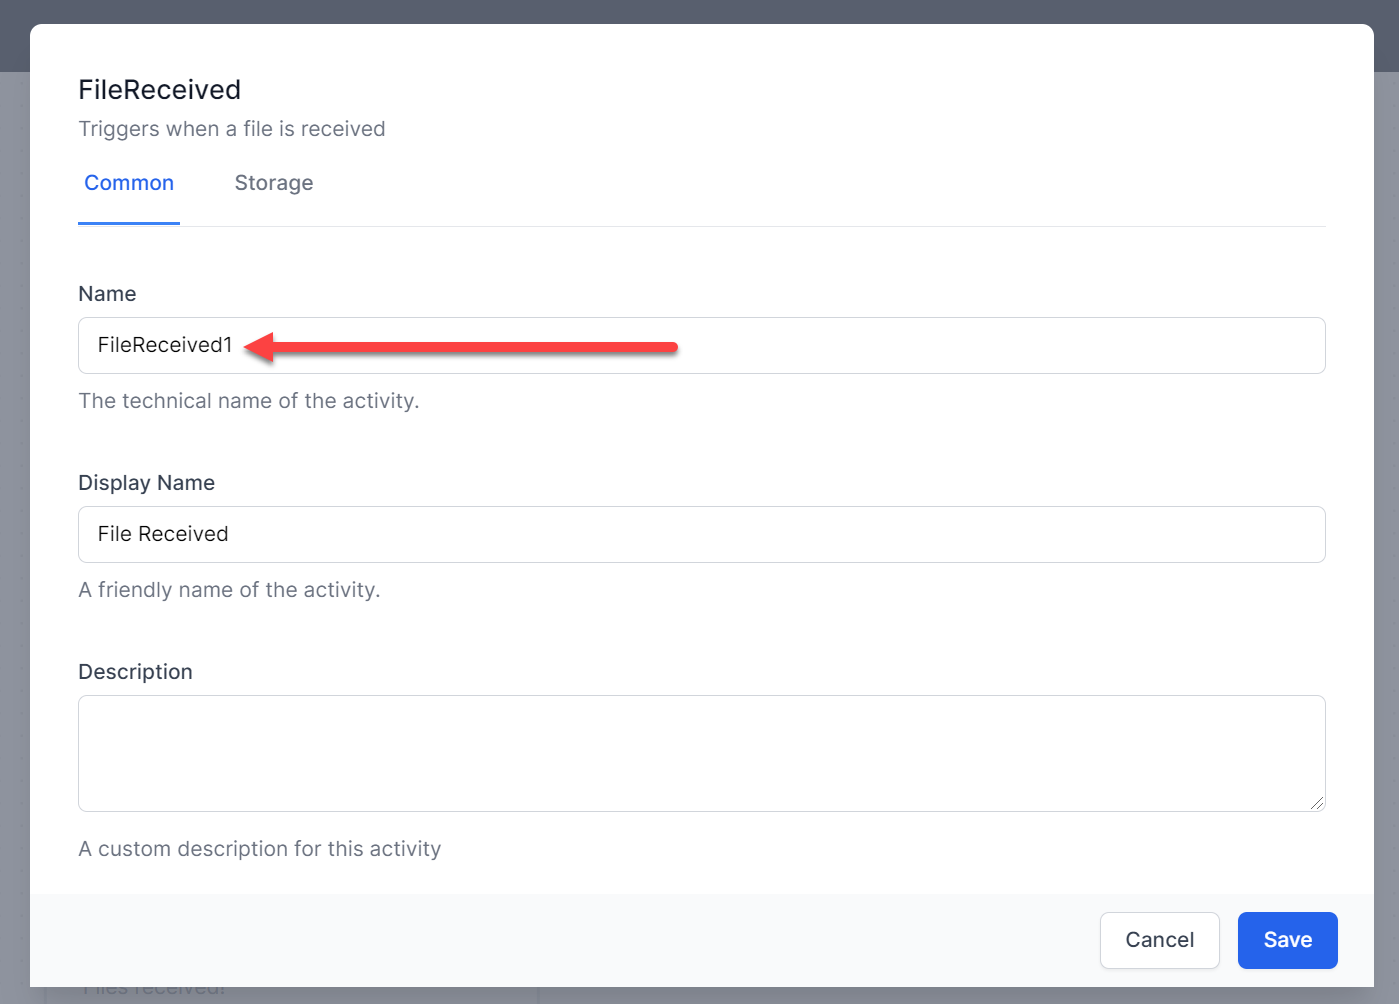
Notice specifically the Attachments and Body field and their JavaScript and Liquid expression respectively: here we are referencing an activity called FileReceived1. Let's update the File Received activity to have exactly this name, or else things won't work.
Make sure to publish the updated workflow and then upload a new file to the /files API endpoint:
curl --location --request POST 'https://localhost:5001/files' --form 'file=@"/C:/Users/sipke/OneDrive/Documents/Document1.docx"'
If everything worked out, you should be able to find a new email when navigating to SMTP4Devs web UI at http://localhost:3000/
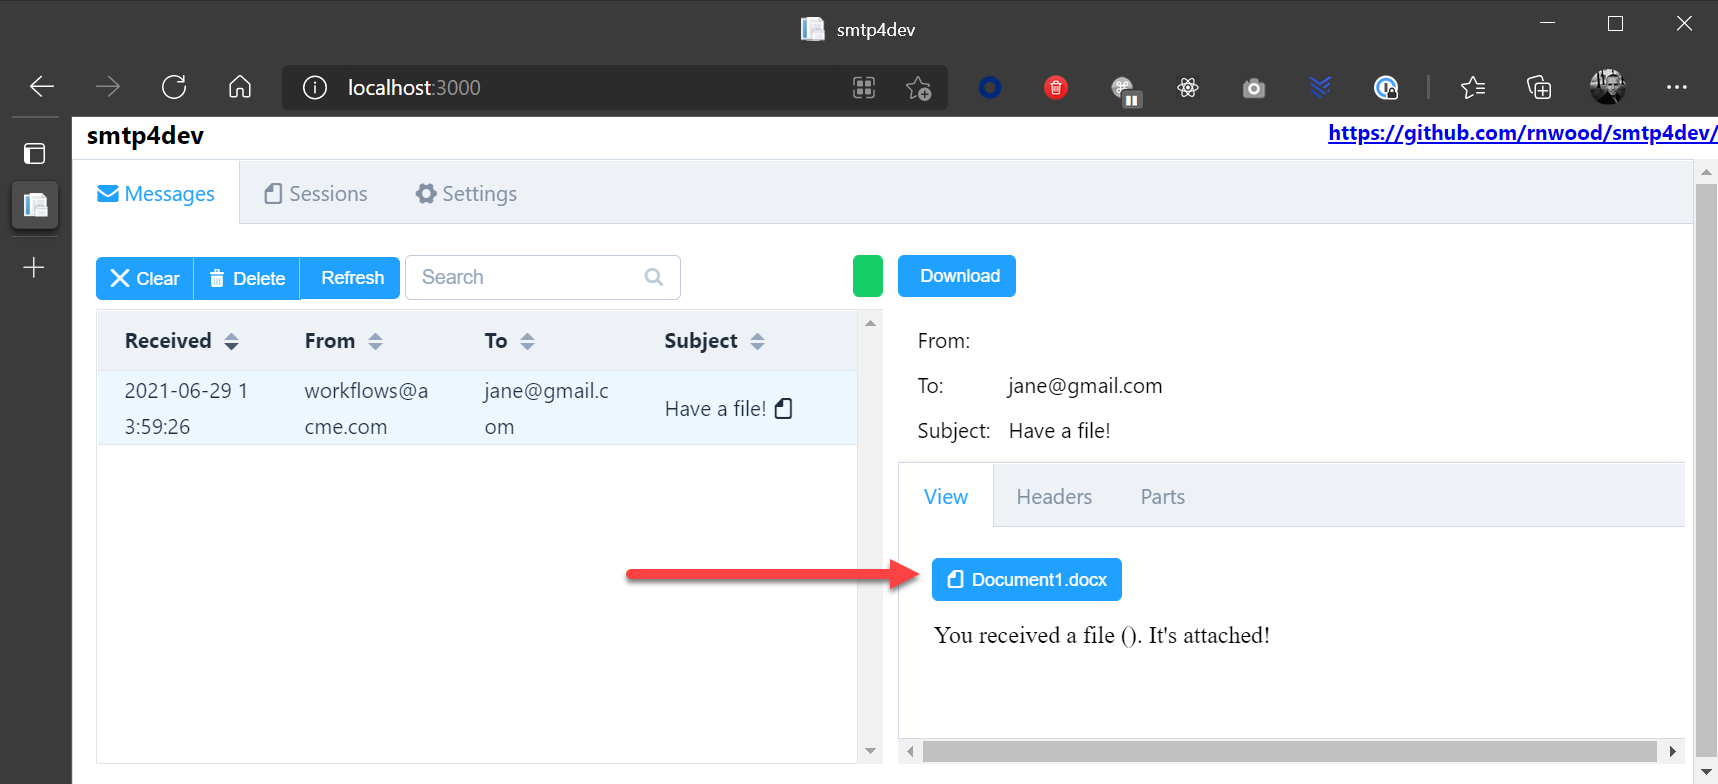
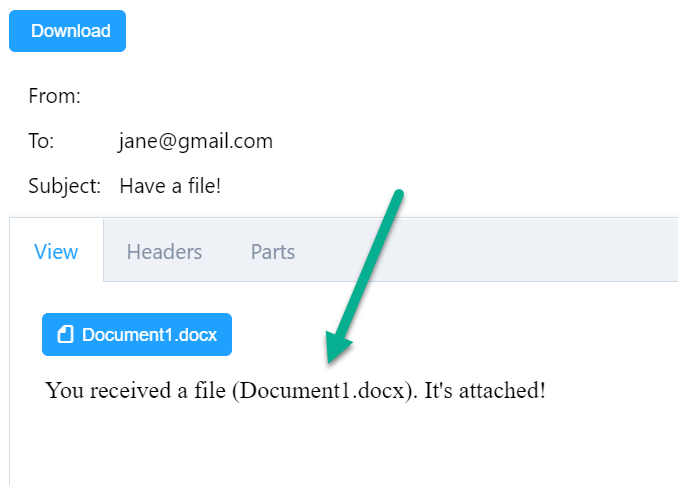
And when we open the attachment:
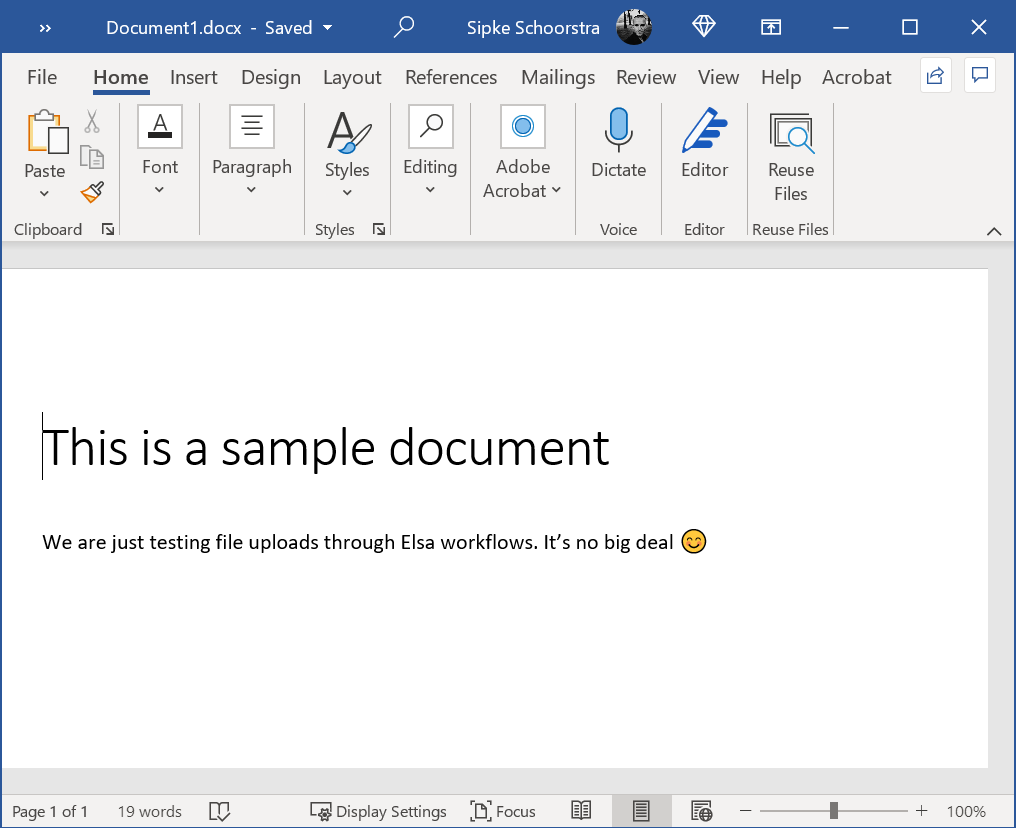
That's indeed the file I posted, so no big deal.
It's a wrap!
Well, not so fast :)
Although the entire process works, there are is at least one issue, one quality improvement and one performance improvement to be made. Let me lay it on you:
- The astute reader might have noticed already: the received email body didn't display the filename:
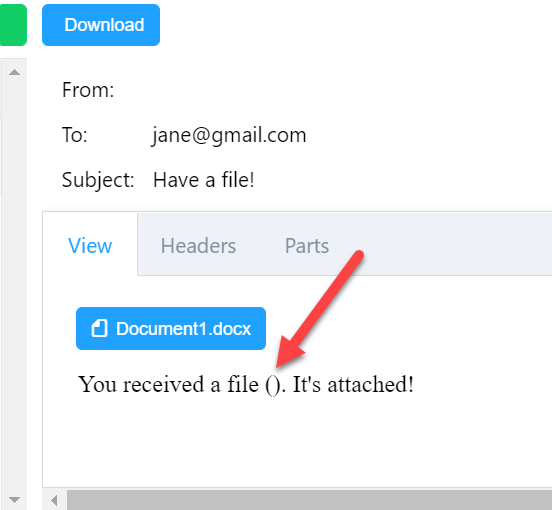
If you went through this guide step by step, you might have noticed that the Attachments field is able to use JavaScript intellisense, but only up to the point of typing in
Output(). Is there a way to have intellisense "know" that the output is of typeFileModel? Yes there is, and we'll see how shortly.If you open the SQLite database and inspect the WorkflowInstances table, you will quickly notice that each workflow instance will store the posted file in Base64 format. Although this might be fine for small 1kb sample files, this is absolutely no good for anything larger. Let's fix this too.
Issue 1
To fix the first issue, we need to understand why this is happening. The liquid syntax is correct. But why no file name? As it turns out, the underlying liquid interpreter, Fluid, uses an allow-listing strategy. This means that we need to explicitly allow Liquid to access properties of a certain type. To allow access to a given type, we need to implement a simple handler that receives Liquid context that we can configure.
Before we can implement such a handler, we need to install the Elsa.Scripting.Liquid package first:
dotnet add ElsaGuides.BlockingActivities/src/activities/MyActivityLibrary.csproj package Elsa.Scripting.Liquid
Then create a new folder called Liquid and create the following handler:
using System.Threading;
using System.Threading.Tasks;
using Elsa.Scripting.Liquid.Messages;
using Fluid;
using MediatR;
using MyActivityLibrary.Models;

namespace MyActivityLibrary.Liquid
{
    public class LiquidHandler : INotificationHandler<EvaluatingLiquidExpression>
    {
        public Task Handle(EvaluatingLiquidExpression notification, CancellationToken cancellationToken)
        {
            notification.TemplateContext.Options.MemberAccessStrategy.Register<FileModel>();
            return Task.CompletedTask;
        }
    }
}
Go back to Startup to register this handler as follows:
services.AddNotificationHandlersFrom<LiquidHandler>();
That will register all notification handlers found in the assembly containing the specified type.
This time when you invoke the API endpoint to post a file, you should see the filename proper:
One down, two more issues to go.
Issue 2
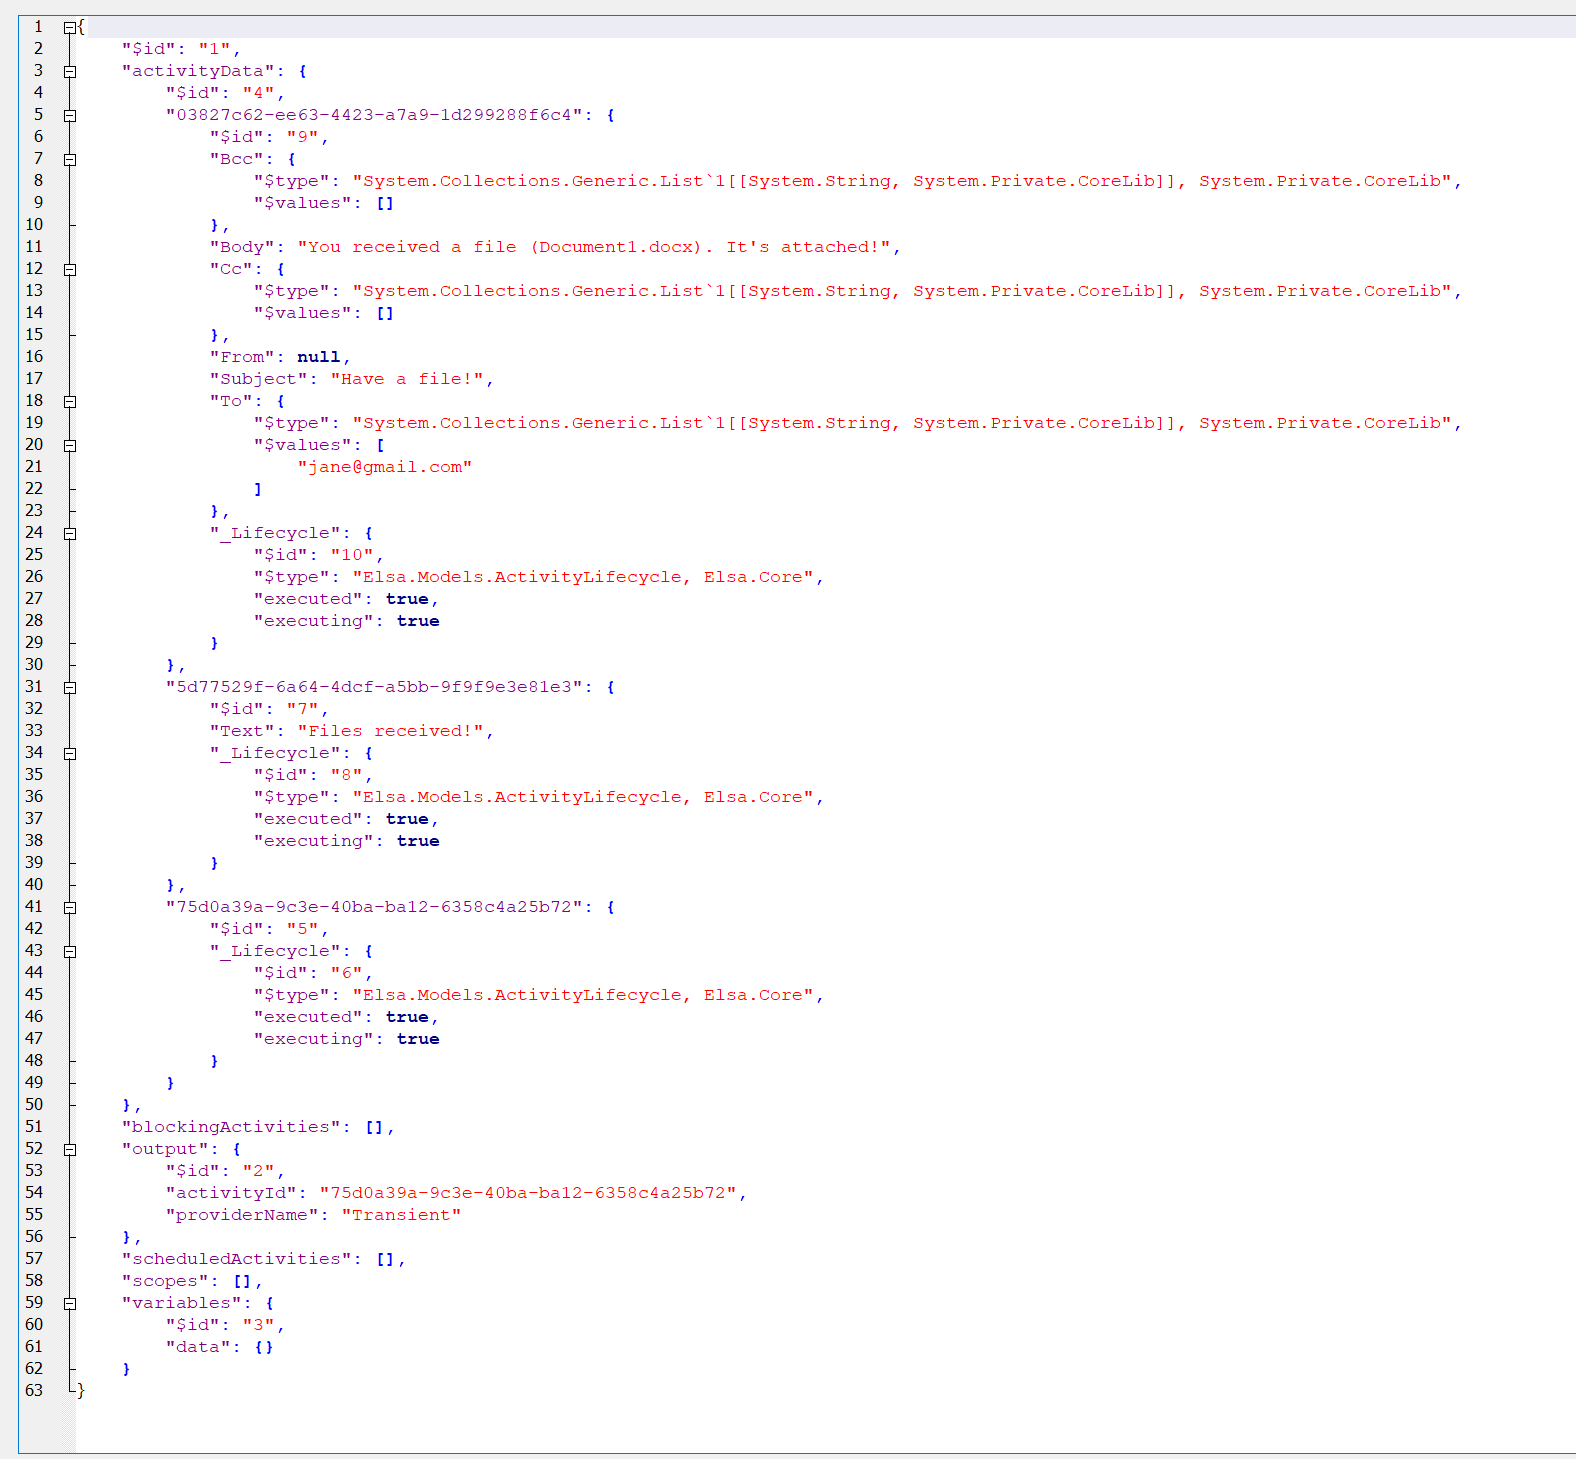
Open the SQLite database file from the root of the application folder with a tool such as DB Browser for SQLite. When you look at the WorkflowInstances table's Data column, you will see something like this:
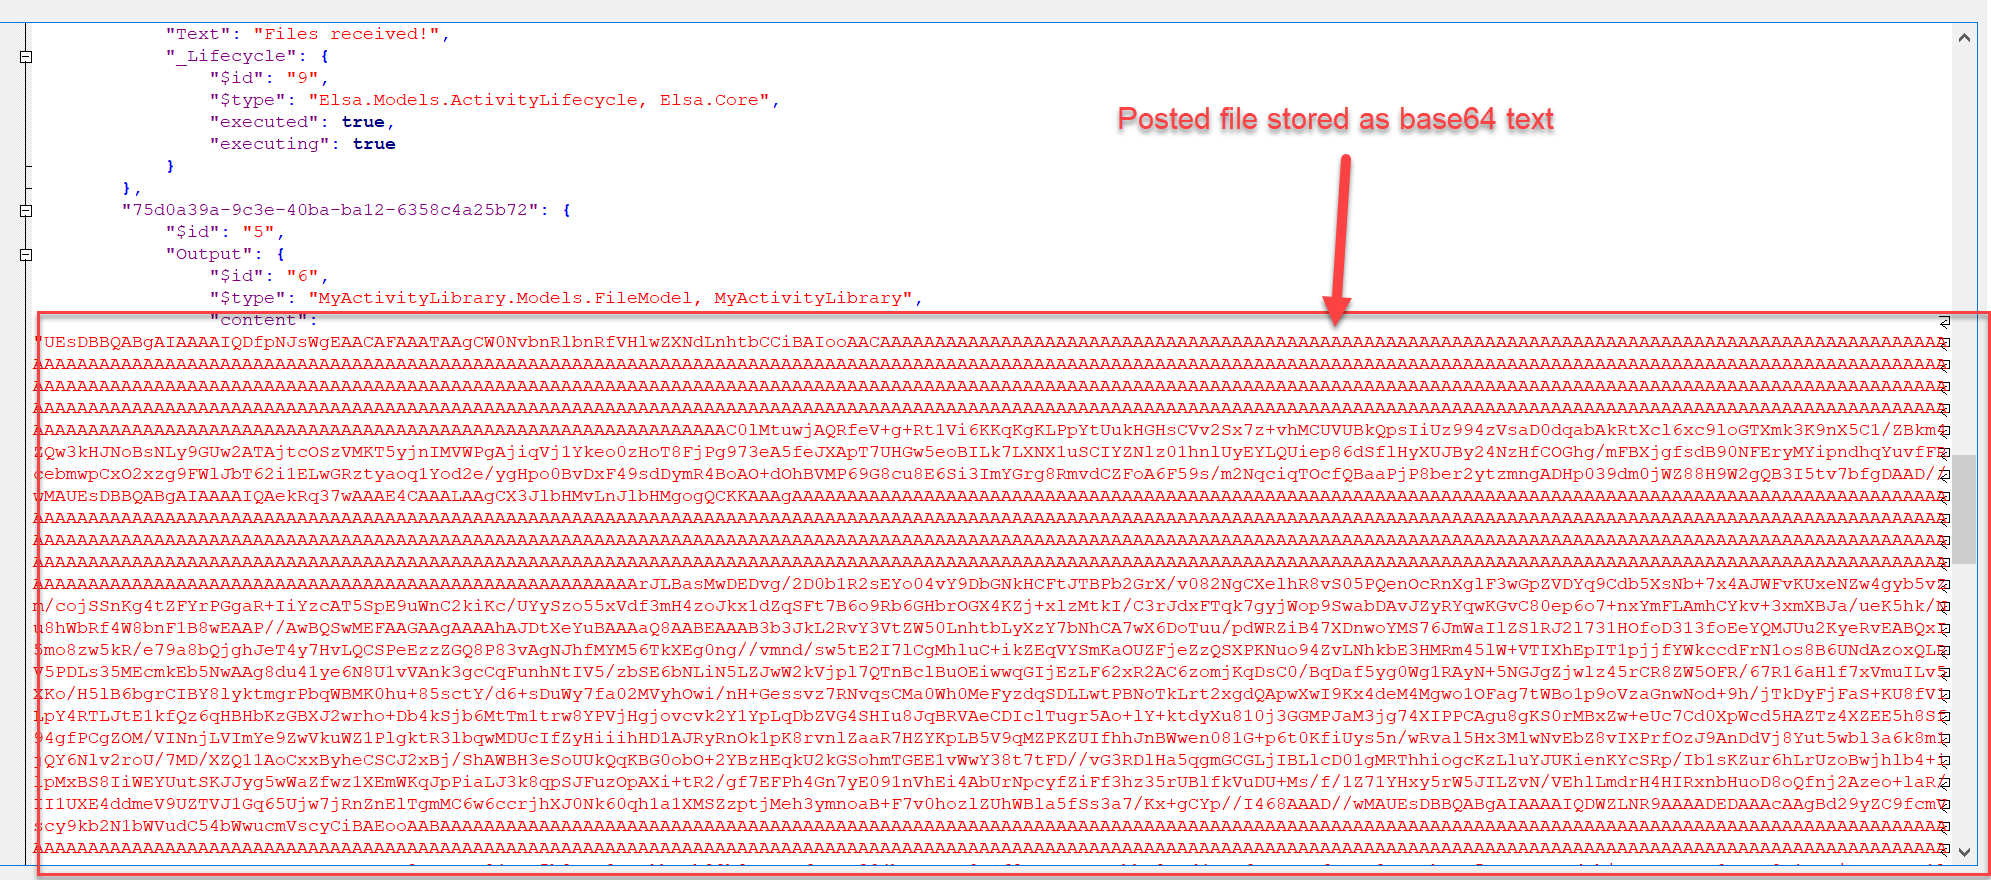
In fact, you may notice that the file is stored for both the File Received activity as well as the Send Email activity.
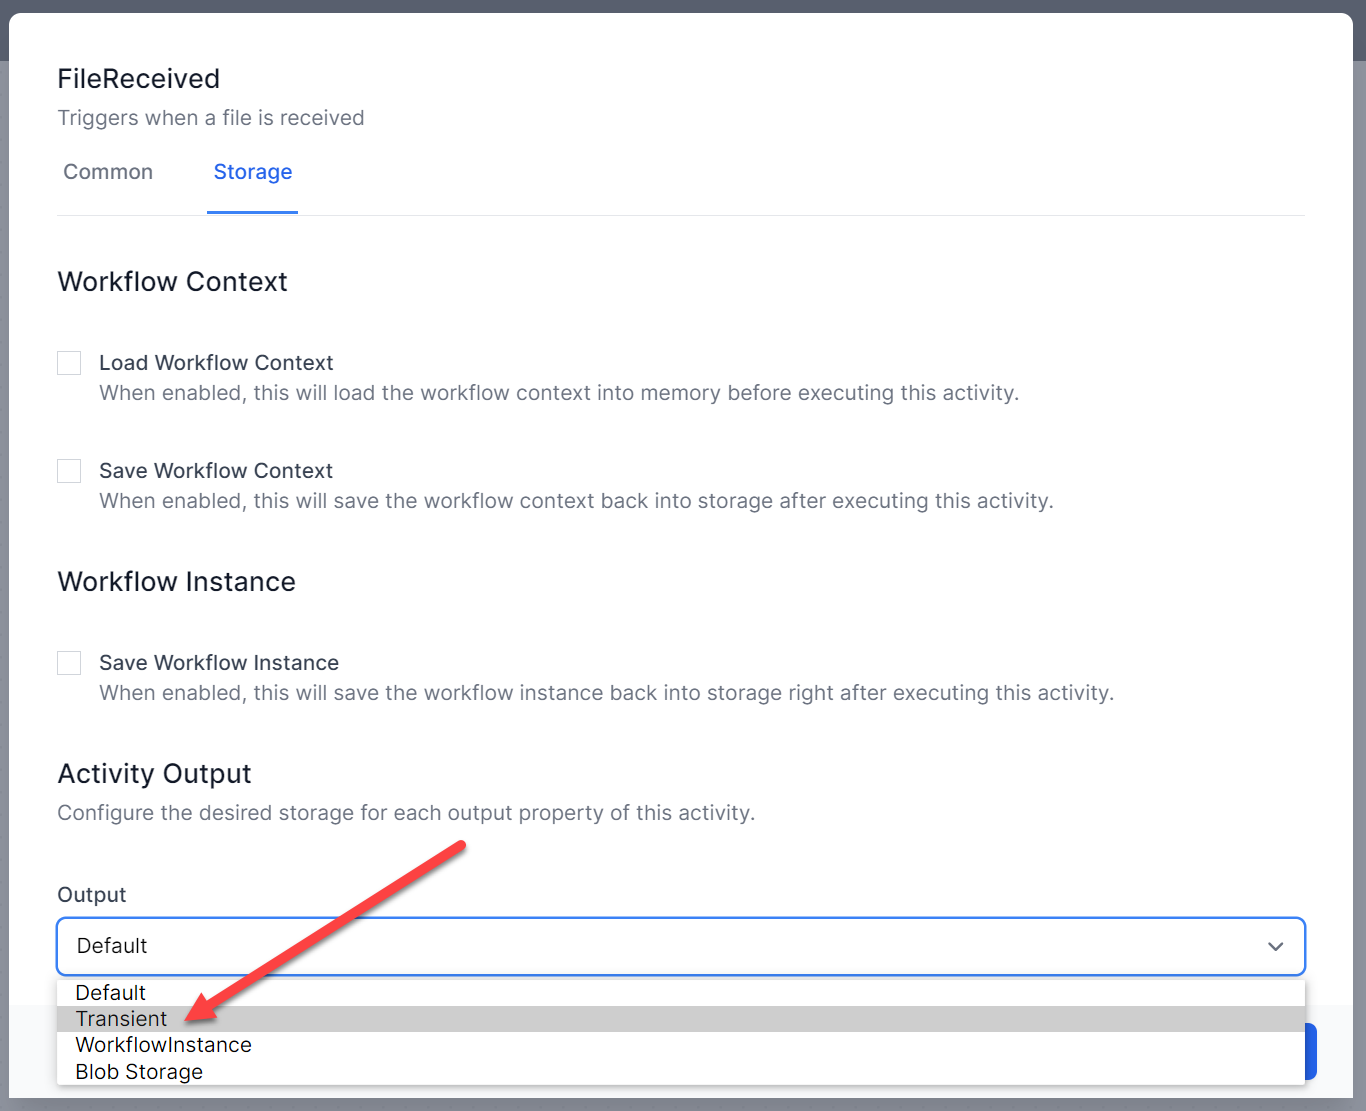
As it turns out, fixing this is easy. We can configure where to save activity input & output on a per-property basis using a pluggable storage provider mechanism called workflow storage providers.
Out of the box, Elsa ships with three such providers:
- Workflow Instance Storage (the default)
- Blob Storage
- Transient Storage
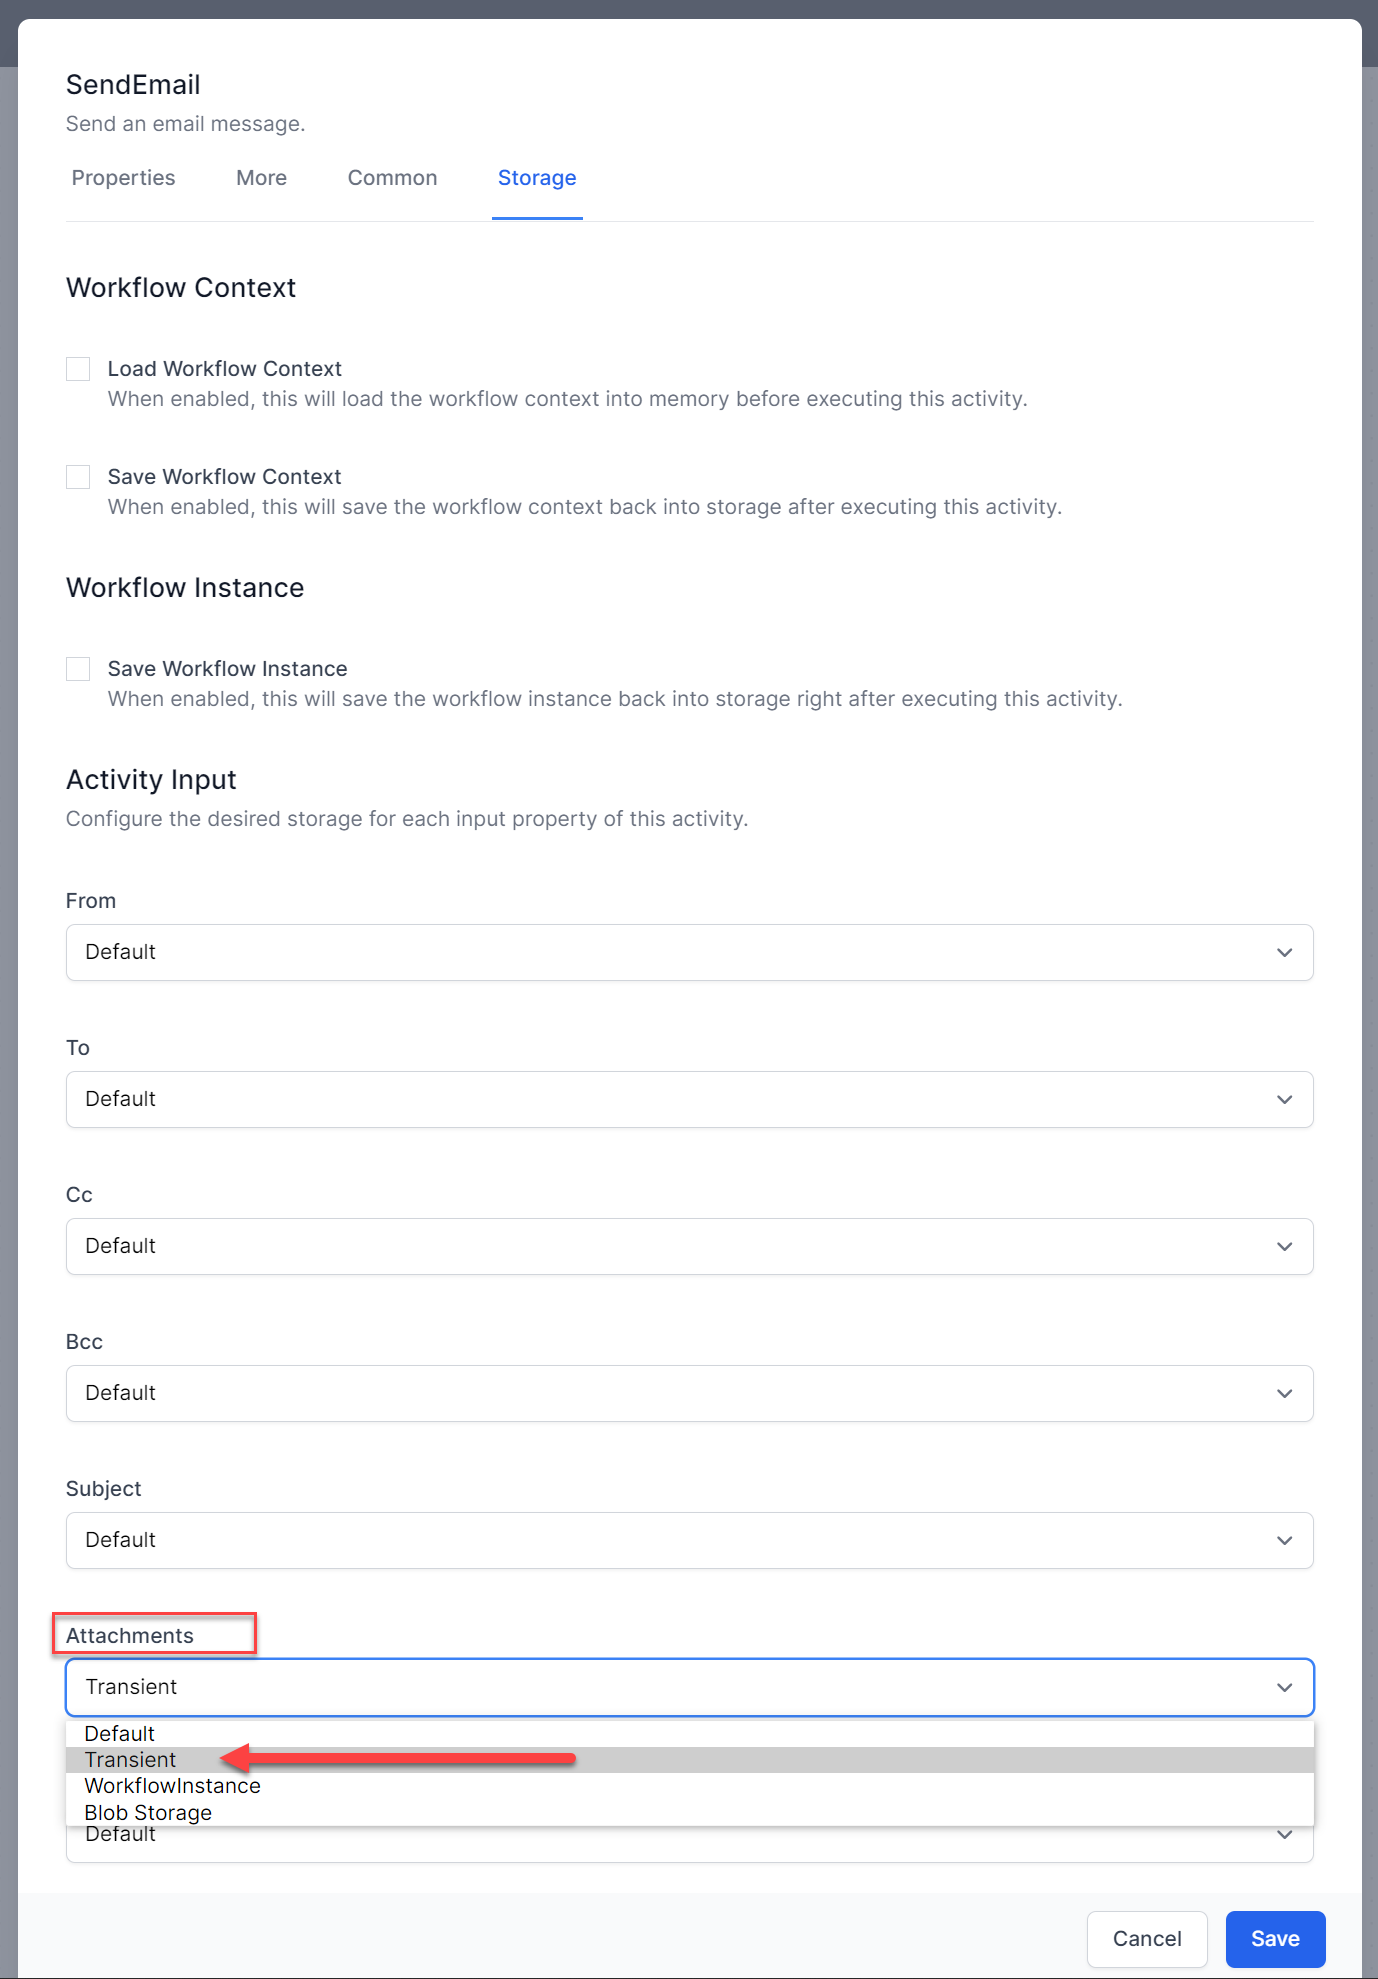
All we need to do is open the activity settings window of the File Received and the Send Email activity and change their storage provider to either Transient or Blob Storage.
Blob Storage is useful if we want the file to persist long-term, but for our demo, we don't need that so we'll go with Transient:
Do the same for the Send Email activity:
When you publish the change and post another file, you will see that the file is no longer stored as part of the workflow instance:
Only one issue left!
Issue 3
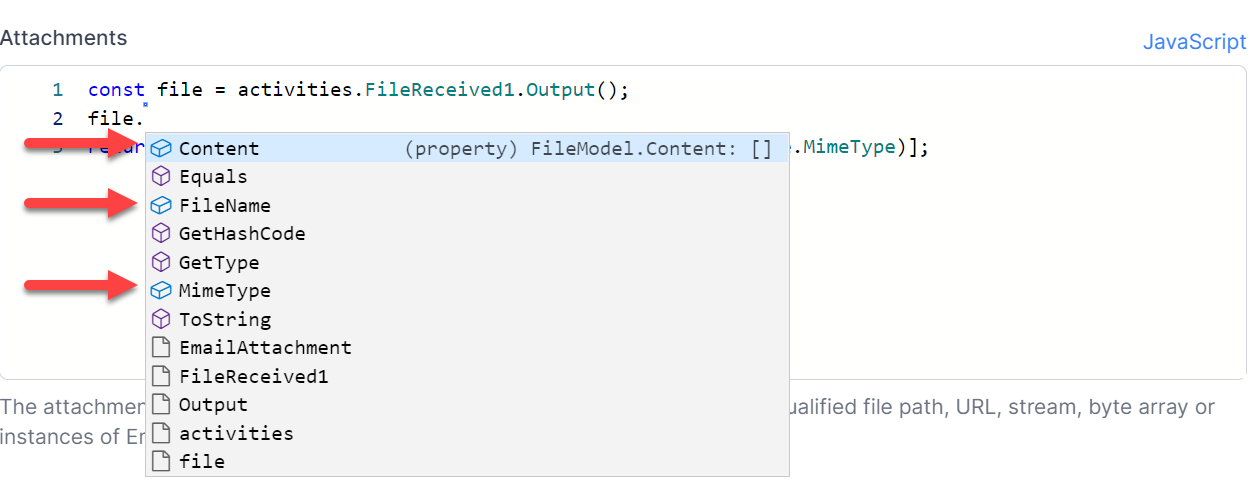
When we open the Send Email activity property window, we get a lot of intellisense, but not for the type of the Output method as depicted in the following screenshot:

To fix this, we need to provide a type definition for the FileModel class, since that is the type of the Output property of our File Received activity. Elsa can automatically generate a type definition based on a given class. All we have to do is implement a type definition provider and register it with DI.
For this we need to add the Elsa.Scripting.JavaScript package:
dotnet add ElsaGuides.BlockingActivities/src/activities/MyActivityLibrary.csproj package Elsa.Scripting.JavaScript
Next, create a new folder called JavaScript and a new class called MyTypeDefinitionProvider:
using System;
using System.Collections.Generic;
using System.Threading;
using System.Threading.Tasks;
using Elsa.Scripting.JavaScript.Services;
using MyActivityLibrary.Models;

namespace MyActivityLibrary.JavaScript
{
    public class MyTypeDefinitionProvider : TypeDefinitionProvider
    {
        public override ValueTask<IEnumerable<Type>> CollectTypesAsync(TypeDefinitionContext context, CancellationToken cancellationToken = default)
        {
            var types = new[] { typeof(FileModel) };
            return new ValueTask<IEnumerable<Type>>(types);
        }
    }
}
And register it with DI like this:
services.AddJavaScriptTypeDefinitionProvider<MyTypeDefinitionProvider>();
Build the solution, start the server and refresh the workflow definition editor.
This time around you should see intellisense recognizing the proper type for the Output property of the File Received activity:

This also means that we can "dot" into it to access its properties:
All fixed!
File Monitoring
We have seen how to trigger the workflow with new files by posting them to an API endpoint. But that's not the only way we can send files to a workflow.
Another scenario might be a process that monitors some directory. Every time a new file is added, we want to send it to a workflow for processing.
Let's see how that might work.
File Monitor Service
First, install the Microsoft.AspNetCore.StaticFiles package so we can get the mime type from a given file:
dotnet add ElsaGuides.BlockingActivities/src/web/Elsa.Server.Web.csproj package Microsoft.AspNetCore.StaticFiles
Next, create a new Hosted Service called FileMonitorService in a new folder called HostedServices in the web project:
using System;
using System.IO;
using System.Threading;
using System.Threading.Tasks;
using Microsoft.AspNetCore.StaticFiles;
using Microsoft.Extensions.DependencyInjection;
using Microsoft.Extensions.Hosting;
using MyActivityLibrary.Models;
using MyActivityLibrary.Services;

namespace Elsa.Server.Web.HostedServices
{
    public class FileMonitorService : IHostedService, IDisposable
    {
        private readonly IHostEnvironment _hostEnvironment;
        private readonly IContentTypeProvider _contentTypeProvider;
        private readonly IServiceScopeFactory _serviceScopeFactory;
        private FileSystemWatcher _watcher;

        public FileMonitorService(IHostEnvironment hostEnvironment, IContentTypeProvider contentTypeProvider, IServiceScopeFactory serviceScopeFactory)
        {
            _hostEnvironment = hostEnvironment;
            _contentTypeProvider = contentTypeProvider;
            _serviceScopeFactory = serviceScopeFactory;
        }

        public Task StartAsync(CancellationToken cancellationToken)
        {
            var folderPath = Path.Combine(_hostEnvironment.ContentRootPath, "Files");

            // Ensure the path exists.
            Directory.CreateDirectory(folderPath);

            _watcher = new FileSystemWatcher(folderPath)
            {
                NotifyFilter = NotifyFilters.Attributes
                    | NotifyFilters.CreationTime
                    | NotifyFilters.DirectoryName
                    | NotifyFilters.FileName
                    | NotifyFilters.LastAccess
                    | NotifyFilters.LastWrite
                    | NotifyFilters.Security
                    | NotifyFilters.Size
            };

            _watcher.Created += OnFileCreated;
            _watcher.Filter = "*.*";
            _watcher.IncludeSubdirectories = true;
            _watcher.EnableRaisingEvents = true;

            return Task.CompletedTask;
        }

        public Task StopAsync(CancellationToken cancellationToken)
        {
            _watcher.Dispose();
            return Task.CompletedTask;
        }

        public void Dispose()
        {
            _watcher?.Dispose();
        }

        private async void OnFileCreated(object sender, FileSystemEventArgs e)
        {
            await using var fileStream = File.OpenRead(e.FullPath);
            var content = await fileStream.ReadBytesToEndAsync();
            var fileName = e.Name!;
            var mimeType = GetMimeType(fileName);

            var fileModel = new FileModel
            {
                FileName = fileName,
                MimeType = mimeType,
                Content = content
            };

            using var scope = _serviceScopeFactory.CreateScope();
            var invoker = scope.ServiceProvider.GetRequiredService<IFileReceivedInvoker>();
            await invoker.DispatchWorkflowsAsync(fileModel);
        }

        private string GetMimeType(string fileName) => _contentTypeProvider.TryGetContentType(fileName, out var mimeType) ? mimeType : "application/octet-stream";
    }
}
That's a lot of code, but it's all quite straightforward. All it does is setup a file monitor and listen for new files being created in the "Files" directory. When the event handler is invoked, we read the file contents and trigger any and all workflows that have a File Received activity on them.
For this to work, we need to register the IContentTypeProvider (which is provided by the Microsoft.AspNetCore.StaticFiles package) service in Startup as follows:
services.AddSingleton<IContentTypeProvider, FileExtensionContentTypeProvider>();
And while we are here, let's also register the FileMonitorService:
services.AddHostedService<FileMonitorService>();
Now when we run the server and place some file into the "Files" directory, we will see that the workflow gets invoked and an email is sent with the created file attached.
File Extension Filter
Everything works great, but there's one improvement that we might implement: a file extension filter.
Currently, any & all file types are being processed by the workflow. For some workflows this may be fine, but in other scenarios you might want to process only files of a certain file type. One way to go about this is to use the If activity to check against the file extension.
Although this will certainly work, it is a little bit more cumbersome to the user creating the workflow.
Instead, let's make this a built-in feature of our File Received activity.
First off, let's add an activity input property called SupportedFileExtensions:
[ActivityInput(
    Hint = "Specify a list of file extensions to filter. Leave empty to allow any file extension.",
    UIHint = ActivityInputUIHints.MultiText,
    DefaultSyntax = SyntaxNames.Json,
    DefaultValue = new string[0],
    SupportedSyntaxes = new[] {SyntaxNames.Json, SyntaxNames.JavaScript, SyntaxNames.Liquid})]
public ICollection<string> SupportedFileExtensions { get; set; } = new List<string>();
The activity itself doesn't use this property, but it will be leveraged by the FileReceivedBookmarkProvider class, which needs to be updated like this:
using System.Collections.Generic;
using System.Linq;
using System.Threading;
using System.Threading.Tasks;
using Elsa.Services.Bookmarks;
using MyActivityLibrary.Activities;

namespace MyActivityLibrary.Bookmarks
{
    public class FileReceivedBookmarkProvider : BookmarkProvider<FileReceivedBookmark, FileReceived>
    {
        public override async ValueTask<IEnumerable<BookmarkResult>> GetBookmarksAsync(BookmarkProviderContext<FileReceived> context, CancellationToken cancellationToken)
        {
            var supportedExtensions = (await context.ReadActivityPropertyAsync<FileReceived, ICollection<string>>(x => x.SupportedFileExtensions, cancellationToken))?.ToList() ?? new List<string>();

            return !supportedExtensions.Any()
                ? new[] {Result(new FileReceivedBookmark())}
                : supportedExtensions.Select(x => Result(new FileReceivedBookmark(x)));
        }
    }
}
The modified bookmark provider reads the SupportedFileExtensions property of the activity being indexed. If any extension was specified, we return a bookmark for each individual extension. If on the other hand no file extensions were configured, we will simply return a single bookmark without an extension specified.
Update the FileReceivedBookmark next:
using Elsa.Services.Bookmarks;

namespace MyActivityLibrary.Bookmarks
{
    public class FileReceivedBookmark : IBookmark
    {
        public FileReceivedBookmark()
        {
        }

        public FileReceivedBookmark(string fileExtension)
        {
            FileExtension = fileExtension;
        }

        public string? FileExtension { get; set; }
    }
}
This adds a FileExtension property that will be persisted as part of the bookmark payload, which we will use next.
Finally, we need to update the FileReceivedInvoker implementation to take into account that there may be bookmarks specific to a given file extension. We also need to consider that there may be bookmarks that have no particular file extension stored, which represents a "wild card", i.e any file extension is allowed.
To achieve this, update the class as follows:
using System.Collections.Generic;
using System.IO;
using System.Linq;
using System.Threading;
using System.Threading.Tasks;
using Elsa.Services;
using Elsa.Services.Models;
using MyActivityLibrary.Activities;
using MyActivityLibrary.Bookmarks;
using MyActivityLibrary.Models;
using Open.Linq.AsyncExtensions;

namespace MyActivityLibrary.Services
{
    public class FileReceivedInvoker : IFileReceivedInvoker
    {
        private readonly IWorkflowLaunchpad _workflowLaunchpad;

        public FileReceivedInvoker(IWorkflowLaunchpad workflowLaunchpad)
        {
            _workflowLaunchpad = workflowLaunchpad;
        }

        public async Task<IEnumerable<CollectedWorkflow>> DispatchWorkflowsAsync(FileModel file, CancellationToken cancellationToken = default)
        {
            var collectedWorkflows = await CollectWorkflowsAsync(file, cancellationToken).Select(x => x).ToList();
            await _workflowLaunchpad.DispatchPendingWorkflowsAsync(collectedWorkflows, file, cancellationToken);

            return collectedWorkflows;
        }

        public async Task<IEnumerable<CollectedWorkflow>> ExecuteWorkflowsAsync(FileModel file, CancellationToken cancellationToken = default)
        {
            var collectedWorkflows = await CollectWorkflowsAsync(file, cancellationToken).Select(x => x).ToList();
            await _workflowLaunchpad.ExecutePendingWorkflowsAsync(collectedWorkflows, file, cancellationToken);

            return collectedWorkflows;
        }

        private async Task<IEnumerable<CollectedWorkflow>> CollectWorkflowsAsync(FileModel fileModel, CancellationToken cancellationToken)
        {
            var wildcardContext = new WorkflowsQuery(nameof(FileReceived), new FileReceivedBookmark());
            var filteredContext = new WorkflowsQuery(nameof(FileReceived), new FileReceivedBookmark(Path.GetExtension(fileModel.FileName)));

            var wildcardWorkflows = await _workflowLaunchpad.CollectWorkflowsAsync(wildcardContext, cancellationToken).ToList();
            var filteredWorkflows = await _workflowLaunchpad.CollectWorkflowsAsync(filteredContext, cancellationToken).ToList();

            return wildcardWorkflows.Concat(filteredWorkflows);
        }
    }
}
The most interesting change is found in the new private method called CollectWorkflowsAsync. What it does is setup two types of "queries": one for any workflows that responds to any file extension, and another one for any workflows that listen to one ore mor specific file extensions.
Build and start the server, go to the workflow editor and update the File Received activity's File Extensions setting with ".zip":

Publish the changes and try posting a file with a .zip extension and then another file with another extension. If all went well, only the .zip file should have triggered the workflow. Experiment: try different combinations, create multiple workflows with different settings to see how it behaves.
Summary
Implementing activities such as the File Received activity requires a bit of work, specifically the infrastructural code around it. But when done right, it offers a very powerful, flexible way to create workflows with ease.
In this guide we have seen how to:
- Create a blocking activity that can be used as a workflow trigger.
- Create bookmarks.
- Trigger workflows using bookmarks.
- Setup liquid to allow-access properties of custom .NET types.
- Setup javascript intellisense.
- Leverage Workflow Storage Providers to configure activity input and output storage.