Guides
A simple document approval workflow
In this guide, we will take a look at implementing a simple document approval workflow. Although it may be a simple one, it will show us a couple of interesting aspects:
- Implementing long-running workflows that get suspended & resumed.
- Accessing activity input & output from other activities.
- Implementing forked execution where a timer will send reminders until the recipient responds to the approval request.
- See how we can generate a signal URL to embed in email bodies.
We will see how to implement such a workflow programmatically using the Workflow Builder API as well as visually using the Elsa Dashboard.
Let's get into it!
Source Code
The source code of the completed project can be found here.
Workflow Export
The visually designed workflow can be found as a JSON export here. To import this file, run the project, create a new workflow definition, and choose Import (as a sub-option on the Publish button),
Workflow Requirements
The purpose of the workflow is to allow authors to submit documents (modeled as JSON objects), and have a reviewer either approve or reject the document. Furthermore, if the reviewer takes too long to take action, they are ** reminded periodically** to approve or reject the pending document.
The JSON payload we'll be posting to the workflow looks like this:
{
  "Id": "1",
  "Author": {
    "Name": "John",
    "Email": "john@gmail.com"
  },
  "Body": "This is sample document."
}
Before we can create the workflow, we need to scaffold the project. For this demo, we will be hosting both the Elsa Server as well as the Elsa Dashboard, but you're free to create a separate Elsa Dashboard project.
The Project
Create a new, empty ASP.NET Core project called ElsaGuides.ContentApproval.Web:
dotnet new web -n "ElsaGuides.ContentApproval.Web"
CD into the created project folder:
cd ElsaGuides.ContentApproval.Web
And add the following packages:
dotnet add package Elsa
dotnet add package Elsa.Activities.Email
dotnet add package Elsa.Activities.Http
dotnet add package Elsa.Activities.Temporal.Quartz
dotnet add package Elsa.Persistence.EntityFramework.Sqlite
dotnet add package Elsa.Server.Api
dotnet add package Elsa.Designer.Components.Web
Startup
Open Startup.cs and replace its contents with the following:
using Elsa;
using Elsa.Persistence.EntityFramework.Core.Extensions;
using Elsa.Persistence.EntityFramework.Sqlite;
using Microsoft.AspNetCore.Builder;
using Microsoft.AspNetCore.Hosting;
using Microsoft.Extensions.Configuration;
using Microsoft.Extensions.DependencyInjection;

namespace ElsaGuides.ContentApproval.Web
{
    public class Startup
    {
        public Startup(IWebHostEnvironment environment, IConfiguration configuration)
        {
            Environment = environment;
            Configuration = configuration;
        }

        private IWebHostEnvironment Environment { get; }
        private IConfiguration Configuration { get; }

        public void ConfigureServices(IServiceCollection services)
        {
            var elsaSection = Configuration.GetSection("Elsa");

            services
                .AddElsa(elsa => elsa
                    .UseEntityFrameworkPersistence(ef => ef.UseSqlite())
                    .AddConsoleActivities()
                    .AddHttpActivities(elsaSection.GetSection("Server").Bind)
                    .AddEmailActivities(elsaSection.GetSection("Smtp").Bind)
                    .AddQuartzTemporalActivities()
                    .AddWorkflowsFrom<Startup>()
                );

            services.AddElsaApiEndpoints();
            services.AddRazorPages();
        }

        public void Configure(IApplicationBuilder app)
        {
            app
                .UseStaticFiles()
                .UseHttpActivities()
                .UseRouting()
                .UseEndpoints(endpoints =>
                {
                    endpoints.MapControllers();
                    endpoints.MapFallbackToPage("/_Host");
                });
        }
    }
}
Notice that we're accessing a configuration section called "Elsa". We then use this section to retrieve sub-sections called "Server" and "Smtp"". Let's update appsettings.json with these sections next:
Appsettings.json
Open appsettings.json and add the following section:
{
  "Elsa": {
    "Server": {
      "BaseUrl": "https://localhost:5001"
    },
    "Smtp": {
      "Host": "localhost",
      "Port": "2525",
      "DefaultSender": "noreply@acme.com"
    }
  }
}
The reason we are setting a "base URL" is because the HTTP activities library provides an absolute URL provider that can be used by activities and workflow expressions. Since this absolute URL provider can be used outside the context of an actual HTTP request (for instance, when a timer event occurs), we cannot rely on e.g.
IHttpContextAccessor, since there won't be any HTTP context.
_Host.cshtml
Notice that the application will always fall back to serve the _Host.cshtml page, which we will create next.
- Create a new folder called
Pages. - Inside
Pages, create a new file called_Host.cshtml.
Add the following content to _Host.cshtml:
@page "/"
@{
    var serverUrl = $"{Request.Scheme}://{Request.Host}";
}
<!DOCTYPE html>
<html lang="en">
<head>
    <meta charset="utf-8"/>
    <meta name="viewport" content="width=device-width, initial-scale=1.0"/>
    <title>Elsa Workflows</title>
    <link rel="icon" type="image/png" sizes="32x32" href="/_content/Elsa.Designer.Components.Web/elsa-workflows-studio/assets/images/favicon-32x32.png">
    <link rel="icon" type="image/png" sizes="16x16" href="/_content/Elsa.Designer.Components.Web/elsa-workflows-studio/assets/images/favicon-16x16.png">
    <link rel="stylesheet" href="/_content/Elsa.Designer.Components.Web/elsa-workflows-studio/assets/fonts/inter/inter.css">
    <link rel="stylesheet" href="/_content/Elsa.Designer.Components.Web/elsa-workflows-studio/elsa-workflows-studio.css">
    <script src="/_content/Elsa.Designer.Components.Web/monaco-editor/min/vs/loader.js"></script>
    <script type="module" src="/_content/Elsa.Designer.Components.Web/elsa-workflows-studio/elsa-workflows-studio.esm.js"></script>
</head>
<body>
<elsa-studio-root server-url="@serverUrl" monaco-lib-path="_content/Elsa.Designer.Components.Web/monaco-editor/min">
    <elsa-studio-dashboard></elsa-studio-dashboard>
</elsa-studio-root>
</body>
</html>
At this point, you should have a functioning Elsa Server application that can execute workflows and serve the Elsa Dashboard.
Document Approval Workflow: Builder API
Before we create the workflow visually, let's see how we can do so programmatically first. Even if you never intend to write workflows in this way, it may come in handy when you need to create composite activities, which use the same builder API.
Composite Activities
The Elsa Designer currently does not support creating composite activities using the visual designer, but when that feature is released you won't have to programmatically create composite activities anymore.
Create a new file called DocumentApprovalWorkflow.cs and add the following contents:
using System.Net;
using System.Net.Http;
using Elsa.Activities.ControlFlow;
using Elsa.Activities.Email;
using Elsa.Activities.Http;
using Elsa.Activities.Http.Extensions;
using Elsa.Activities.Http.Models;
using Elsa.Activities.Primitives;
using Elsa.Activities.Temporal;
using Elsa.Builders;
using NodaTime;
namespace ElsaGuides.ContentApproval.Web
{
public class DocumentApprovalWorkflow : IWorkflow
{
public void Build(IWorkflowBuilder builder)
{
builder
.WithDisplayName("Document Approval Workflow")
.HttpEndpoint(activity => activity
.WithPath("/v1/documents")
.WithMethod(HttpMethod.Post.Method)
.WithReadContent())
.SetVariable("Document", context => context.GetInput<HttpRequestModel>()!.Body)
.SendEmail(activity => activity
.WithSender("workflow@acme.com")
.WithRecipient("josh@acme.com")
.WithSubject(context => $"Document received from {context.GetVariable<dynamic>("Document")!.Author.Name}")
.WithBody(context =>
{
var document = context.GetVariable<dynamic>("Document")!;
var author = document!.Author;
return $"Document from {author.Name} received for review.<br><a href=\"{context.GenerateSignalUrl("Approve")}\">Approve</a> or <a href=\"{context.GenerateSignalUrl("Reject")}\">Reject</a>";
}))
.WriteHttpResponse(
HttpStatusCode.OK,
"<h1>Request for Approval Sent</h1><p>Your document has been received and will be reviewed shortly.</p>",
"text/html")
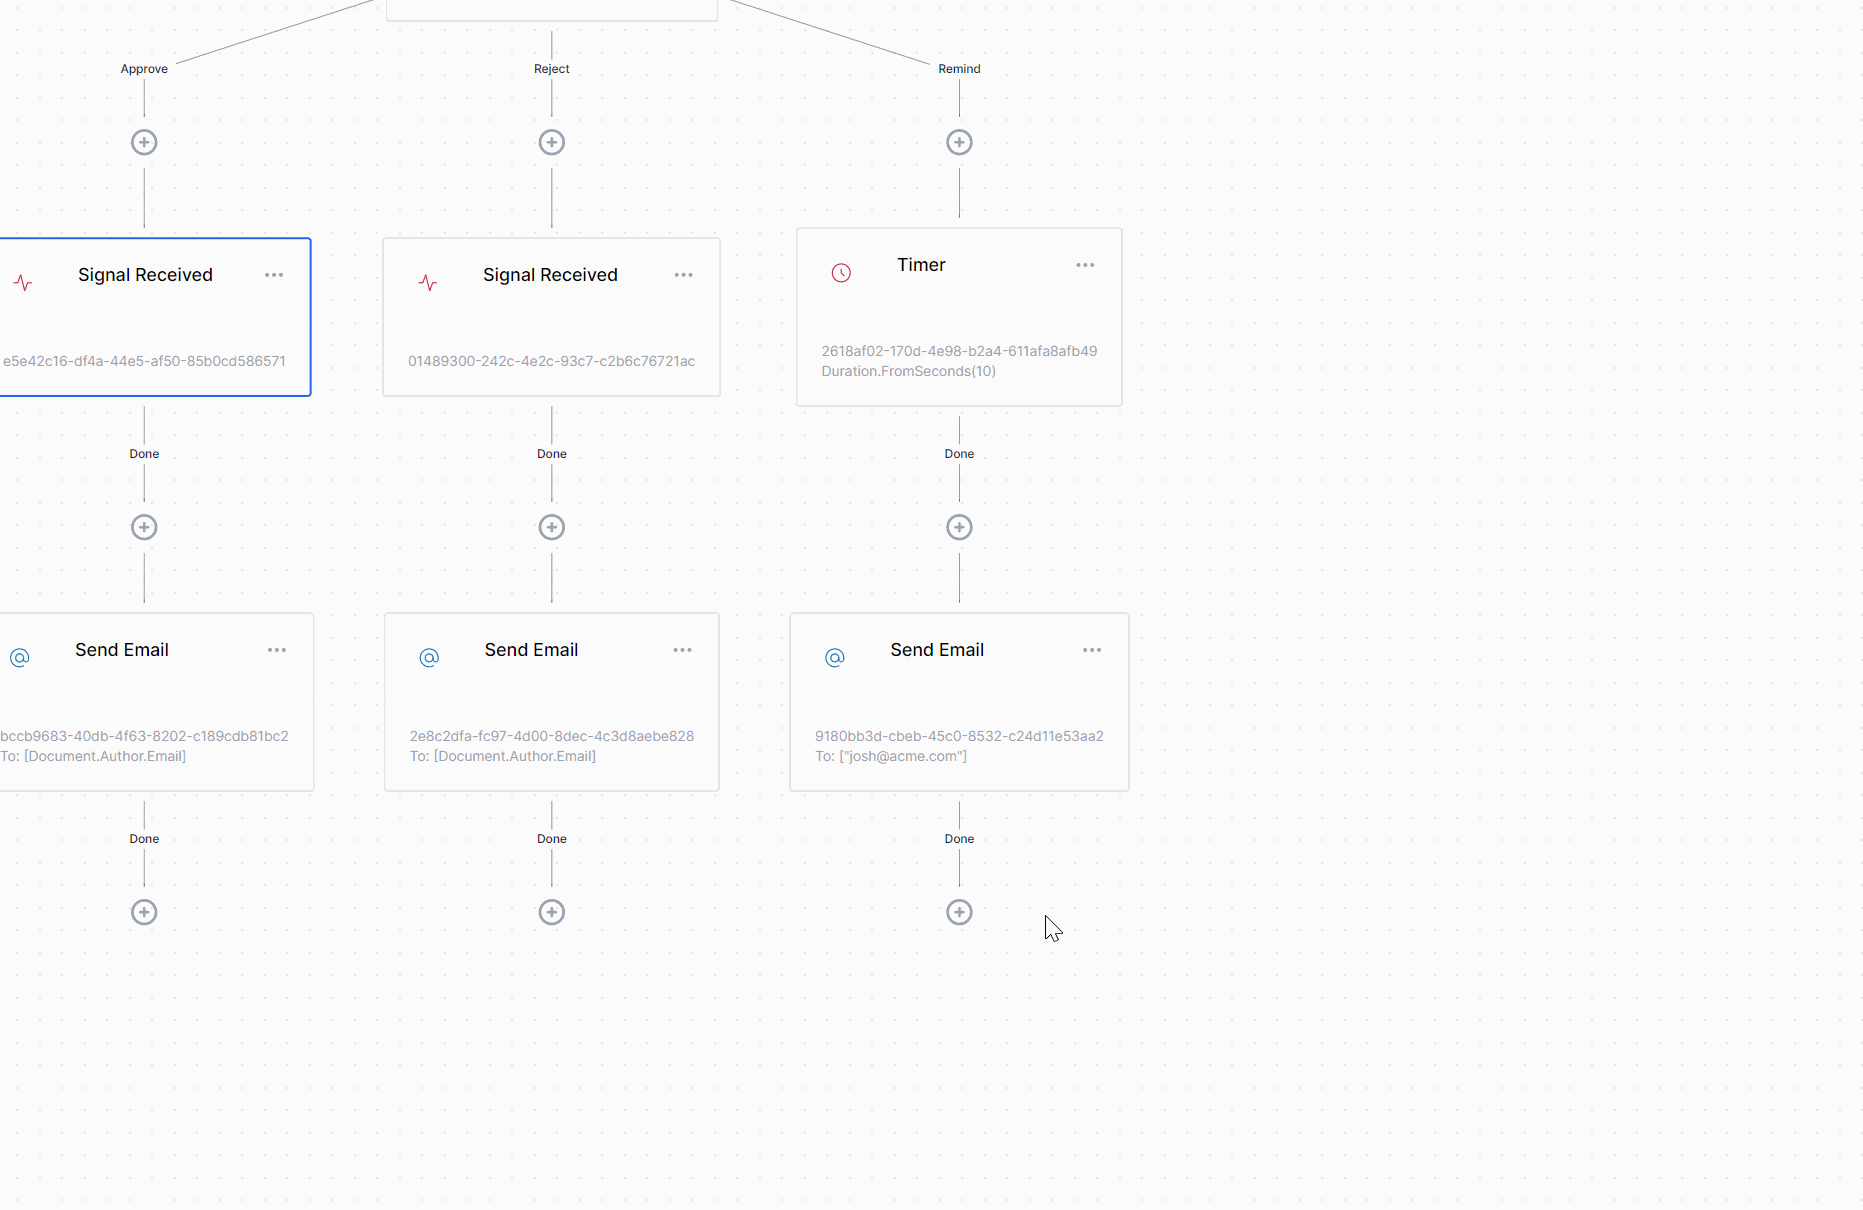
.Then<Fork>(activity => activity.WithBranches("Approve", "Reject", "Remind"), fork =>
{
fork
.When("Approve")
.SignalReceived("Approve")
.SendEmail(activity => activity
.WithSender("workflow@acme.com")
.WithRecipient(context => context.GetVariable<dynamic>("Document")!.Author.Email)
.WithSubject(context => $"Document {context.GetVariable<dynamic>("Document")!.Id} Approved!")
.WithBody(context => $"Great job {context.GetVariable<dynamic>("Document")!.Author.Name}, that document is perfect."))
.ThenNamed("Join");
fork
.When("Reject")
.SignalReceived("Reject")
.SendEmail(activity => activity
.WithSender("workflow@acme.com")
.WithRecipient(context => context.GetVariable<dynamic>("Document")!.Author.Email)
.WithSubject(context => $"Document {context.GetVariable<dynamic>("Document")!.Id} Rejected")
.WithBody(context => $"Nice try {context.GetVariable<dynamic>("Document")!.Author.Name}, but that document needs work."))
.ThenNamed("Join");
fork
.When("Remind")
.Timer(Duration.FromSeconds(10)).WithName("Reminder")
.SendEmail(activity => activity
.WithSender("workflow@acme.com")
.WithRecipient("josh@acme.com")
.WithSubject(context => $"{context.GetVariable<dynamic>("Document")!.Author.Name} is waiting for your review!")
.WithBody(context =>
$"Don't forget to review document {context.GetVariable<dynamic>("Document")!.Id}.<br><a href=\"{context.GenerateSignalUrl("Approve")}\">Approve</a> or <a href=\"{context.GenerateSignalUrl("Reject")}\">Reject</a>"))
.ThenNamed("Reminder");
})
.Add<Join>(join => join.WithMode(Join.JoinMode.WaitAny)).WithName("Join")
.WriteHttpResponse(HttpStatusCode.OK, "Thanks for the hard work!", "text/html");
}
}
}
Before we try out the workflow, let's setup an SMTP host. The easiest way to do so is by running Smtp4Dev using Docker:
docker run -p 3000:80 -p 2525:25 rnwood/smtp4dev:linux-amd64-3.1.0-ci0856
When Smtp4Dev has started, you'll be able to navigate to its dashboard at http://localhost:3000/ and inspect the emails the workflow will send.
First Run
Run the project and send the following HTTP request (using e.g. Postman):
POST /v1/documents HTTP/1.1
Host: localhost:5001
Content-Type: application/json

{
	"Id": "3",
	"Author": {
		"Name": "John",
		"Email": "john@gmail.com"
	},
	"Body": "This is sample document."
}
The response should look like this:
<h1>Request for Approval Sent</h1>
<p>Your document has been received and will be reviewed shortly.</p>
When you launch the Smtp4Dev dashboard, you should be seeing this:
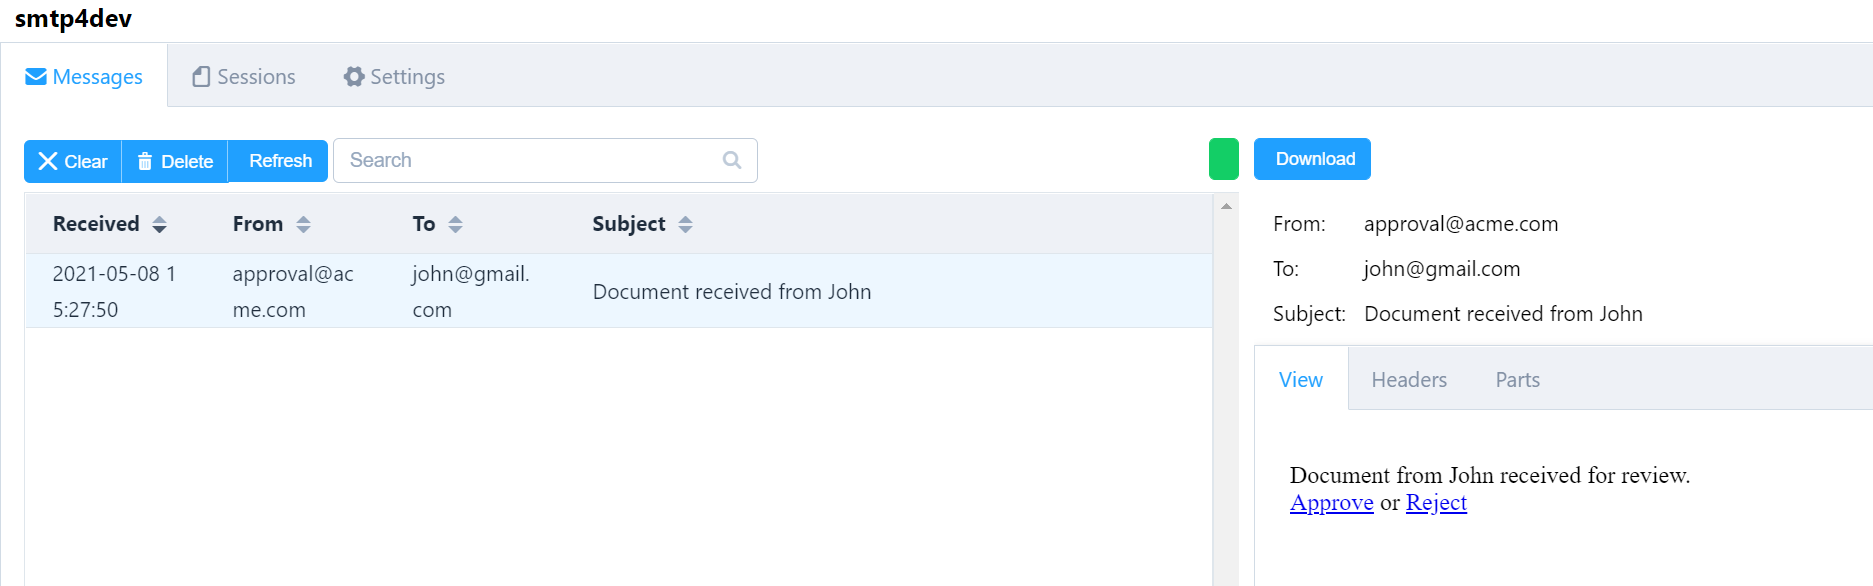
And after around every 10 seconds, reminder email messages will come in:

This will continue until you either click the Approve or Reject link.
Long Running Workflows
Due to the fact that the workflow is blocked on Timer and SignalReceived activities, the workflow will be persisted. This means that even when you stop the application and then start it again, Elsa will pick up where it has left off: the Timer activity will keep resuming the workflow. Similarly, clicking the Accept or Reject link from the email messages will resume the workflow too.
Go ahead and click either the Approve or Reject link. This should trigger a final email message, clear the Timer activity (due to the Join activity), and finish the workflow.
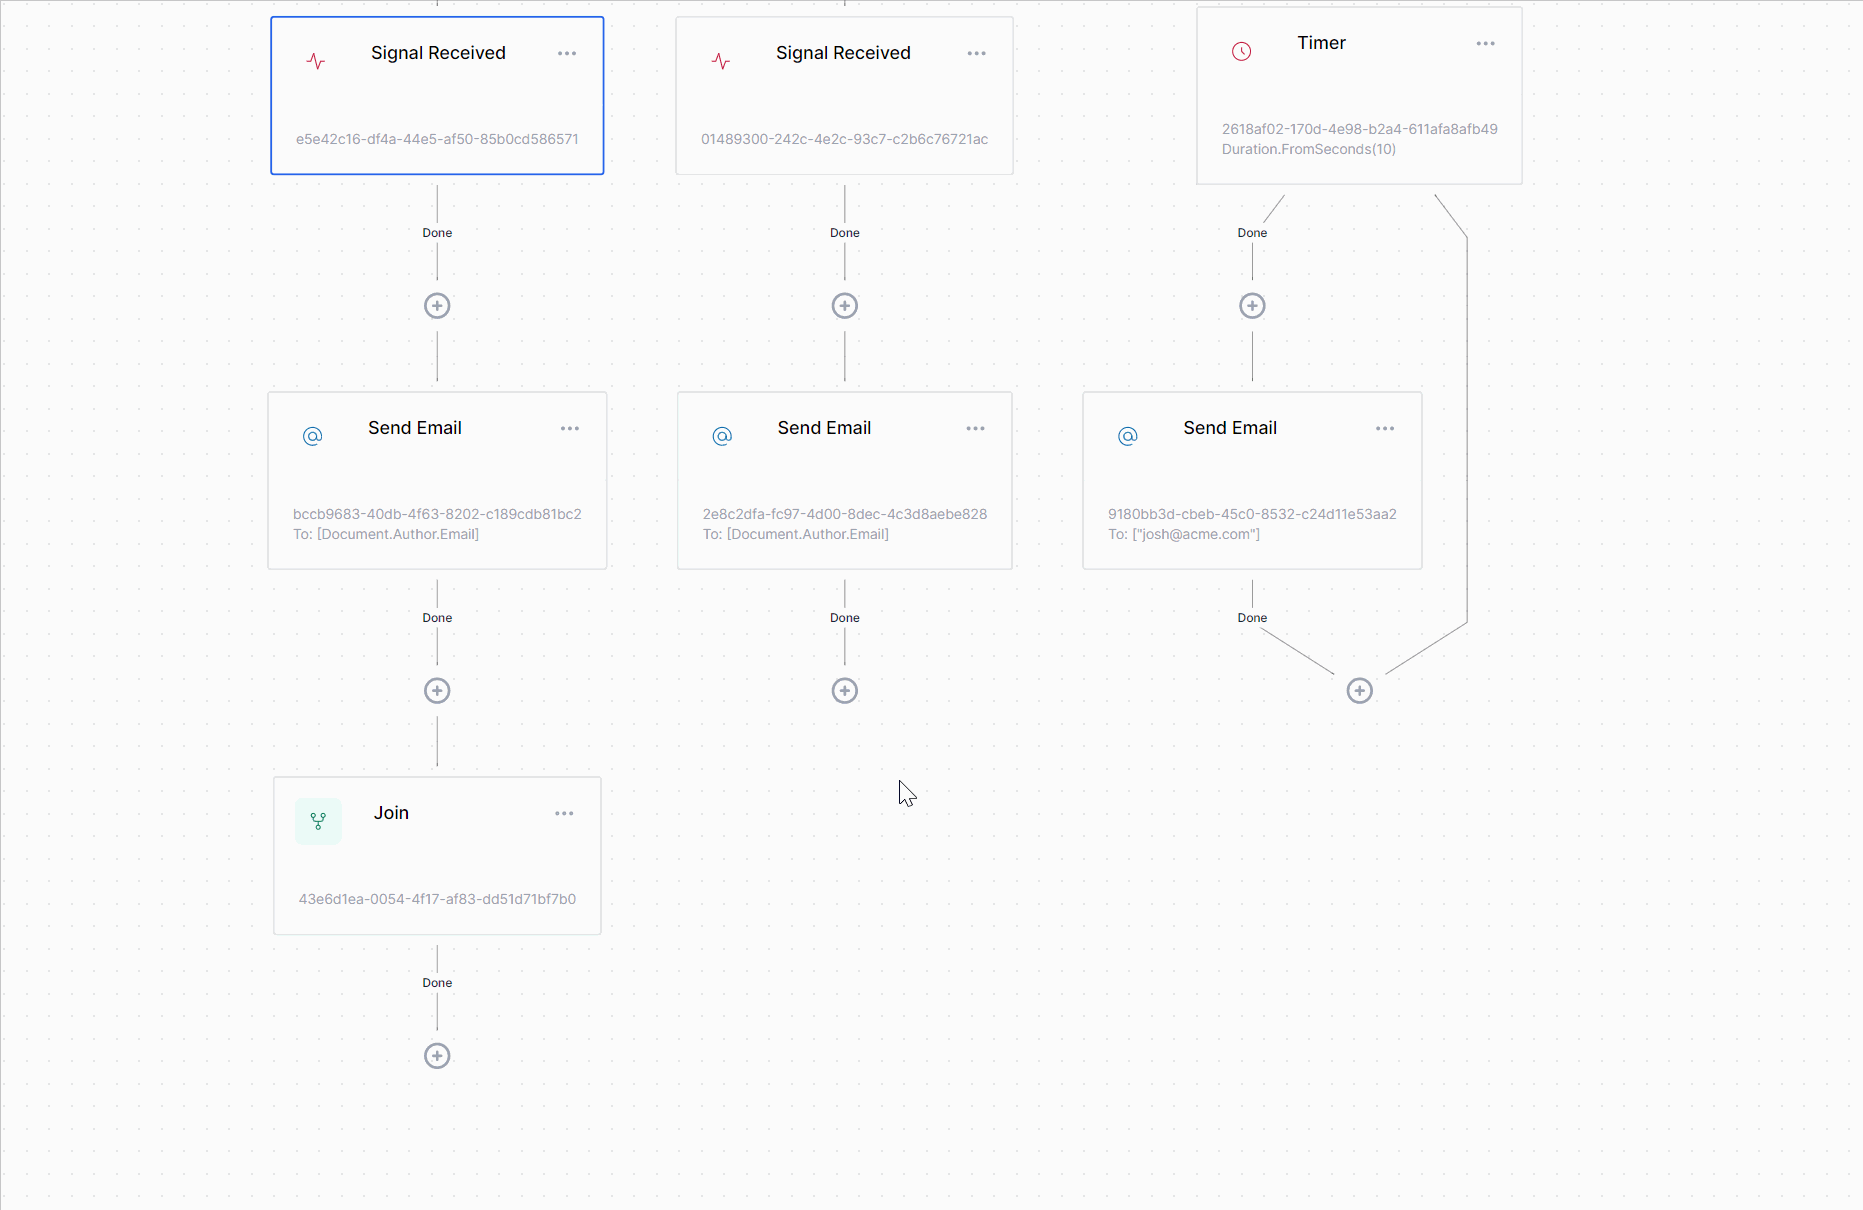
Let's take a look at the workflow instance using the Elsa Dashboard:
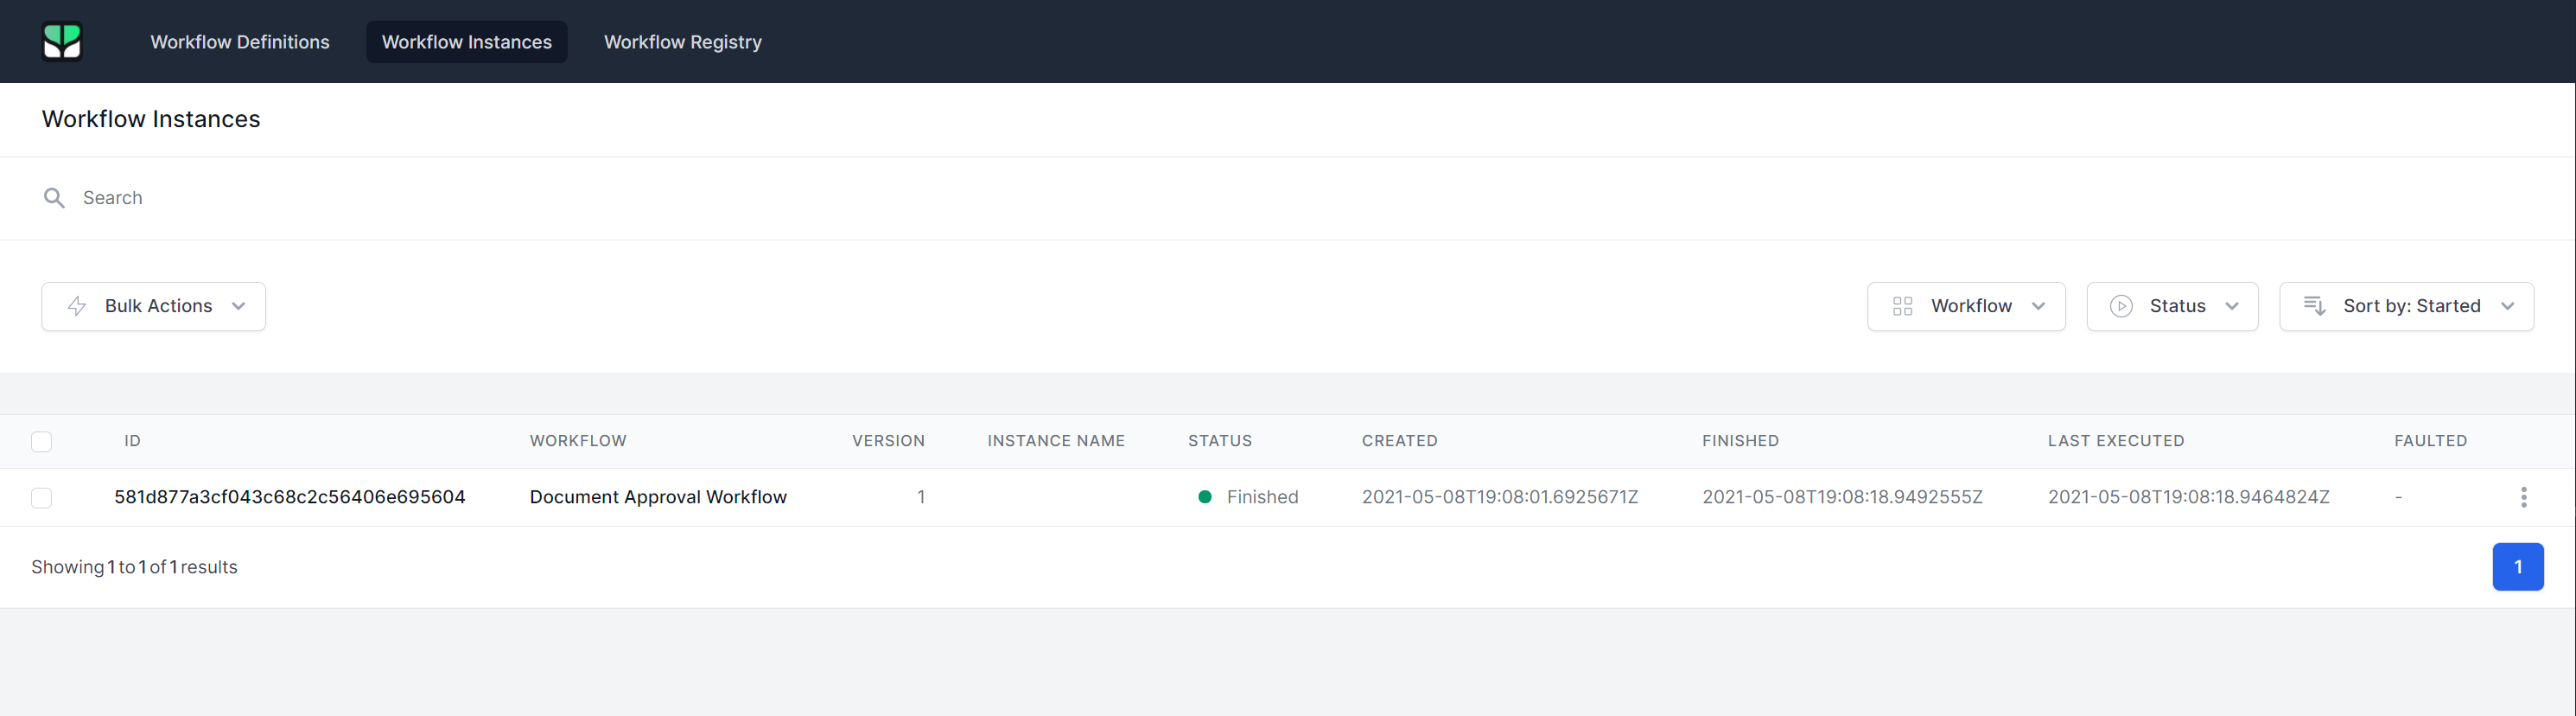
As you can see, one workflow instance was created, and it got completed.
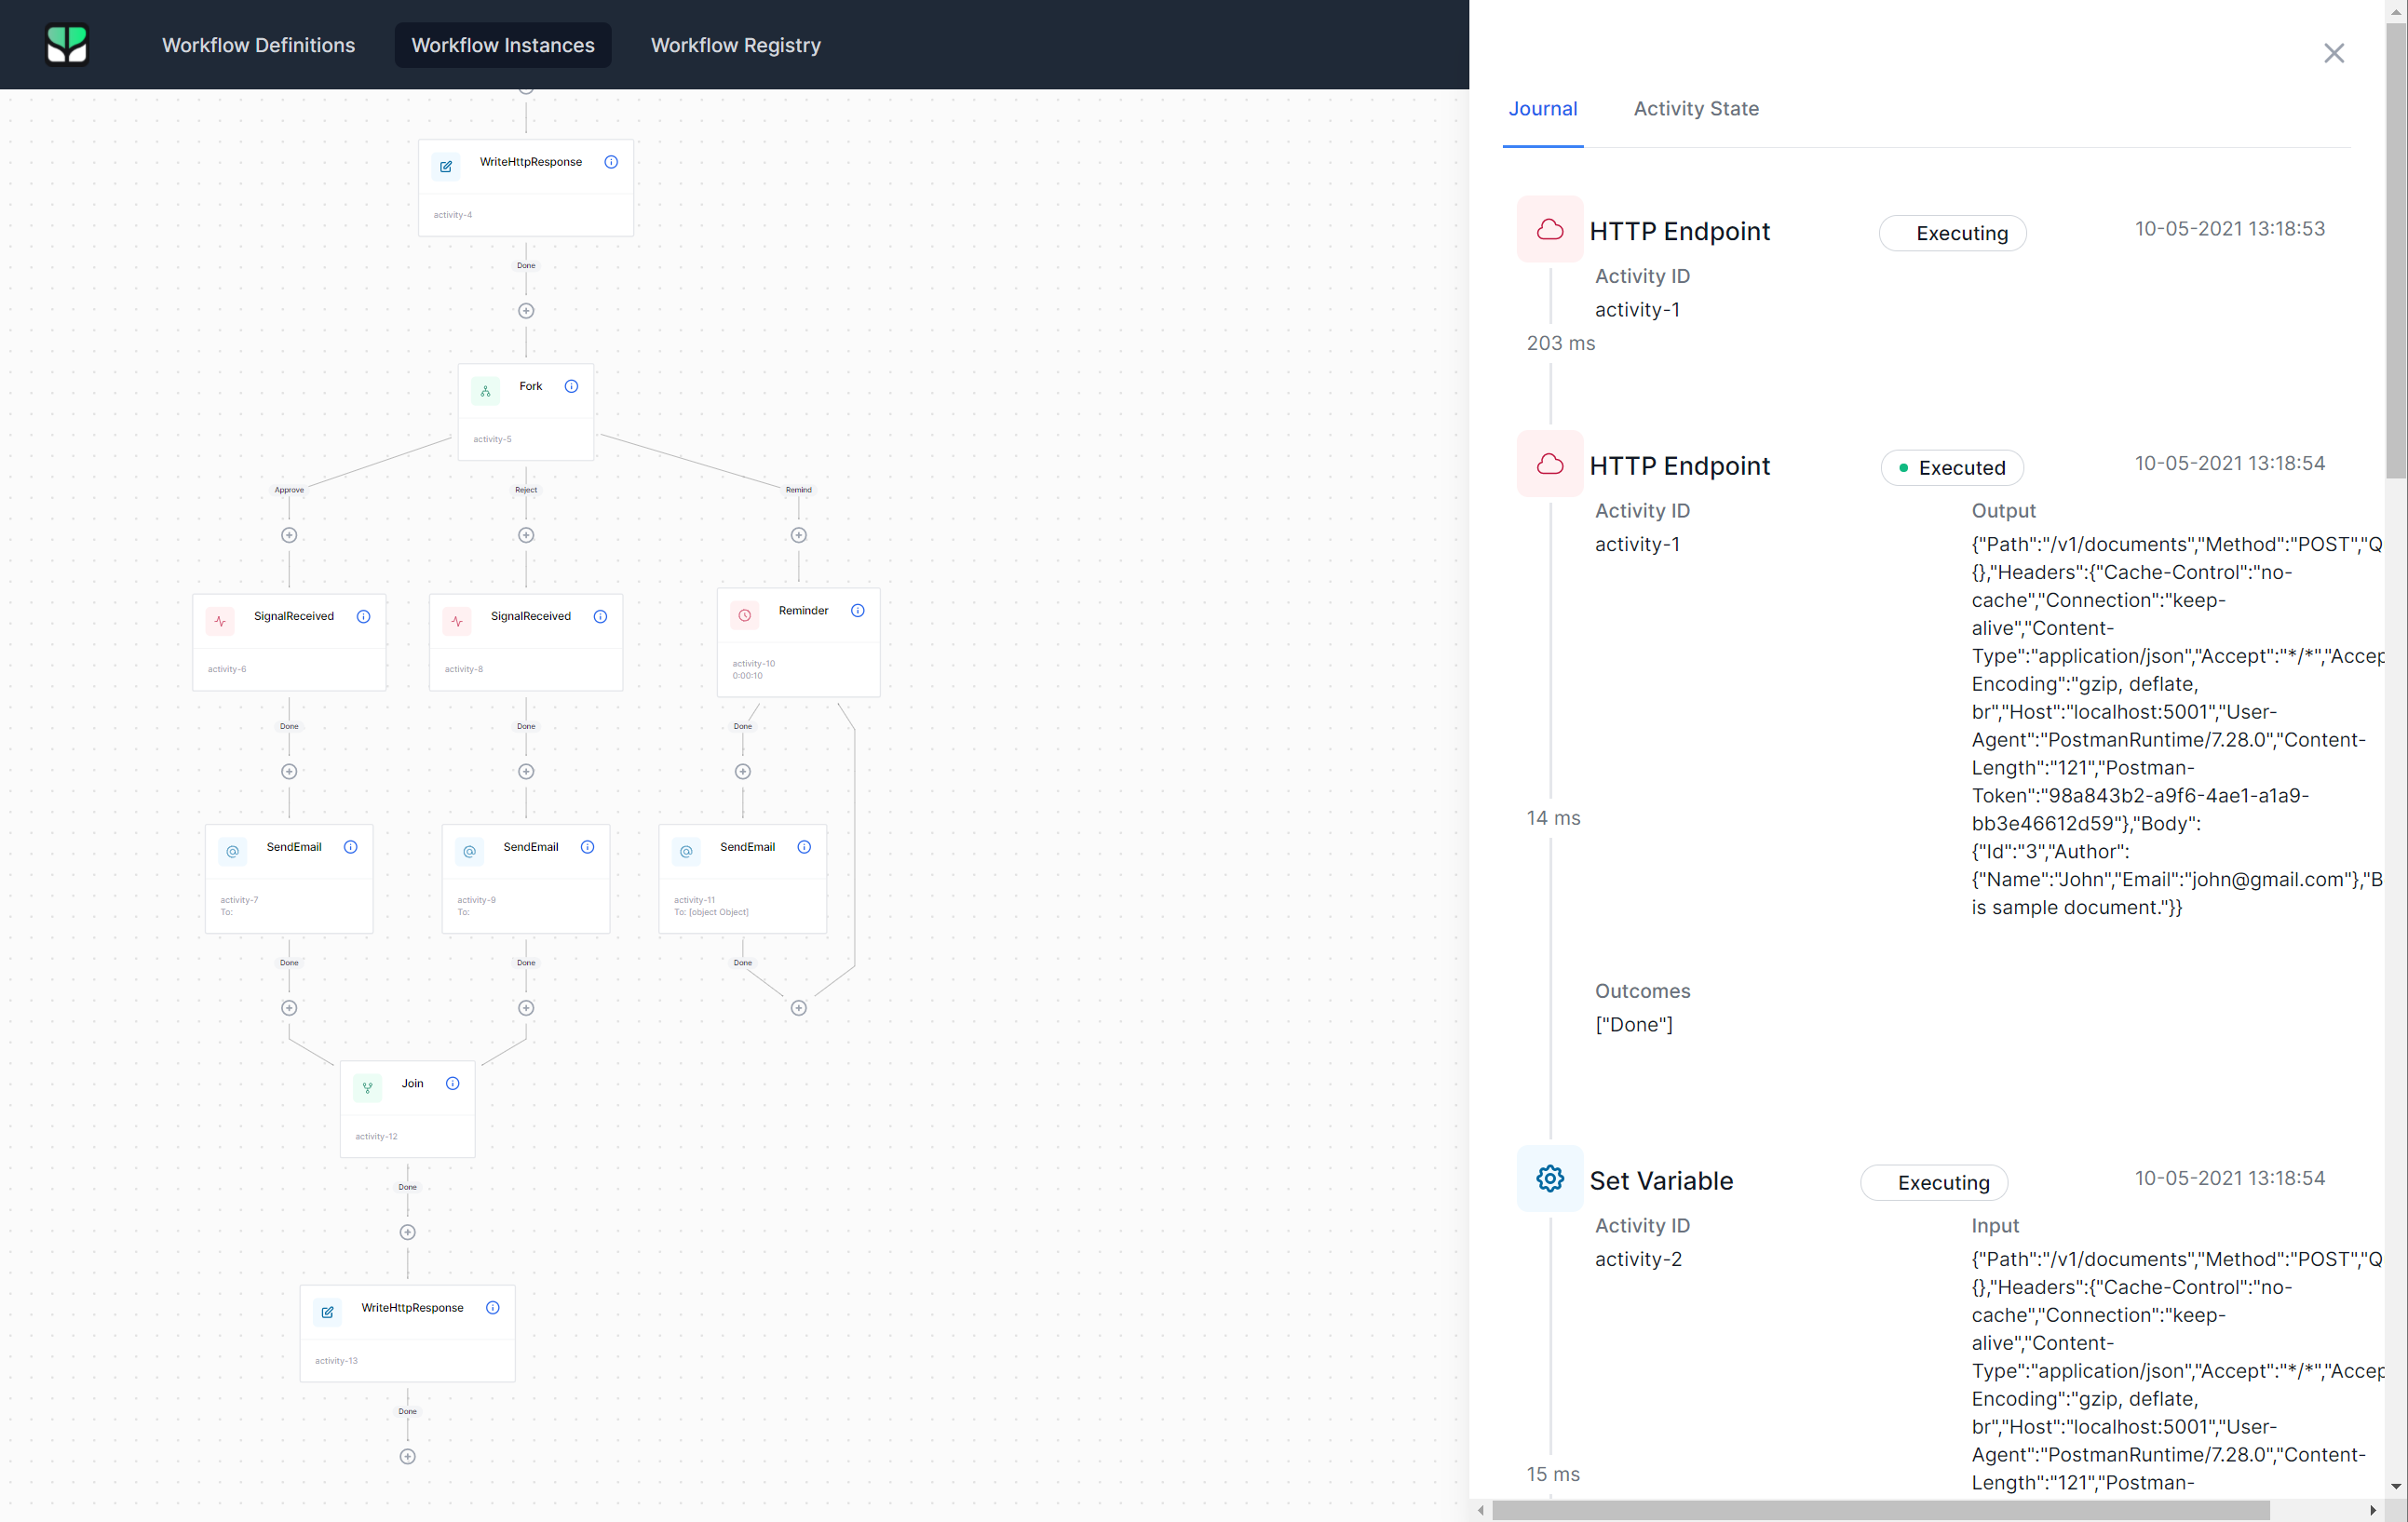
When you click on the workflow instance, you will be taken to the workflow instance viewer, which will display the workflow visually as well as the execution log:
Now that we've seen how to create the workflow programmatically, let's do it again but this time using the designer!
Document Approval Workflow: Visual Designer
Creating the workflow visually is actually quite simple. Just add the activities one by one and configure their settings. However, there's one important difference between coded workflows and designed workflows: when designing visual workflows, there's (currently) no way to specify expressions using C# code as we did in the form of lambda statements in the DocumentApprovalWorkflow class. Instead, we have to use JavaScript and Liquid expressions. The latter is specifically useful when we need to generate a body of text using dynamic data.
Without further ado, let's create a new workflow called using the dashboard!
Create Workflow
With the Elsa Dashboard in front of you, navigate to the Workflow Definitions page and click the Create button. You should now see an empty canvas with just a Start button and a cog wheel to configure workflow settings.
Let's do that first: click the cog wheel and specify the following:
- Name:
VisualDocumentApprovalWorkflow - Display Name:
Visual Document Approval Workflow
Click Save.
HTTP Endpoint
Now click the Start button and look for the HTTP Endpoint activity and select it. Configure it with the following settings:
- Path:
/v2/documents - Methods:
POST - Read Content:
true(checked)
Set Document Variable
Click the Done outcome button on the previous activity and look for the Set Variable activity and configure it as follows:
- Variable Name:
Document - Value:
input.Body(JavaScript)
Send Email to Josh the Approver
Click the Done outcome button on the previous activity and look for the Send Email activity and configure it as follows:
- From:
workflow@acme.com - To:
josh@acme.com - Subject:
Document received from {{Variables.Document.Author.Name}}(Liquid) - Body:
Document from {{ Variables.Document.Author.Name }} received for review.<br><a href="{{ "Approve" | signal_url }}">Approve</a> or <a href="{{ "Reject" | signal_url }}">Reject</a>
HTTP Response: Document Received
Click the Done outcome button on the previous activity and look for the HTTP Response activity and configure it as follows:
- Status Code:
OK - Content:
<h1>Request for Approval Sent</h1><p>Your document has been received and will be reviewed shortly.</p> - Content Type:
text/html
Fork
Click the Done outcome button on the previous activity and look for the Fork activity and configure it as follows:
- Branches:
Approve,Reject,Remind
Approve: Signal Received
Click the Approve outcome button on the previous activity and look for the Signal Received activity and configure it as follows:
- Signal:
Approve
Send Approved Email to Author
Click the Done outcome button on the previous activity and look for the Send Email activity and configure it as follows:
- From:
workflow@acme.com - To:
[Document.Author.Email](JavaScript) - Subject:
Document {{ Variables.Document.Id }} Approved!(Liquid) - Body:
Great job {{ Variables.Document.Author.Name }}, that document is perfect.(Liquid)
Reject: Signal Received
Click the Reject outcome button on the Fork activity and look for the Signal Received activity and configure it as follows:
- Signal:
Reject
Send Rejected Email to Author
Click the Done outcome button on the previous activity and look for the Send Email activity and configure it as follows:
- From:
workflow@acme.com - To:
[Document.Author.Email](JavaScript) - Subject:
Document {{ Variables.Document.Id }} Rejected(Liquid) - Body:
Nice try {{ Variables.Document.Author.Name }}, but that document needs work.(Liquid)
Remind: Timer
Click the Remind outcome button on the Fork activity and look for the Timer activity and configure it as follows:
- Timeout:
Duration.FromSeconds(10)(JavaScript)
Send Reminder Email to Josh the Approver
Click the Done outcome button on the previous activity and look for the Send Email activity and configure it as follows:
- From:
workflow@acme.com - To:
josh@acme.com - Subject:
{{ Variables.Document.Author.Name }} is waiting for your review!(Liquid) - Body:
Don't forget to review document {{ Variables.Document.Id }}.<br><a href="{{ "Approve" | signal_url }}">Approve</a> or <a href="{{ "Reject" | signal_url }}">Reject</a>(Liquid)
Now connect the Send Email activity we just added back to the Timer activity so that the workflow will keep sending reminders for as long as we haven't received a signal. To connect an outcome to an existing activity, simply press and hold the SHIFT button while clicking the outcome. Release the SHIFT button and left-click on the target activity:
Join
Click the Done outcome button of the Send Email activity in the Approve branch and look for the Join activity and configure it as follows:
- Mode:
WaitAny
We also need to connect the Send Email activity from the Reject branch using the same technique used to connect the reminder Send Email activity back to the Timer activity:
HTTP Response: All set!
Finally, we just write a simple HTTP response, completing the workflow.
Click the Done outcome button of the Join activity and look for the HTTP Response activity and configure it as follows:
- Status Code:
OK - Content:
Thanks for the hard work! - Content Type:
text/html
Second Run
Make sure to publish your changes and then issue the following HTTP request:
POST workflows/v2/documents HTTP/1.1
Host: localhost:5001
Content-Type: application/json

{
	"Id": "4",
	"Author": {
		"Name": "Hannah",
		"Email": "hannah@gmail.com"
	},
	"Body": "This is another sample document."
}
As you'll see, it works exactly the same as with the programmatic workflow created earlier.