Guides
Parent/child workflows
In this guide, we will see how we can invoke other workflows from a parent workflow using the RunWorkflow activity.
We will see how we can run child workflows in a fire and forget fashion as well as in a wait until completed fashion. We'll also see how we can provide input into the child workflows and allow the child workflows to provide output back to the parent workflow.
You don't need to setup an Elsa project to follow this guide. All we need is a running Elsa Server + Dashboard Docker container by running the following command:
docker run -t -i -e ELSA__SERVER__BASEURL=http://localhost:13000 -p 13000:80 elsaworkflows/elsa-dashboard-and-server:latest
Next, we'll go over the following scenarios:
- Parent Child: Fire and Forget
- Parent Child: Block until Complete.
- Parent Children: Run Many Children and Block until Complete.
Scenario 1: Parent Child: Fire and Forget
For this scenario, we will setup one parent workflow and a child workflow.
The parent workflow:
- Listens for incoming HTTP requests
- Runs a child workflow.
Child Workflow
Let's start with the child workflow first. With the Dashboard open, create a new Workflow Definition called "Child" and add the HTTP response activity with the following settings.
HTTP Response
- Content (Liquid):
Parent says: "{{ Input.Message }}"
Make sure to publish your changes.
Parent Workflow
Next, create a new Workflow Definition called "Parent" and add the following activities:
HTTP Endpoint
- Path:
/parent - Methods:
[GET]
Run Workflow
- Workflow Definition (Liquid):
{{ "Child" | workflow_definition_id: "name" }} - Input (JavaScript):
({ Message: 'Hello child!' }) - Mode:
FireAndForget
The
workflow_definition_idliquid filter resolves a workflow name into a workflow definition ID. This is convenient, because now you don't have to provide the actual workflow definition ID. The workflow definition ID changes everytime you export and then import a workflow definition.
Try it out
Run the workflow by making an HTTP GET request to /workflows/parent. The response should be:
Parent says: "Hello child!"
The following JSON files are completed workflows that you can import.
Scenario 2: Parent Child: Block until Complete
In this scenario, we will update the parent workflow from scenario 1 by adding an HTTP Response after the child workflow completes. We will also update the Run Workflow activity's mode from FireAndForget to Blocking.
The child workflow will be updated and become a long-running workflow that will suspend execution while waiting for a signal to be received. When we send this signal (via HTTP), the child workflow completes and sets its output. The parent workflow will receive this output and display it in the web browser.
I'm assuming a clean slate here, so either make sure to delete the existing workflows from Scenario 1, use new names, or simply update them as necessary.
Parent Workflow
Update the Run Workflow activity's Mode with the Blocking value.
Next, connect a new HTTP Response activity to the Done outcome and configure it as follows:
- Content (Liquid):
Message received from child {{ Input.WorkflowInstanceId }}: {{ Input.WorkflowOutput.Message }}
Child Workflow
Open the Child workflow and open the existing HTTP Response activity editor. Change its settings as follows:
HTTP Response
Content (Liquid):
<pre> Parent says: "" My workflow instance ID is: <pre>Content Type:
text/html
Notice that we're writing back the workflow instance ID of the executing Child workflow. It will become apparent why in a few moments.
Next, connect a new Signal Received activity to the Done outcome of the existing HTTP Response activity and provide the following settings:
Signal Received
- Signal:
Resume
Connect another activity called Finish. This activity allows us to provide an outcome as well as an output value to the parent workflow.
Finish
- Output Value (JavaScript):
({ Message: 'Hello parent!' }) - Outcome Names: (leave empty)
Try it out
When you now trigger the parent workflow (GET /workflows/parent), you will notice that two new workflow instances will have been created that are both in the Suspended state.
- The Parent is blocked on the Child workflow.
- The Child workflow is blocked on the Signal Received activity.
Take a note of the Child workflow instance and execute the following HTTP request to send the Resume signal to it (I'm using Postman to issue HTTP requests):
When I ran the workflow, I received a workflow instance ID of 975ed020276e430f91c1338e92131402. Yours will be different, so make sure to substitute the workflow instance ID parameter in the following request:
curl --location --request POST 'https://localhost:11000/v1/signals/resume/execute' \
--header 'Content-Type: application/json' \
--data-raw '{
    "workflowInstanceId": "975ed020276e430f91c1338e92131402"
}'
The response should read:
Message received from child 975ed020276e430f91c1338e92131402: Hello parent!
When you look at the workflow instances, you will see that both the Child as well as the Parent are now in the Finished state.
The following JSON files are completed workflows that you can import.
Scenario 3: Parent Children: Run Many Children and Block until Complete.
In this scenario, we will update the Parent workflow to launch 3 Child workflows from a Fork activity. Each branch will send a branch number, which is then used by the Child workflow to setup a signal dynamically.
The Parent workflow will suspend execution until all Child workflows complete execution.
Parent Workflow
Update the Parent workflow by adding a new Fork activity between the HTTP Endpoint activity and the Run Workflow activity and specify the following settings:
Fork
- Branches:
['Child 1', 'Child 2', 'Child 3']
This will generate 3 branches.
Now reconnect the existing Run Workflow to the Child 1 outcome.
Run Workflow 1
Update the existing Run Workflow activity's Input setting with the following JavaScript expressions:
({ Message: 'Hello child 1!', Label: 1 })
We will use the Label field in the Child workflow to construct the signal name to listen for. This is not required, but were doing it for demonstration purposes only.
Run Workflow (2 and 3)
Connect the Child 2 and Child 3 outcomes of the Fork activity to two new Run Workflow activities that have the same settings as the original one:
Run Workflow 2:
- Workflow Definition (Liquid):
{{ "Child" | workflow_definition_id: "name" }} - Input (JavaScript):
({ Message: 'Hello child 2!', Label: 2 }) - Mode:
Blocking
Run Workflow 3
- Workflow Definition (Liquid):
{{ "Child" | workflow_definition_id: "name" }} - Input (JavaScript):
({ Message: 'Hello child 3!', Label: 3 }) - Mode:
Blocking
Join
Connect all three Run Workflow activities to a new Join activity with the following settings:
- Mode:
WaitAll
This ensures that the parent workflow continues only after all three child workflows are finished.
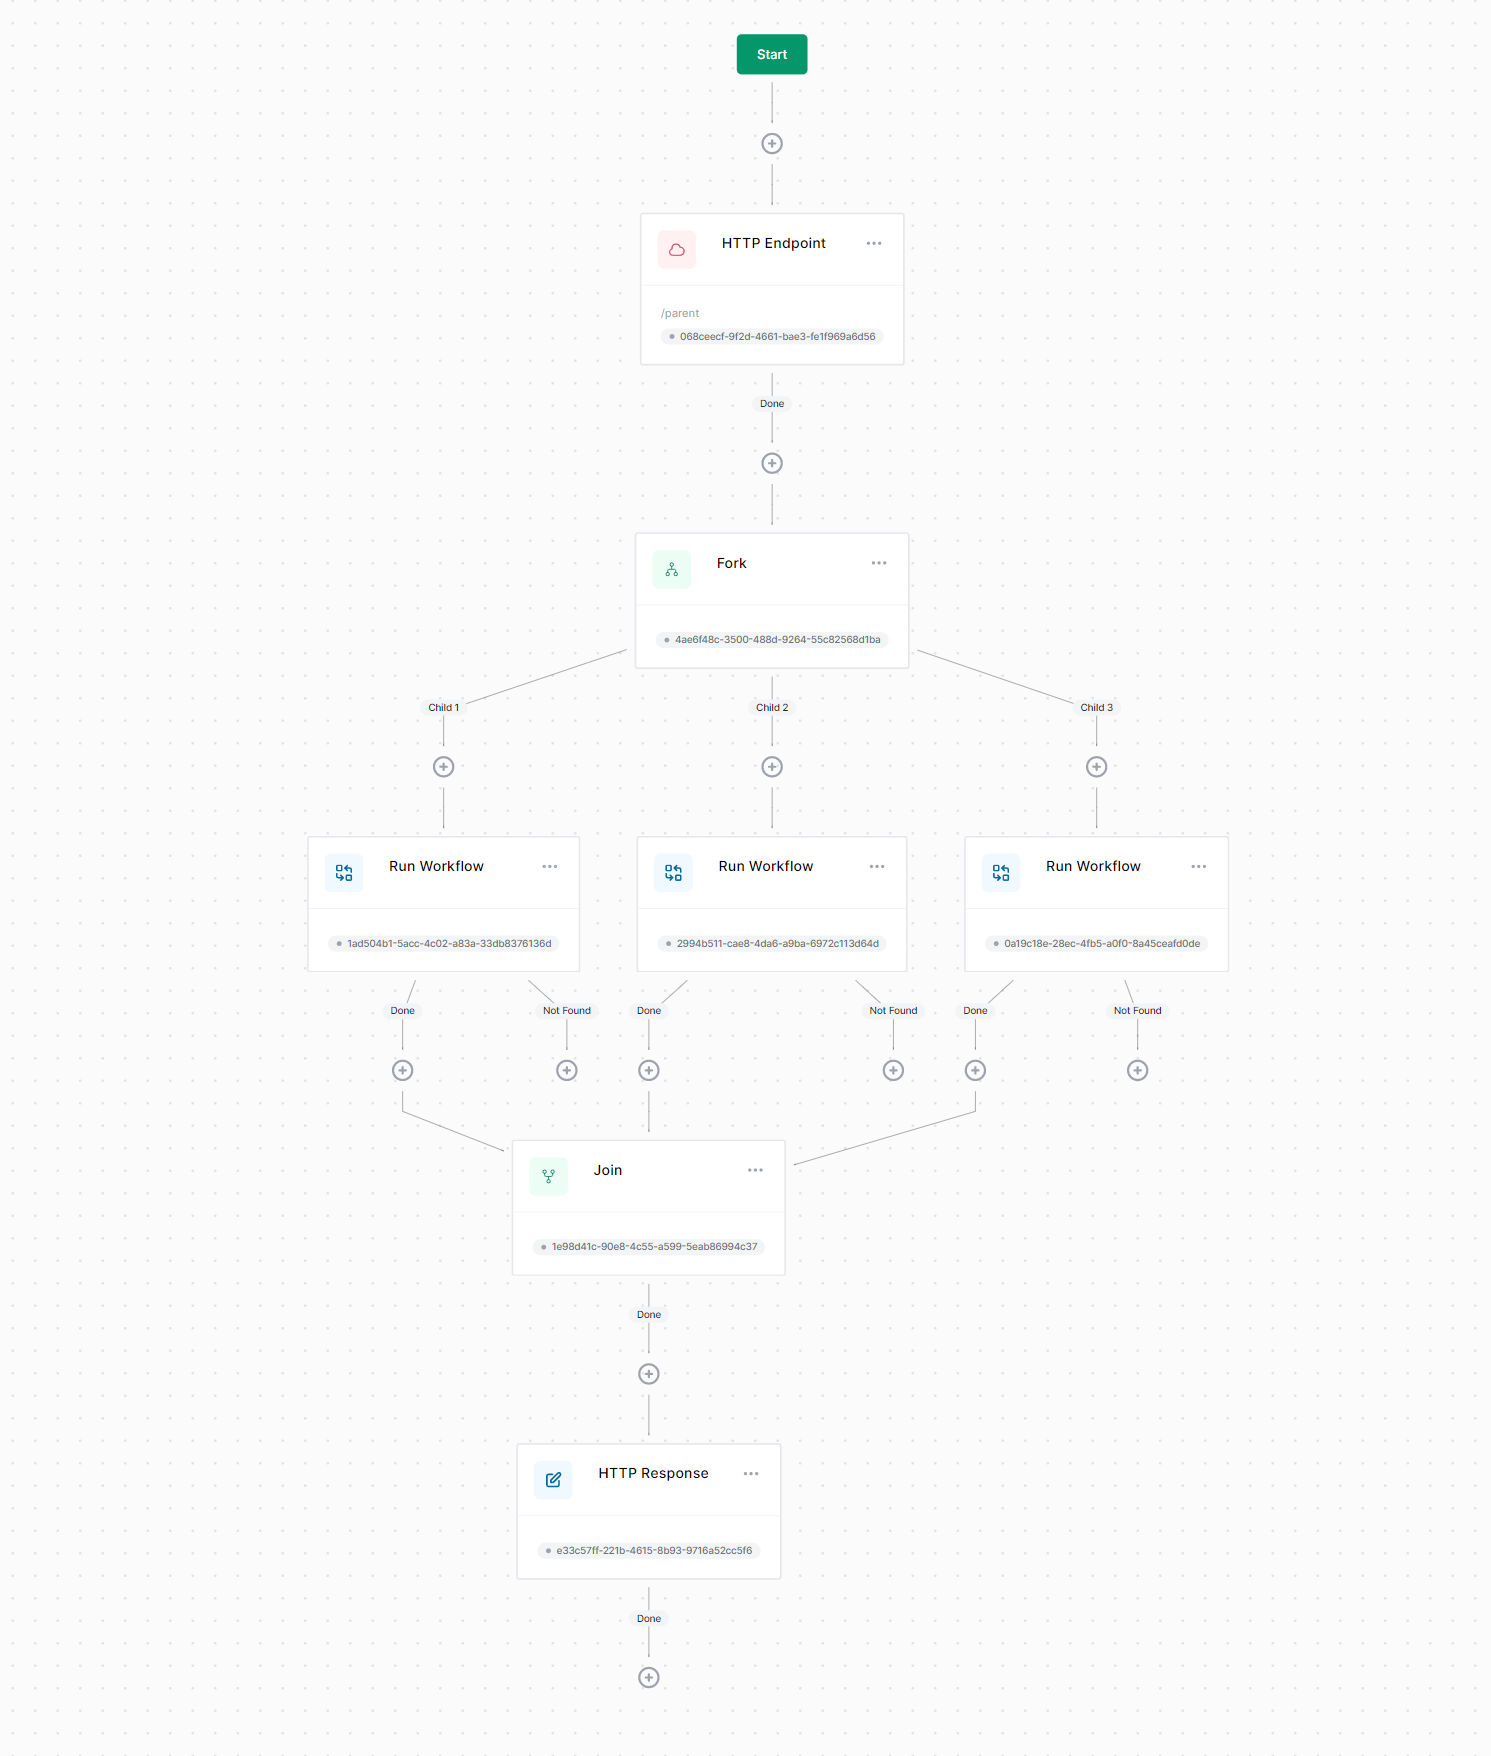
HTTP Response
Finally, make sure that the HTTP Response activity is connected to the Join activity. This activity will execute once all child workflows complete.
Configure it as follows:
- Content:
All set! - Content Type:
text/plain
The final result should look like this:
Child Workflow
Now let's update the Child workflow. Because the parent workflow will be executing this child workflow multiple times within the same burst of execution, we can't use the HTTP Response activity here, because we can write HTTP response headers to the HTTP response only once. What we will do instead is write some text to Console Out for debugging (and entertainment purposes).
Furthermore, we want to be able to trigger child workflow instances individually. Although we could simply stick with the "Resume" signal name, we can make the exercise a little bit more interesting by dynamically setting the signal name. We will use the input from the parent workflow to do so. Finally, we will add a Finish activity to send output back to the parent workflow.
Let's go over this step-by-step.
Set Variable
In Scenario 2 we added the HTTP Response activity to the Child workflow. Let's remove this activity now and instead start the workflow with a new Set Variable activity:
- Variable Name:
ParentInput - Value (JavaScript):
input
We are storing the input from the parent workflow in a variable so that we can use it from multiple other activities.
Write Line
Connect a new Write Line activity with the following settings:
- Text (Liquid):
Parent says: "{{ Variables.ParentInput.Message }}".
My workflow instance ID is: {{ WorkflowInstanceId }}
Signal Received
Ensure that the Write Line activity is connected to the Signal Received activity already on the workflow from Scenario 2, and update its Signal setting to the following Liquid expression:
Resume-{{ Variables.ParentInput.Label }}
Although this is not necessary, it demonstrates that you can use dynamic signal names if you wanted to.
Finish
Finally, ensure that the Finish activity is connected to the Signal Received activity. No other changes are necessary.
Make sure to publish your changes and let's try out the updated workflows.
Try it out
Trigger the parent workflow by executing the following request:
curl --location --request GET 'https://localhost:11000/workflows/parent'
When you do, you should see something like the following output in the console window:
Parent says: "Hello Child 3!".
My workflow instance ID is: f26d9bcefee84b7cb4c625831e648f5a
Parent says: "Hello Child 2!".
My workflow instance ID is: 5706b5bdcaca43a2940d4ad70b05361f
Parent says: "Hello Child 1!".
My workflow instance ID is: bd345ece3aba48a69383a471185a16fd
Notice also that there are now 4 workflow instances in the Suspended state: one Parent workflow and three Child workflows:

Execute the following HTTP requests one-by-one (the order in which does not matter) and notice that the Parent workflow will finish only after the last Child workflow completes:
curl --location --request POST 'https://localhost:11000/v1/signals/resume-3/execute' \
--header 'Content-Type: application/json' \
--data-raw '{
    "workflowInstanceId": "f26d9bcefee84b7cb4c625831e648f5a"
}'

curl --location --request POST 'https://localhost:11000/v1/signals/resume-2/execute' \
--header 'Content-Type: application/json' \
--data-raw '{
    "workflowInstanceId": "5706b5bdcaca43a2940d4ad70b05361f"
}'

curl --location --request POST 'https://localhost:11000/v1/signals/resume-1/execute' \
--header 'Content-Type: application/json' \
--data-raw '{
    "workflowInstanceId": "bd345ece3aba48a69383a471185a16fd"
}'
After the last child executes, the HTTP response should read All set!, and all workflows should have completed.
The following JSON files are completed workflows that you can import.