Guides
Create & run a recurring workflow
In this guide, we will do the following:
- Create a console project.
- Programmatically define a workflow using the Workflow Builder API that automatically executes every 5 seconds using the
Timeractivity. - Convert the project into an ASP.NET Core project and create the same workflow using the visual designer.
Create Console Project
Create a new .NET Core Console project called ElsaGuides.RecurringTasks:
dotnet new console -n "ElsaGuides.RecurringTasks"
CD into the created project folder:
cd ElsaGuides.RecurringTasks
And add the following packages:
dotnet add package Elsa
dotnet add package Elsa.Activities.Temporal.Quartz
dotnet add package Microsoft.Extensions.Hosting
The Recurring Workflow
Create a new file called RecurringTaskWorkflow.cs and add the following code:
using Elsa.Activities.Console;
using Elsa.Activities.Temporal;
using Elsa.Builders;
using NodaTime;

namespace ElsaGuides.RecurringTasks
{
    public class RecurringTaskWorkflow : IWorkflow
    {
        private readonly IClock _clock;

        public RecurringTaskWorkflow(IClock clock) => _clock = clock;

        public void Build(IWorkflowBuilder builder) =>
            builder
                .Timer(Duration.FromSeconds(5))
                .WriteLine(() => $"It's now {_clock.GetCurrentInstant()}. Let's do this thing!");
    }
}
Program
Now that we have a workflow, we need to be able to execute it. Since the workflow starts with the Timer activity, Elsa can invoke it for us if we setup a .NET Host. Let's see how that works.
Open Program.cs and replace its contents with the following:
using System.Threading.Tasks;
using Elsa;
using Microsoft.Extensions.DependencyInjection;
using Microsoft.Extensions.Hosting;
using Microsoft.Extensions.Logging;

namespace ElsaGuides.RecurringTasks
{
    class Program
    {
        static async Task Main()
        {
            var host = new HostBuilder()
                .ConfigureServices(ConfigureServices)
                .UseConsoleLifetime()
                .Build();

            using (host)
            {
                await host.StartAsync();
                await host.WaitForShutdownAsync();
            }
        }

        private static void ConfigureServices(IServiceCollection services) =>
            services
                .AddElsa(elsa => elsa
                    .AddConsoleActivities()
                    .AddQuartzTemporalActivities()
                    .AddWorkflow<RecurringTaskWorkflow>());
    }
}
Notice that we don't have to invoke the workflow ourselves manually. Instead, this is taken care of by a background task that is executed within the host built with
HostBuilder.
First Run
Run the program. After 5 seconds, you will start seeing the following output:
It's now 2021-05-08T11:24:06Z. Let's do this thing!
It's now 2021-05-08T11:24:11Z. Let's do this thing!
It's now 2021-05-08T11:24:16Z. Let's do this thing!
That's all it takes to setup a .NET application that is capable of executing recurring workflows.
The Real World
In real-world scenarios, you might want to configure a persistence provider so that workflow instances get persisted.
Visual Workflows
Now that we've seen how to create a recurring workflow using Elsa's Workflow Builder API, let's see how we can convert the project into an ASP.NET Core host that is capable of the following things:
- Host the Elsa Dashboard.
- Host the Elsa Server API Endpoints (for consumption by the Elsa Dashboard).
We'll use the dashboard to visually create the same workflow.
Convert Project
Open the ElsaGuides.RecurringTasks.csproj file and replace its contents with the following:
<Project Sdk="Microsoft.NET.Sdk.Web">

    <PropertyGroup>
        <TargetFramework>net5.0</TargetFramework>
    </PropertyGroup>

    <ItemGroup>
        <PackageReference Include="Elsa" Version="2.0.0-rc1.27"/>
        <PackageReference Include="Elsa.Activities.Temporal.Quartz" Version="2.0.0-rc1.27"/>
        <PackageReference Include="Elsa.Designer.Components.Web" Version="2.0.0-rc1.27"/>
        <PackageReference Include="Elsa.Persistence.EntityFramework.Sqlite" Version="2.0.0-rc1.27"/>
        <PackageReference Include="Elsa.Server.Api" Version="2.0.0-rc1.27"/>
    </ItemGroup>

</Project>
Create a new file called Startup.cs and replace its default contents with the following:
using Elsa;
using Elsa.Persistence.EntityFramework.Core.Extensions;
using Elsa.Persistence.EntityFramework.Sqlite;
using Microsoft.AspNetCore.Builder;
using Microsoft.AspNetCore.Hosting;
using Microsoft.Extensions.Configuration;
using Microsoft.Extensions.DependencyInjection;

namespace ElsaGuides.RecurringTasks
{
    public class Startup
    {
        public void ConfigureServices(IServiceCollection services)
        {
            services.AddRazorPages();

            services
                .AddElsa(options => options
                    .UseEntityFrameworkPersistence(ef => ef.UseSqlite())
                    .AddConsoleActivities()
                    .AddQuartzTemporalActivities()
                );

            services
                .AddElsaApiEndpoints();
        }

        public void Configure(IApplicationBuilder app, IWebHostEnvironment env)
        {
            app.UseStaticFiles();
            app.UseRouting();
            app.UseEndpoints(endpoints =>
            {
                endpoints.MapControllers();
                endpoints.MapFallbackToPage("/_Host");
            });
        }
    }
}
Update Program.cs with the following contents:
using Microsoft.AspNetCore.Hosting;
using Microsoft.Extensions.Hosting;

namespace ElsaGuides.RecurringTasks
{
    public class Program
    {
        public static void Main(string[] args) => CreateHostBuilder(args).Build().Run();

        public static IHostBuilder CreateHostBuilder(string[] args) =>
            Host.CreateDefaultBuilder(args)
                .ConfigureWebHostDefaults(webBuilder => webBuilder
                    .UseStaticWebAssets() // See note "Blank Page?!".
                    .UseStartup<Startup>());
    }
}
Finally, create a new folder called Pages and add a new file called _Host.cshtml with the following contents:
@page "/"
@{
    var serverUrl = $"{Request.Scheme}://{Request.Host}";
}
<!DOCTYPE html>
<html lang="en">
<head>
    <meta charset="utf-8"/>
    <meta name="viewport" content="width=device-width, initial-scale=1.0"/>
    <title>Elsa Workflows</title>
    <link rel="icon" type="image/png" sizes="32x32" href="/_content/Elsa.Designer.Components.Web/elsa-workflows-studio/assets/images/favicon-32x32.png">
    <link rel="icon" type="image/png" sizes="16x16" href="/_content/Elsa.Designer.Components.Web/elsa-workflows-studio/assets/images/favicon-16x16.png">
    <link rel="stylesheet" href="/_content/Elsa.Designer.Components.Web/elsa-workflows-studio/assets/fonts/inter/inter.css">
    <link rel="stylesheet" href="/_content/Elsa.Designer.Components.Web/elsa-workflows-studio/assets/styles/tailwind.css">
    <script src="/_content/Elsa.Designer.Components.Web/monaco-editor/min/vs/loader.js"></script>
    <script type="module" src="/_content/Elsa.Designer.Components.Web/elsa-workflows-studio/elsa-workflows-studio.esm.js"></script>
</head>
<body class="h-screen" style="background-size: 30px 30px; background-image: url(/_content/Elsa.Designer.Components.Web/elsa-workflows-studio/assets/images/tile.png" /%}; background-color: #FBFBFB;">
<elsa-studio-root server-url="@serverUrl" monaco-lib-path="_content/Elsa.Designer.Components.Web/monaco-editor/min"></elsa-studio-root>
</body>
</html>
Second Run
When you now run the project, you should see the Elsa Dashboard homepage and be able to create new workflows.
Blank Page?!
When I first followed my own guide, the page was simply blank when I launched the application. As it turns out, due to the fact that I converted the project from a console app to a web app myself, I didn't get the launchSettings.json file in the Properties folder that is created when using the web project template. This means that by default, the application will run in Production mode and not in Development mode. According to the Microsoft docs, assets from Razor Class Libraries (such as
Elsa.Designer.Components.Web) will only be served in Development mode or when the application is published. From the docs:"When running the consuming app from build output (dotnet run), static web assets are enabled by default in the Development environment. To support assets in other environments when running from build output, call UseStaticWebAssets on the host builder in Program.cs".
For this reason, I included the
UseStaticWebAssetscall inProgram.csto make sure this guide works smoothly.
Visual Workflow
Let's go ahead and navigate to the Workflow Definitions page and click the Create Workflow button.
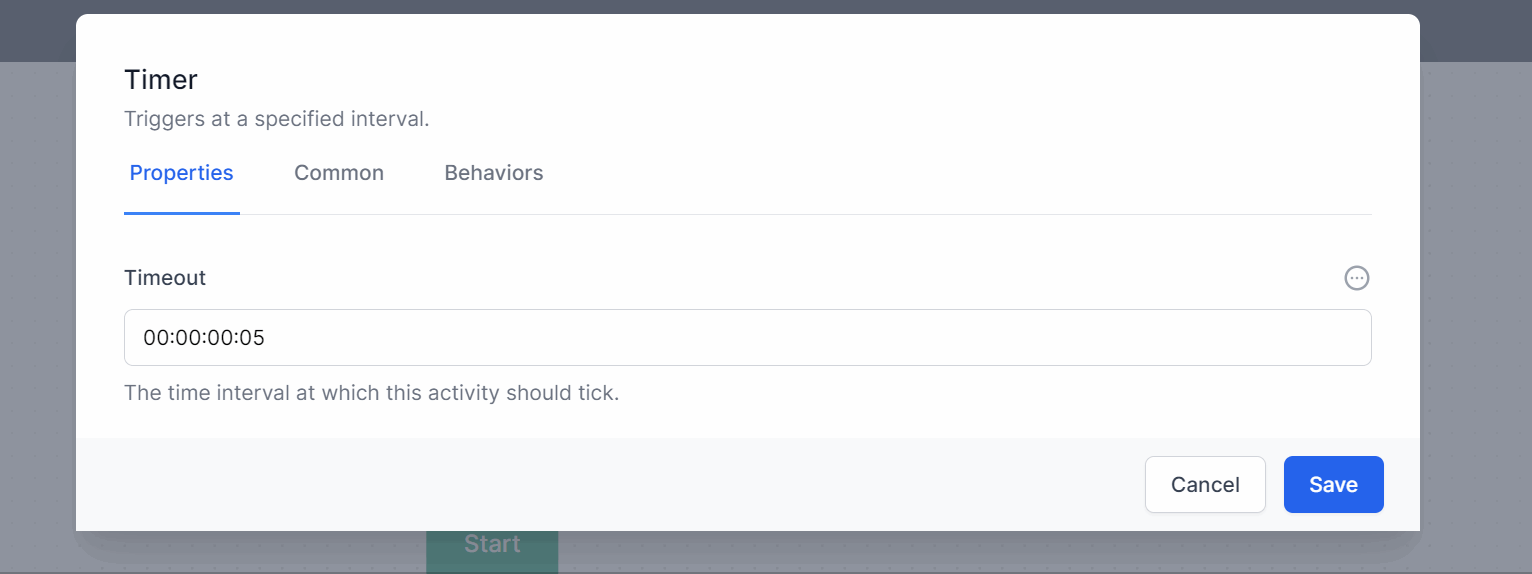
Add a new Timer activity by clicking the Start button (reload the page if you don't see any Start button). Since the Timer activity uses NodaTime's Duration type to store the interval, we can provide the following text value to specify an interval of 5 seconds:
00:00:00:05
Instead of using a plain text value, we might also take advantage of using a JavaScript expression and directly employ NodaTime's Duration type to construct an interval, like this:
Duration.FromSeconds(5)
To switch to JavaScript mode, click on the small button with an icon representing horizontal triple dots and select "JavaScript":
Click the Done outcome's "plus" button to create & connect a new WriteLine activity and configure it as follows:
- Text (JavaScript):
`It's now ${new Date()}. Let's do this thing!`
Click Save and then click Publish (at the bottom right of the screen).
Elsa will now re-index the published workflows and see that there's a workflow with a Timer activity. Every 5 seconds, something like the following string will be written to standard out:
It's now Sat May 08 2021 12:50:34 GMTZ. Let's do this thing!
And that's how easy it is to setup an Elsa Dashboard + Server and create some workflows!