Guides
Working with Workflow Contexts
In this guide, we will learn how to work with Workflow Contexts.
Source Code
The completed solution for this guide can be found here.
Workflow Context
A workflow context represents a model that is specific to your own domain, which means it can be any object that you like. Examples are documents, time sheets, users, employees, products, shopping carts, leave requests, change requests, blog posts and so forth.
See also the conceptual definition of Workflow Context.
Why Use Workflow Contexts?
Oftentimes when you work with long-running workflows that deal with domain entities, you need to load the entity into memory before you can start reading information from it or perform update operations.
For short-running workflows, it is enough to load the entity just once, which will be in memory for the duration of the workflow's lifetime.
For long-running workflows on the other hand, you will need to load the entity each time the workflow gets resumed and if you need access to this entity.
This is usually solved by writing custom activities that take care of loading (and perhaps persisting) these domain entities. Although that works fine, one disadvantage of this approach is that it tends to clutters the workflow.
Elsa's Workflow Context helps alleviate this by providing an API to the developer that allows them to implement a workflow context provider that can load and/or save domain entities from their own data source.
How Use Workflow Contexts?
To demonstrate how to work with workflow contexts, we will setup a simple web application that handles incoming blog posts that can be submitted to a workflow. This workflow will do the following things:
- Handle POST requests at
/workflows/blog-posts. - Respond with the generated workflow instance ID as well as the received blog post (in JSON format).
- Wait for a signal called
"Publish". This will cause the workflow to be suspended. - Set the blog post's
IsPublishedfield totrue. - Respond with a JSON representation of the updated blog post model.
The key thing to notice here is that even though step 3 causes the workflow to be suspended, the blog post will still be available in step 4 and 5 as if the blog post never went out of scope.
That's because we will implement a workflow context provider that will automatically create, save and load the blog post whenever the workflow engine executes the workflow.
The Project
The demo project will have the following key elements:
- A
BlogPostdomain model. - An Entity Framework Core
BlogContextto read and writeBlogPostmodels from and to. - A
StartupTaskto automatically run EF Core migrations forBlogContext. - A workflow context provider that will be invoked by the workflow engine to load and save blog posts.
To scaffold the demo project, perform the following steps:
dotnet new web -n ElsaGuides.WorkflowContexts.Web
cd ElsaGuides.WorkflowContexts.Web
dotnet add package Elsa
dotnet add package Elsa.Activities.Http
dotnet add package Elsa.Persistence.EntityFramework.Sqlite
dotnet add package Elsa.Server.Api
dotnet add package Microsoft.EntityFrameworkCore.Design
dotnet add package Microsoft.EntityFrameworkCore.Sqlite
Create a new folder called Models and add the following class:
namespace ElsaGuides.WorkflowContexts.Web.Models
{
    public class BlogPost
    {
        public string Id { get; set; } = default!;
        public string Title { get; set; } = default!;
        public string Body { get; set; } = default!;
        public bool IsPublished { get; set; }
    }
}
Create a new folder called Data and add the following class:
using ElsaGuides.WorkflowContexts.Web.Models;
using Microsoft.EntityFrameworkCore;

namespace ElsaGuides.WorkflowContexts.Web.Data
{
    public class BlogContext : DbContext
    {
        public BlogContext(DbContextOptions options) : base(options)
        {
        }

        public DbSet<BlogPost> BlogPosts { get; set; } = default!;
    }
}
Create the following class in the same folder:
using System.Linq;
using Microsoft.EntityFrameworkCore;
using Microsoft.EntityFrameworkCore.Design;

namespace ElsaGuides.WorkflowContexts.Web.Data
{
    public class SqliteBlogContextFactory : IDesignTimeDbContextFactory<BlogContext>
    {
        public BlogContext CreateDbContext(string[] args)
        {
            var builder = new DbContextOptionsBuilder<BlogContext>();
            var connectionString = args.Any() ? args[0] : "Data Source=blog.db;Cache=Shared";

            builder.UseSqlite(connectionString, db => db
                .MigrationsAssembly(typeof(SqliteBlogContextFactory).Assembly.GetName().Name));

            return new BlogContext(builder.Options);
        }
    }
}
The design time DB context factory will be used by the dotnet EF Core tool to generate migrations.
To generate the migrations, execute the following command:
dotnet ef migrations add Initial -c BlogContext -o Data/Migrations
At this point, we could go ahead and create the SQLite database by running the following command:
dotnet ef database update -- "Data Source=blog.db;Cache=Shared"
That would be fine, and is usually the right thing to do. But if you for whatever reason prefer to automatically run migrations during application startup, you can create a new class that implements IStartupTask, which is a feature provided by Elsa and will be executed during application startup.
To see how that works, create a new folder called Data/StartupTasks and add the following class:
using System.Threading;
using System.Threading.Tasks;
using Elsa.Services;
using Microsoft.EntityFrameworkCore;

namespace ElsaGuides.WorkflowContexts.Web.Data.StartupTasks
{
    /// <summary>
    /// Executes EF Core migrations for <see cref="BlogContext"/>.
    /// </summary>
    public class RunBlogMigrations : IStartupTask
    {
        private readonly IDbContextFactory<BlogContext> _dbContextFactory;

        public RunBlogMigrations(IDbContextFactory<BlogContext> dbContextFactoryFactory)
        {
            _dbContextFactory = dbContextFactoryFactory;
        }

        public int Order => 0;

        public async Task ExecuteAsync(CancellationToken cancellationToken = default)
        {
            await using var dbContext = _dbContextFactory.CreateDbContext();
            await dbContext.Database.MigrateAsync(cancellationToken);
            await dbContext.DisposeAsync();
        }
    }
}
When we register this class with the service container (which we will get to shortly when updating Startup, the migrations will be applied automatically.
Before we go over the Startup class, we will first create a new folder called Providers/WorkfowContexts and add the following class:
using System;
using System.Linq;
using System.Threading;
using System.Threading.Tasks;
using Elsa.Activities.Http.Models;
using Elsa.Services;
using Elsa.Services.Models;
using ElsaGuides.WorkflowContexts.Web.Data;
using ElsaGuides.WorkflowContexts.Web.Models;
using Microsoft.EntityFrameworkCore;

namespace ElsaGuides.WorkflowContexts.Web.Providers.WorkflowContexts
{
    public class BlogPostWorkflowContextProvider : WorkflowContextRefresher<BlogPost>
    {
        private readonly IDbContextFactory<BlogContext> _blogContextFactory;

        public BlogPostWorkflowContextProvider(IDbContextFactory<BlogContext> blogContextFactoryFactory)
        {
            _blogContextFactory = blogContextFactoryFactory;
        }

        /// <summary>
        /// Loads a BlogPost entity from the database.
        /// </summary>
        public override async ValueTask<BlogPost?> LoadAsync(LoadWorkflowContext context, CancellationToken cancellationToken = default)
        {
            var blogPostId = context.ContextId;
            await using var dbContext = _blogContextFactory.CreateDbContext();
            return await dbContext.BlogPosts.AsQueryable().FirstOrDefaultAsync(x => x.Id == blogPostId, cancellationToken);
        }

        /// <summary>
        /// Updates a BlogPost entity in the database.
        /// If there's no actual workflow context, we will get it from the input. This works because we know we have a workflow that starts with an HTTP Endpoint activity that receives BlogPost models.
        /// This is a design choice for this particular demo. In real world scenarios, you might not even need this since your workflows may be dealing with existing entities, or have (other) workflows that handle initial entity creation.
        /// The key take away is: you can do whatever you want with these workflow context providers :)
        /// </summary>
        public override async ValueTask<string?> SaveAsync(SaveWorkflowContext<BlogPost> context, CancellationToken cancellationToken = default)
        {
            var blogPost = context.Context;
            await using var dbContext = _blogContextFactory.CreateDbContext();
            var dbSet = dbContext.BlogPosts;

            if (blogPost == null)
            {
                // We are handling a newly posted blog post.
                blogPost = ((HttpRequestModel) context.WorkflowExecutionContext.Input!).GetBody<BlogPost>();

                // Generate a new ID.
                blogPost.Id = Guid.NewGuid().ToString("N");

                // Set IsPublished to false to prevent caller from cheating ;)
                blogPost.IsPublished = false;

                // Set context.
                context.WorkflowExecutionContext.WorkflowContext = blogPost;
                context.WorkflowExecutionContext.ContextId = blogPost.Id;

                // Add blog post to DB.
                await dbSet.AddAsync(blogPost, cancellationToken);
            }
            else
            {
                var blogPostId = blogPost.Id;
                var existingBlogPost = await dbSet.AsQueryable().Where(x => x.Id == blogPostId).FirstAsync(cancellationToken);

                dbContext.Entry(existingBlogPost).CurrentValues.SetValues(blogPost);
            }

            await dbContext.SaveChangesAsync(cancellationToken);
            return blogPost.Id;
        }
    }
}
This workflow context provider supports both loading blog posts from and updating blog posts in the database.
I don't recommend that your workflow provider has knowledge about any of your workflow structures like I did here where I "know" about the workflow that we will be building receives a BlogPost model as input. In the real world, you typically either already have an existing entity in your database, or you have a separate means of handling new entities (which could even be in the form of another or the same workflow). I'm doing it here nonetheless because it keeps my demo workflow small. You get the point :)
Although it's a bit of code to read and write, you only have to do it once and the workflow doesn't have to do so explicitly using custom activities. Which is a big win for long-running workflows!
Now that we got the important pieces of the puzzle in place, it's time to update the Startup as follows:
using Elsa.Persistence.EntityFramework.Core.Extensions;
using Elsa.Persistence.EntityFramework.Sqlite;
using Elsa.Runtime;
using ElsaGuides.WorkflowContexts.Web.Data;
using ElsaGuides.WorkflowContexts.Web.Data.StartupTasks;
using ElsaGuides.WorkflowContexts.Web.Providers.WorkflowContexts;
using Microsoft.AspNetCore.Builder;
using Microsoft.AspNetCore.Hosting;
using Microsoft.EntityFrameworkCore;
using Microsoft.Extensions.Configuration;
using Microsoft.Extensions.DependencyInjection;
using Microsoft.Extensions.Hosting;

namespace ElsaGuides.WorkflowContexts.Web
{
    public class Startup
    {
        public Startup(IConfiguration configuration)
        {
            Configuration = configuration;
        }

        private IConfiguration Configuration { get; }

        public void ConfigureServices(IServiceCollection services)
        {
            var connectionString = Configuration.GetConnectionString("Sqlite");

            services
                .AddDbContextFactory<BlogContext>(options => options.UseSqlite(connectionString, sql => sql.MigrationsAssembly(typeof(Startup).Assembly.FullName)))
                .AddCors(cors => cors.AddDefaultPolicy(policy => policy.AllowAnyHeader().AllowAnyMethod().AllowAnyOrigin()))
                .AddElsa(elsa => elsa
                    .UseEntityFrameworkPersistence(ef => ef.UseSqlite(connectionString))
                    .AddConsoleActivities()
                    .AddJavaScriptActivities()
                    .AddHttpActivities(options => options.BasePath = "/workflows"))
                .AddWorkflowContextProvider<BlogPostWorkflowContextProvider>()
                .AddStartupTask<RunBlogMigrations>()
                .AddElsaApiEndpoints();
        }

        public void Configure(IApplicationBuilder app, IWebHostEnvironment env)
        {
            if (env.IsDevelopment())
                app.UseDeveloperExceptionPage();

            app.UseRouting();
            app.UseCors();
            app.UseHttpActivities();
            app.UseEndpoints(endpoints => endpoints.MapControllers());
            app.UseWelcomePage();
        }
    }
}
Nothing too special going on here. We're configuring:
- EF Core with our
BlogContext - CORS
- Elsa
- Our workflow context provider
- Our migrations startup task
- Elsa API endpoints (just ASP.NET Core with controllers)
Before we can run the application, update appsettings.json with the following:
{
  "ConnectionStrings": {
    "Sqlite": "Data Source=blog.db;Cache=Shared"
  }
}
With that in place, run the following command to start the application:
dotnet run
With the application running, you can navigate to http://localhost:5000/ which will display a standard welcome page. Since we didn't setup Elsa Dashboard, we will need to run that separately in order to design our workflow.
Run the following Docker command to do exactly that:
docker run -t -i -e ELSA__SERVER__BASEADDRESS=http://localhost:5000 -p 14000:80 elsaworkflows/elsa-dashboard:latest
Navigate to the dashboard at http://localhost:14000/
The Workflow
From the dashboard, go to Workflow Definitions and create a new workflow.
The first thing to configure are the workflow settings itself. Click on the cog icon to the far top and right of the design surface and select the Workflow Context tab.
Enter the following values:
- Type:
ElsaGuides.WorkflowContexts.Web.Models.BlogPost, ElsaGuides.WorkflowContexts.Web - Fidelity:
Burst(the default)
The Type field tells Elsa what context provider to use when running this workflow. The Fidelity field controls how often the workflow context is loaded or saved. A value of Burst means that the workflow context is only loaded once per burst of execution, while the Activity setting will cause the workflow engine to load the context after every activity execution.
For most typical use cases, you should stick with Burst.
Click Save to apply the changes.
HTTP Endpoint
Next, click the Start button to add the HTTP Endpoint activity with the following settings:
- Properties
- Path:
/blog-posts - Methods:
POST - Read Content:
on
- Path:
- Advanced
- Target Type:
ElsaGuides.WorkflowContexts.Web.Models.BlogPost, ElsaGuides.WorkflowContexts.Web
- Target Type:
- Storage
- Save Workflow Context:
on
- Save Workflow Context:
The Target Type setting together with Read Content tell the activity to parse the received JSON into an actual BlogPost instance.
HTTP Response 1
Connect a new HTTP Response activity to the Done outcome and configure it as follows:
- Content (use JS syntax):
const model = {
    blogPost: workflowContext,
    workflowInstanceId: workflowInstanceId
}

return JSON.stringify(model, null, 2);
- Content Type:
application/json
Notice that we are simply writing back a JSON object that contains the received blog post available from the workflowContext variable. This variable is set because our workflow context provider's SaveAsync method will be invoked when this workflow is triggered, which happens because we set Save Workflow Context: on of the HTTP Endpoint activity.
And when we look back at that method again (BlogPostWorkflowContextProvider.cs:57-58), we see that we are setting the WorkflowContext for newly received blog posts:
// Set context.
context.WorkflowExecutionContext.WorkflowContext = blogPost;
context.WorkflowExecutionContext.ContextId = blogPost.Id;
The reason we're also writing back the workflow instance ID will become apparent after the next step where we will add a new Signal Received activity.
Signal Received
Connect a new Signal Received activity with the following settings:
- Signal:
Publish
When we try out our workflow shortly, we will see that it becomes suspended at this point. To resume the workflow, we will send a signal called "Publish". When doing so, we will also provide the workflow instance ID.
Run JavaScript
Connect a new Run JavaScript activity and configure it with the following script:
workflowContext.IsPublished = true;
All we are doing here is updating the IsPublished property of the blog post in context to true.
The key thing to realize here is that at this point, the workflow got resumed and the blog post was loaded automatically into memory thanks to our workflow context provider. The workflow context provider will also take care of persisting any changes made to the blog post back to storage.
All we had to do is set a simple property that we wanted to change (IsPublished) and that's that.
HTTP Response 2
As a final touch, let's add another HTTP Response after the previous activity with the following content:
JSON.stringify(workflowContext)
Make sure to select the JavaScript syntax and set the Content Type field to application/json.
The result should look like this:
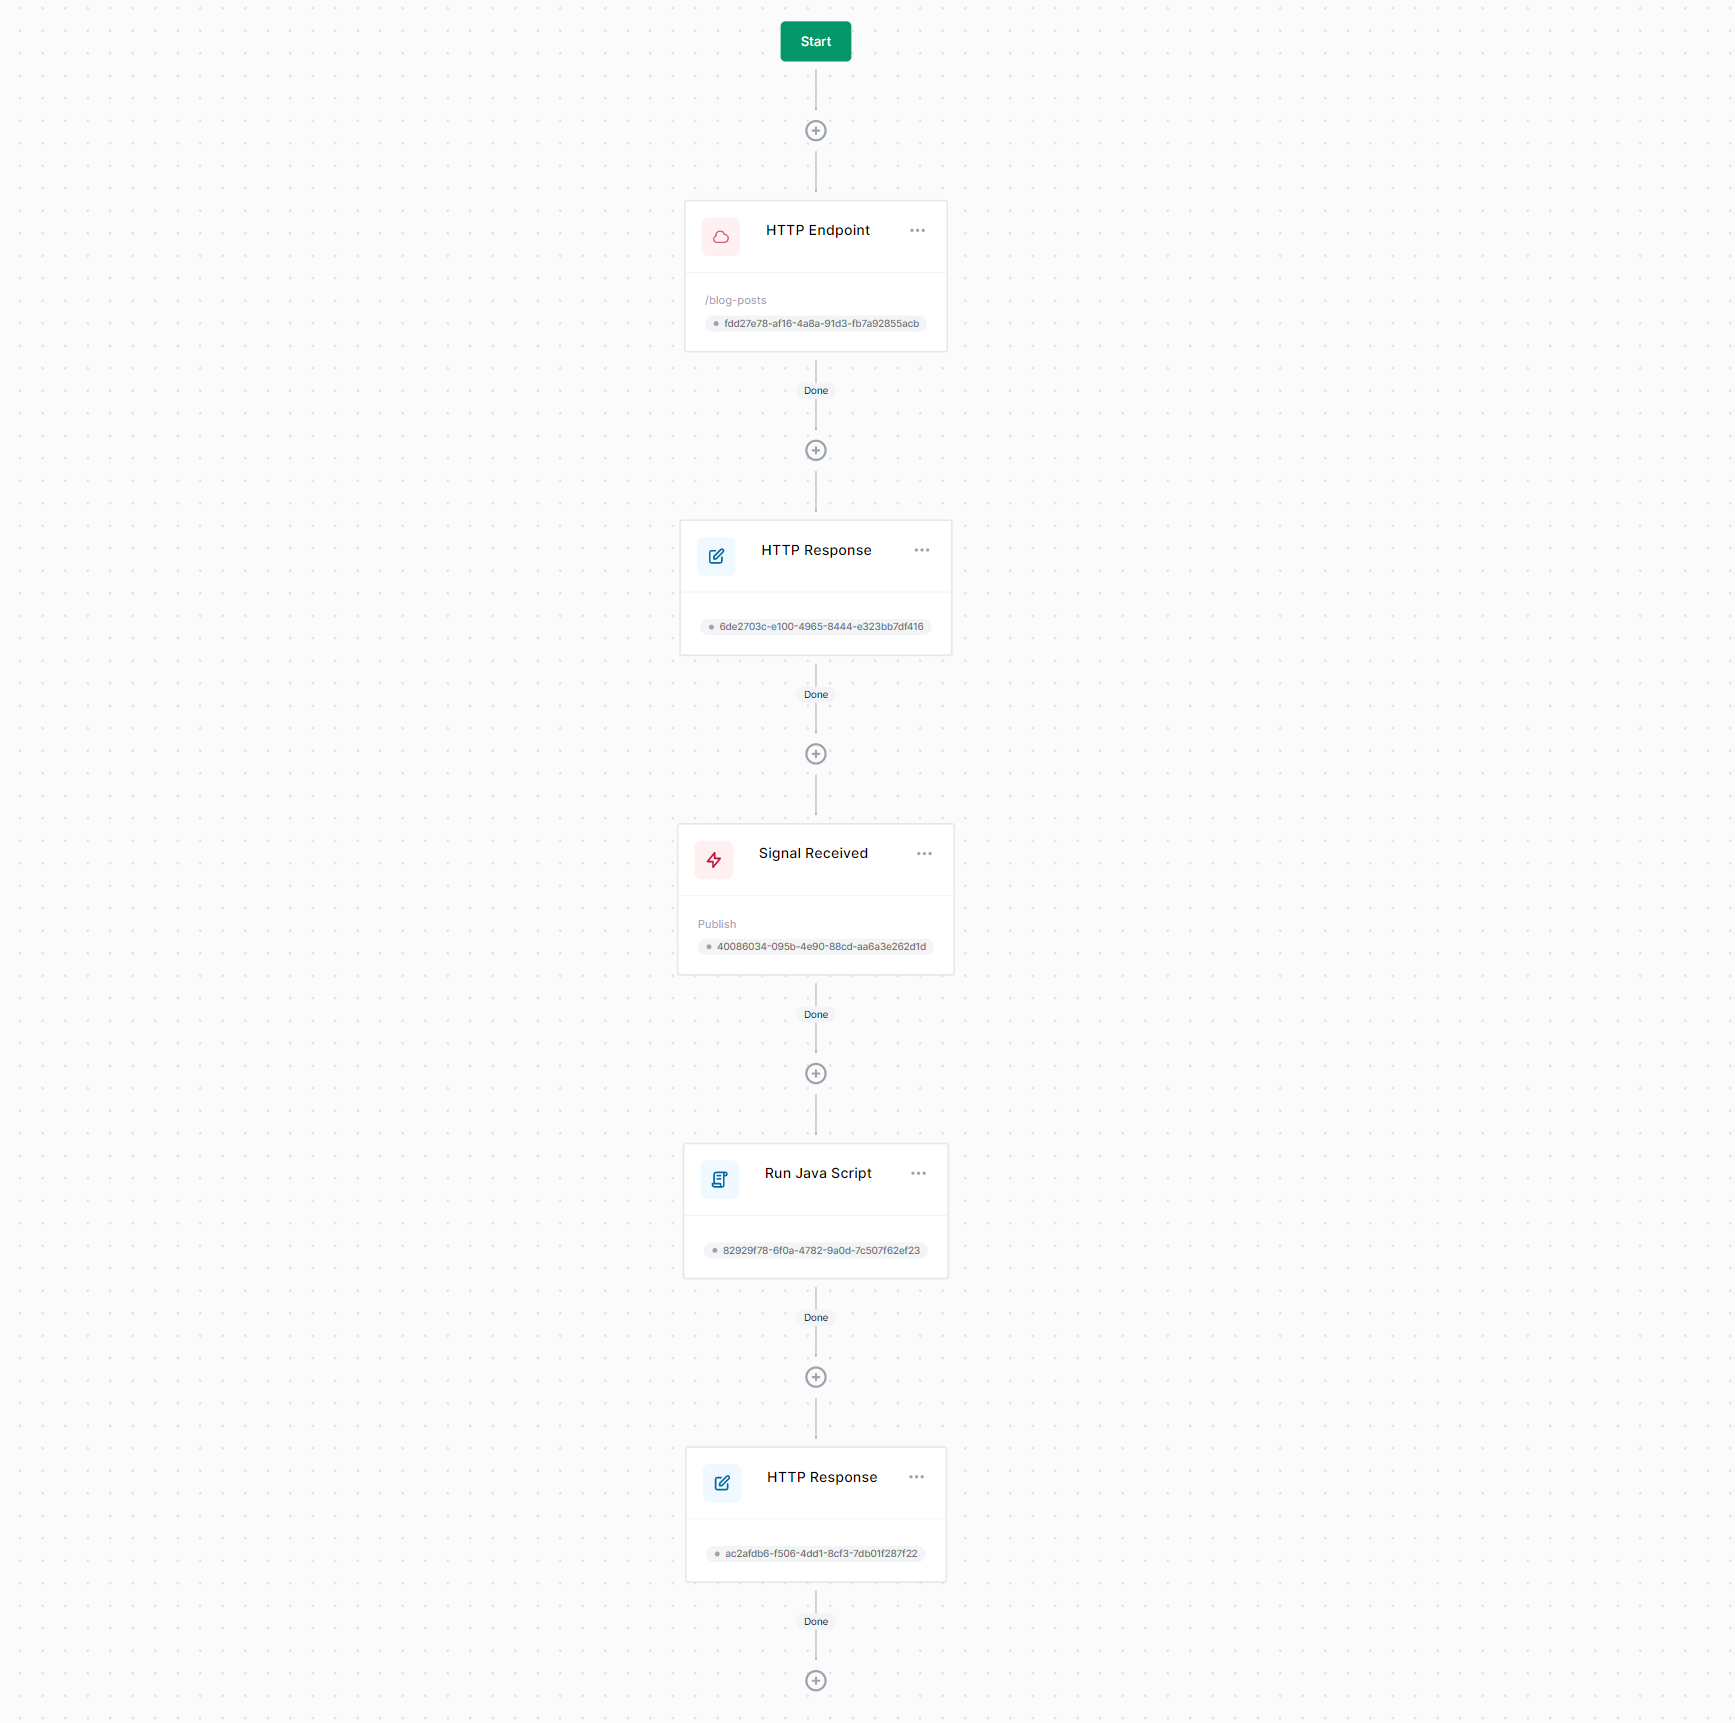
Make sure to publish the workflow.
It's time to try it out!
Running the Workflow
To run the workflow, open your favorite HTTP client application such as Postman and execute the following request:
curl --location --request POST 'https://localhost:5001/workflows/blog-posts' \
--header 'Content-Type: application/json' \
--data-raw '{
    "Title": "Creating Workflow Driven Apps with Elsa",
    "Body": "Low-code applications are the future."
}'
The response will be something like this:
{
    "blogPost": {
        "Id": "c82116f015fd4eedafba4ce5dc24d75a",
        "Title": "Creating Workflow Driven Apps with Elsa",
        "Body": "Low-code applications are the future.",
        "IsPublished": false
    },
    "workflowInstanceId": "039893a53e2c484b92519d33947b29c5"
}
So far so good. If we take a look at the created workflow instance, we should see that it is currently in the Suspended state:
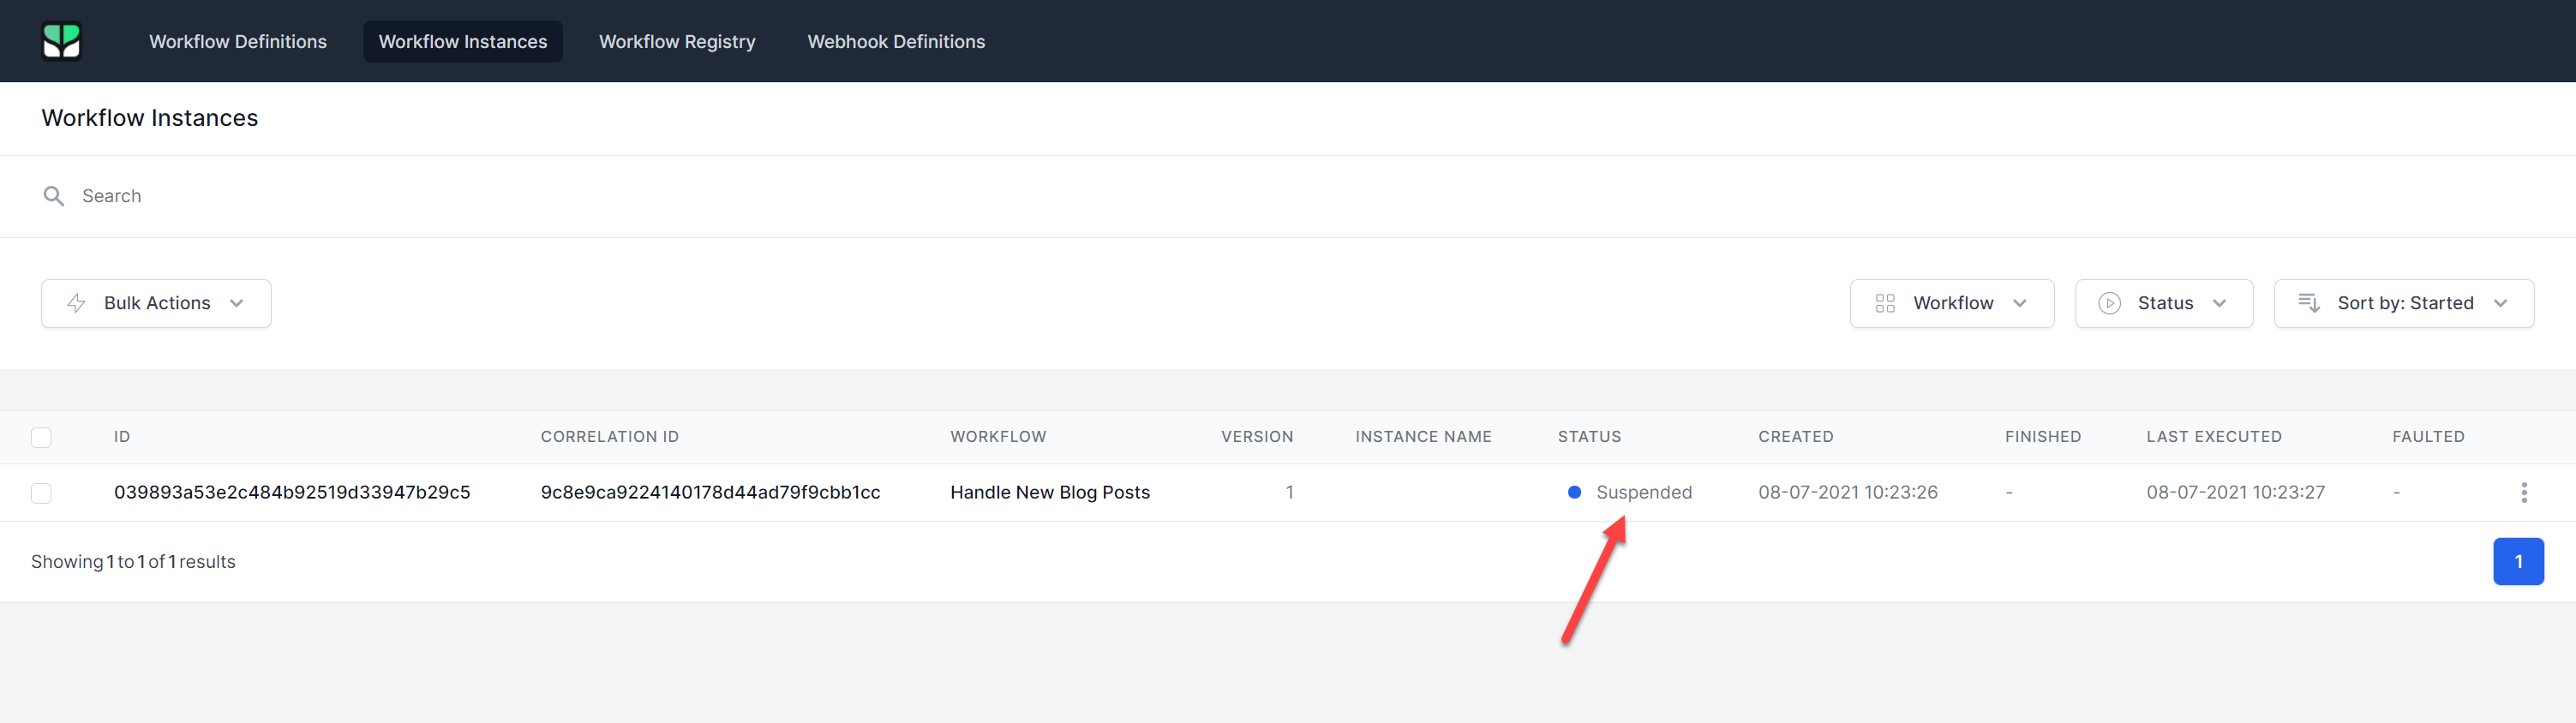
Clicking the workflow instance ID will take us to the workflow instance viewer:
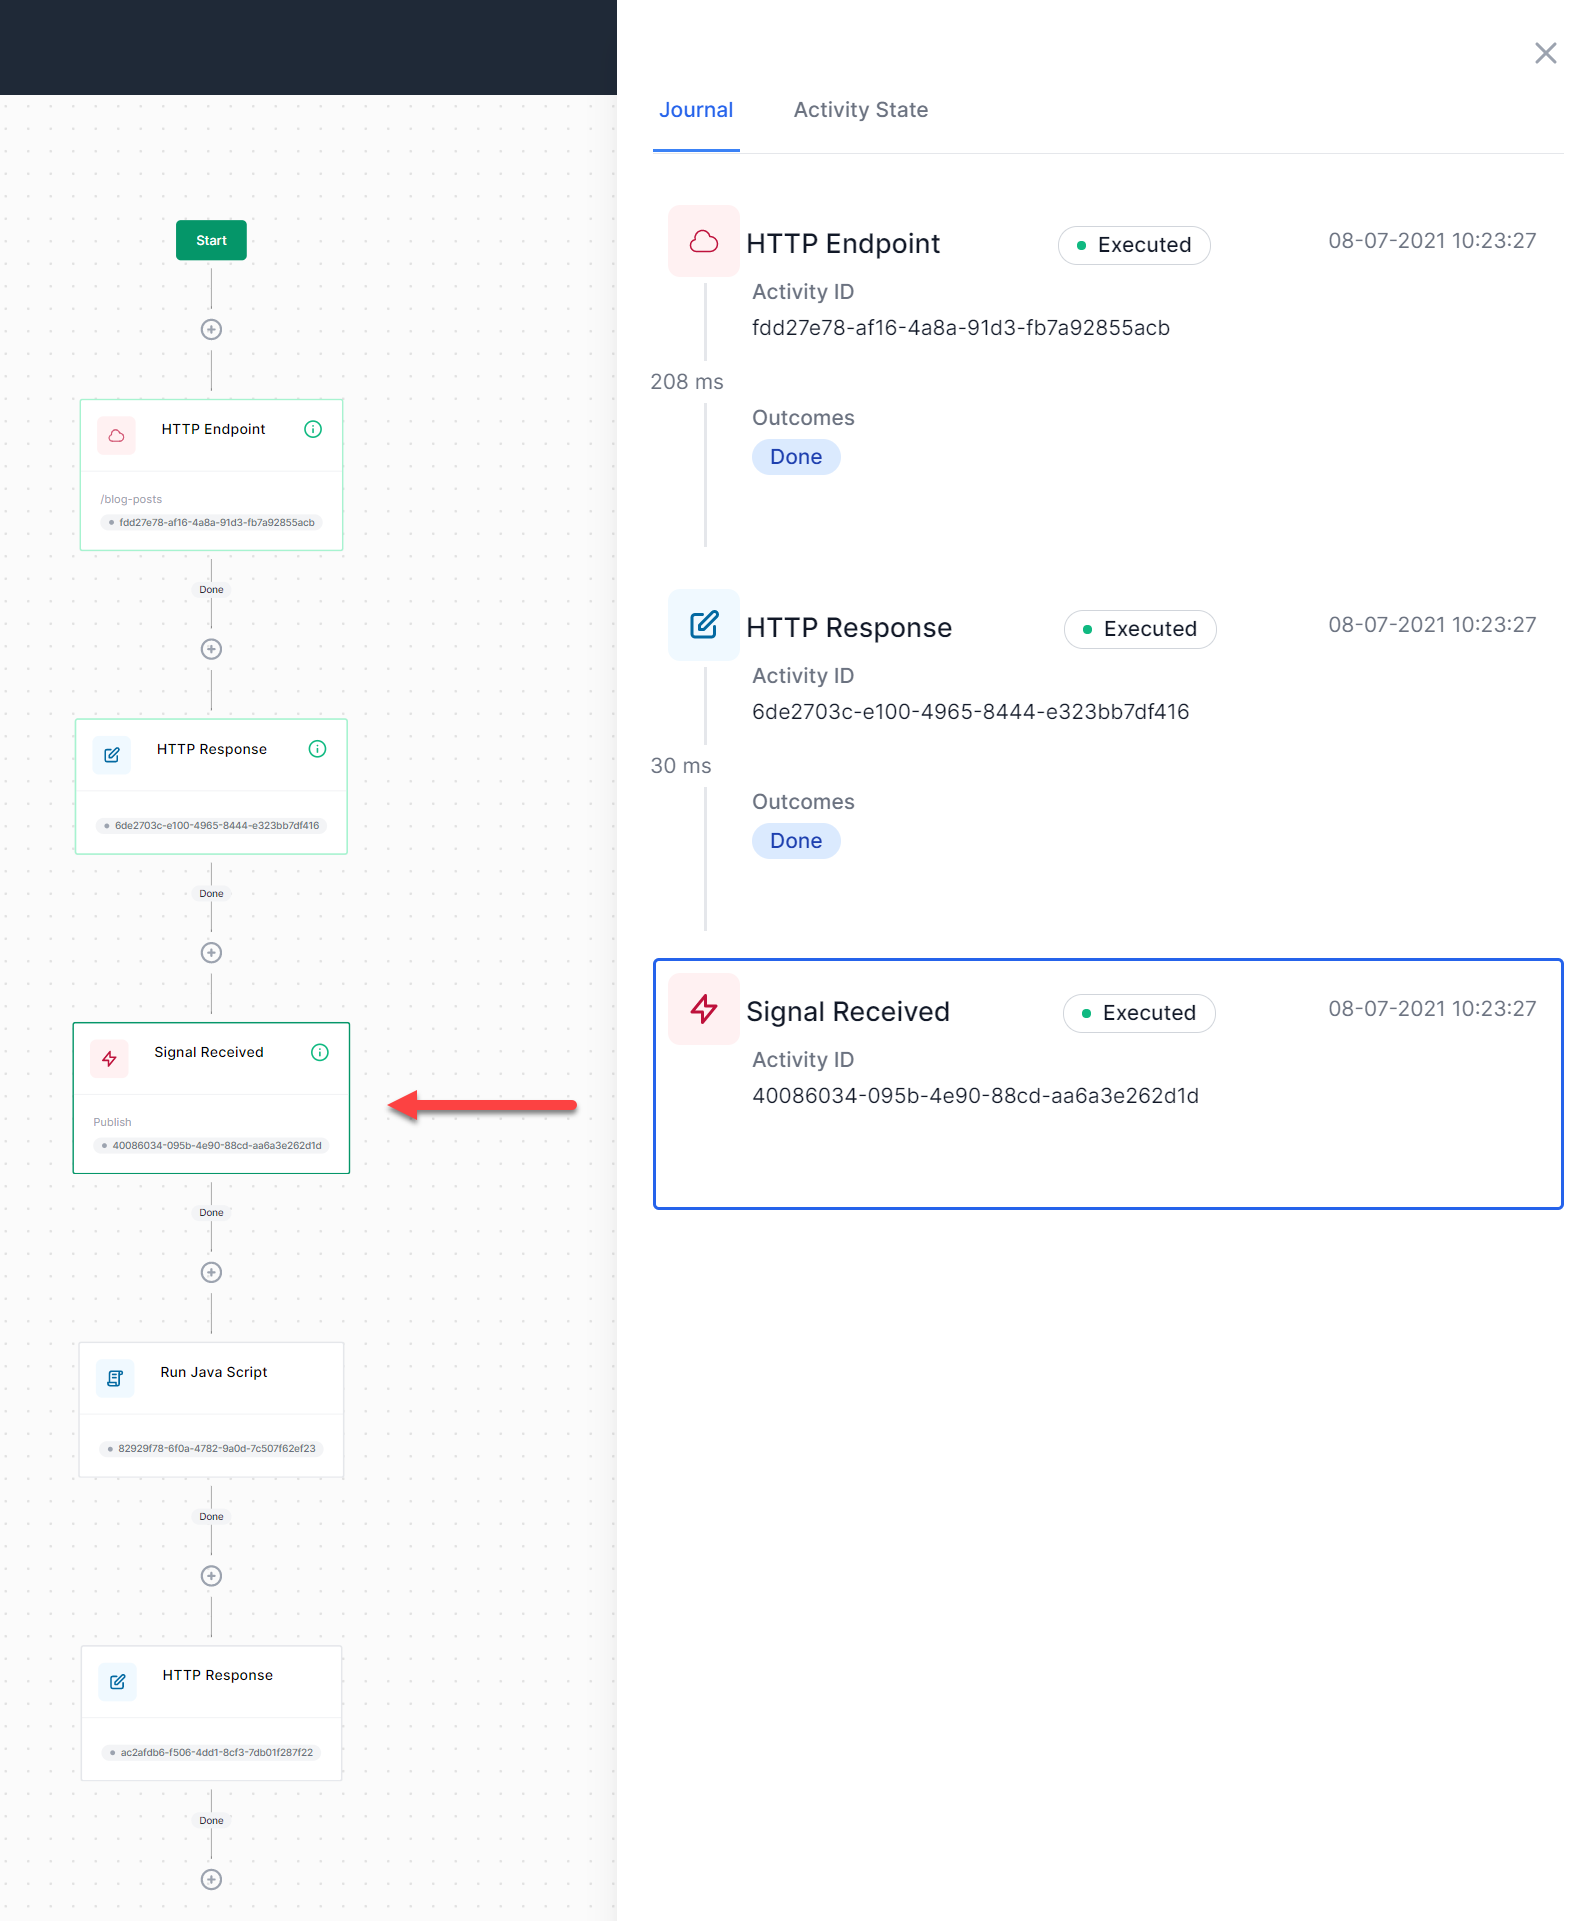
Notice that the last activity that was executed is indeed the Signal Received activity. When this activity executed, it instructed the workflow runner to suspend the workflow.
So right now, the workflow is waiting for a signal to be received.
Sending a signal to a workflow can be done in various ways. To do it programmatically, we might take advantage of the ISignaler service like so:
await _signaler.TriggerSignalAsync(signal: "Publish", workflowInstanceId: "039893a53e2c484b92519d33947b29c5");
We can also do it via an API endpoint like this:
curl --location --request POST 'https://localhost:5001/v1/signals/publish/execute' \
--header 'Content-Type: application/json' \
--data-raw '{
    "workflowInstanceId": "039893a53e2c484b92519d33947b29c5"
}'
When you invoke the HTTP request, the workflow instance will be resumed and the response should look something like:
{
    "Id": "c82116f015fd4eedafba4ce5dc24d75a",
    "Title": "Creating Workflow Driven Apps with Elsa",
    "Body": "Low-code applications are the future.",
    "IsPublished": true
}
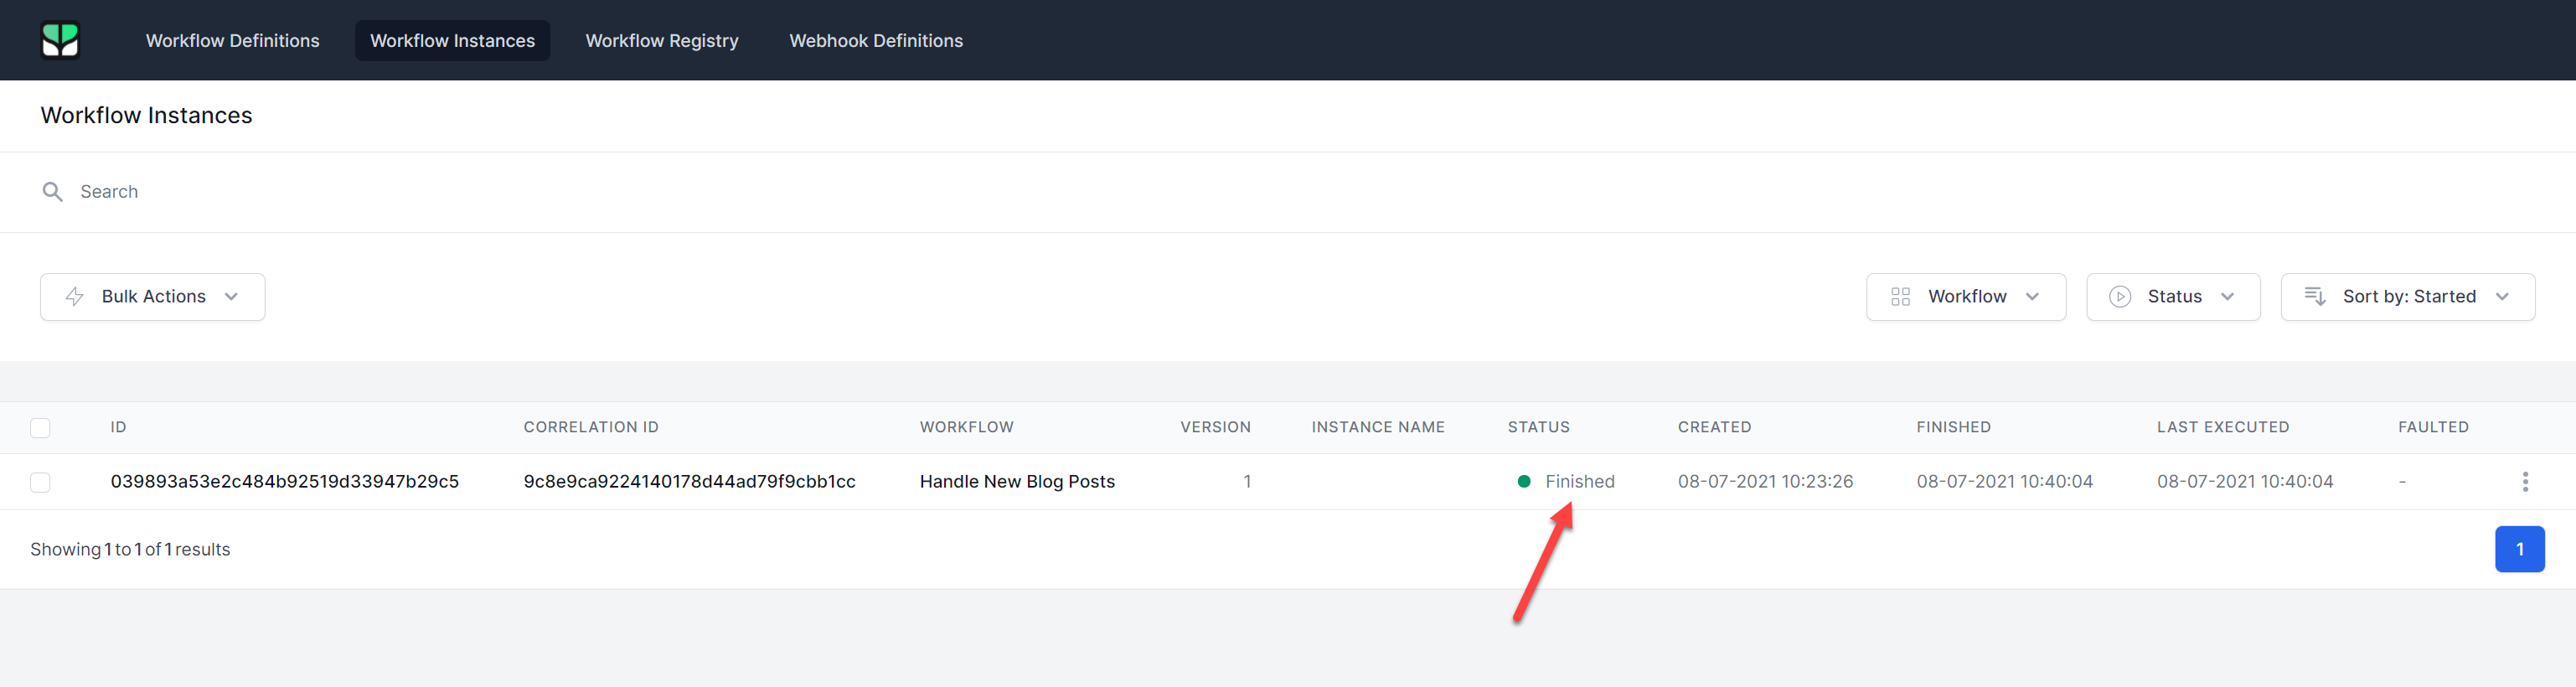
Notice that the IsPublished field is set to true - this was done by our workflow. Looking at the dashboard again, we should indeed see that the workflow was finished:
Finally, let's make sure the posted Blog Post object was actually stored in the database as published:
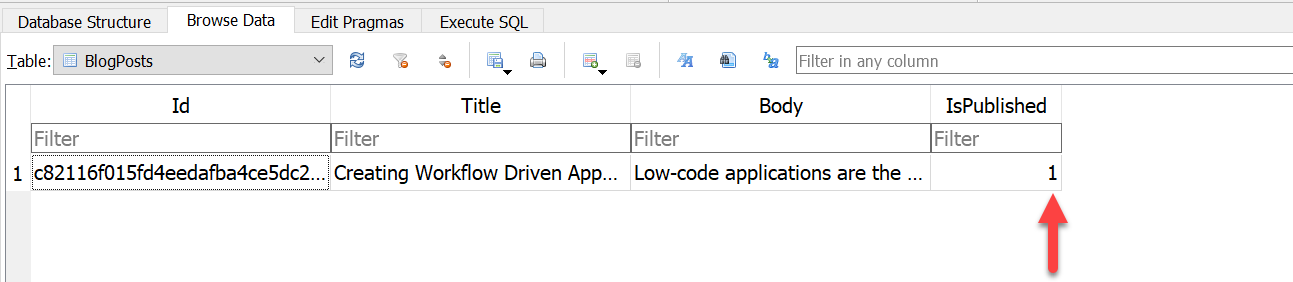
And sure enough, the blog post is there AND it is marked as published.